Privacy Settings
Use the Meeting Assistant’s Privacy Settings to control how Sally handles privacy during meetings: show a privacy notice in meetings, allow or block video recordings, and define how long data is retained on the platform.
Quick Navigation
- How to open Privacy Settings
- Privacy notice via email before meetings
- Meeting privacy notice in the meeting
- How to repeat the privacy notice for new participants
- How to control video and audio recordings
- How to set automatic data deletion
- How to set the internal domain whitelist
1. How to open Privacy Settings
- Open Settings in the left sidebar.
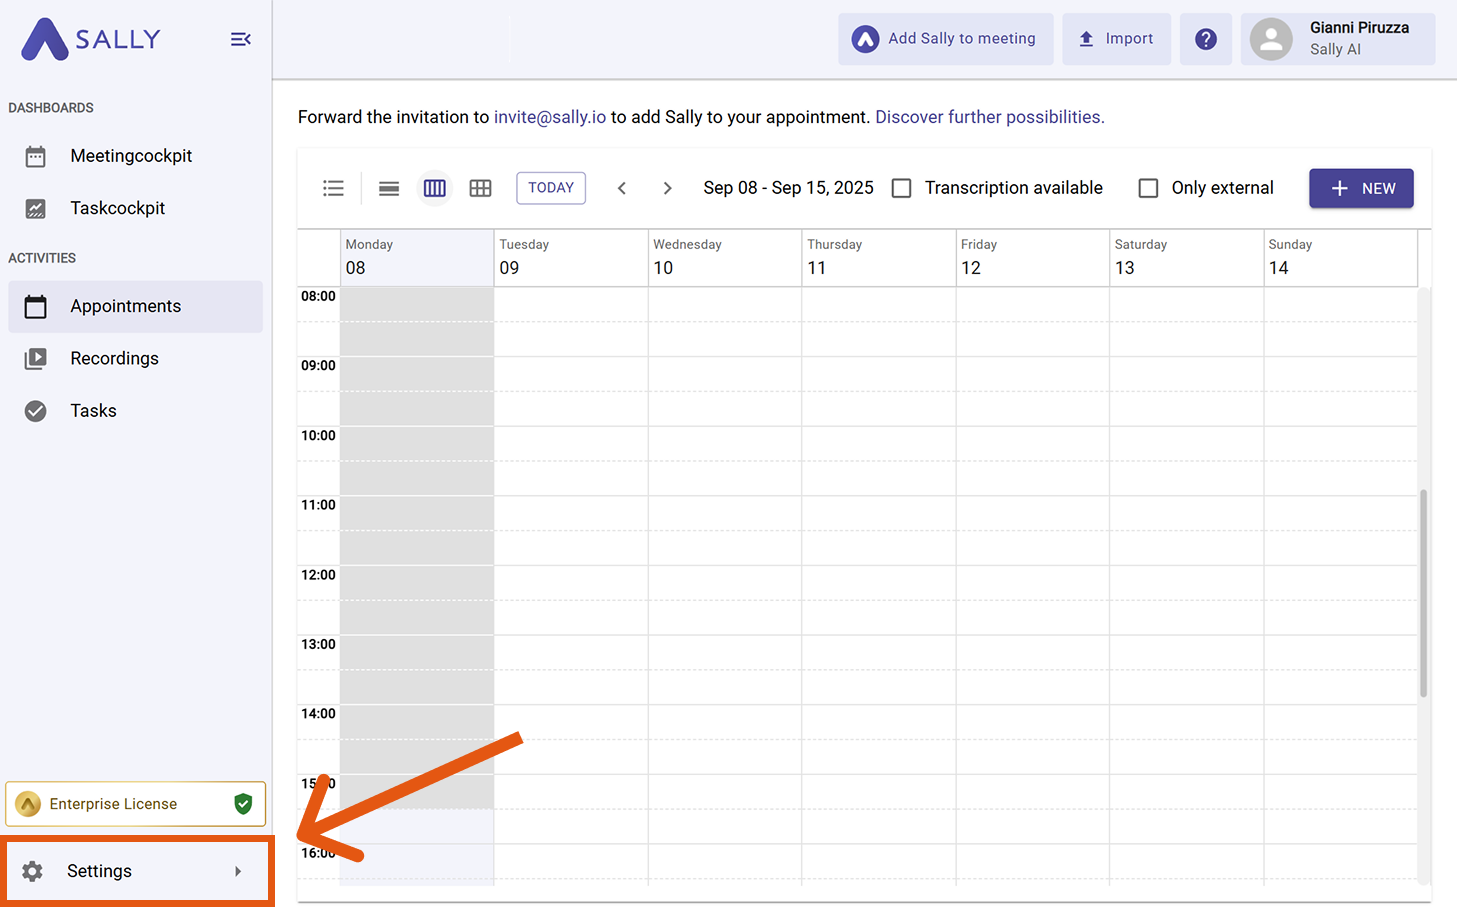
- In Configuration, select Meeting Assistant.
- Scroll to the Privacy section.
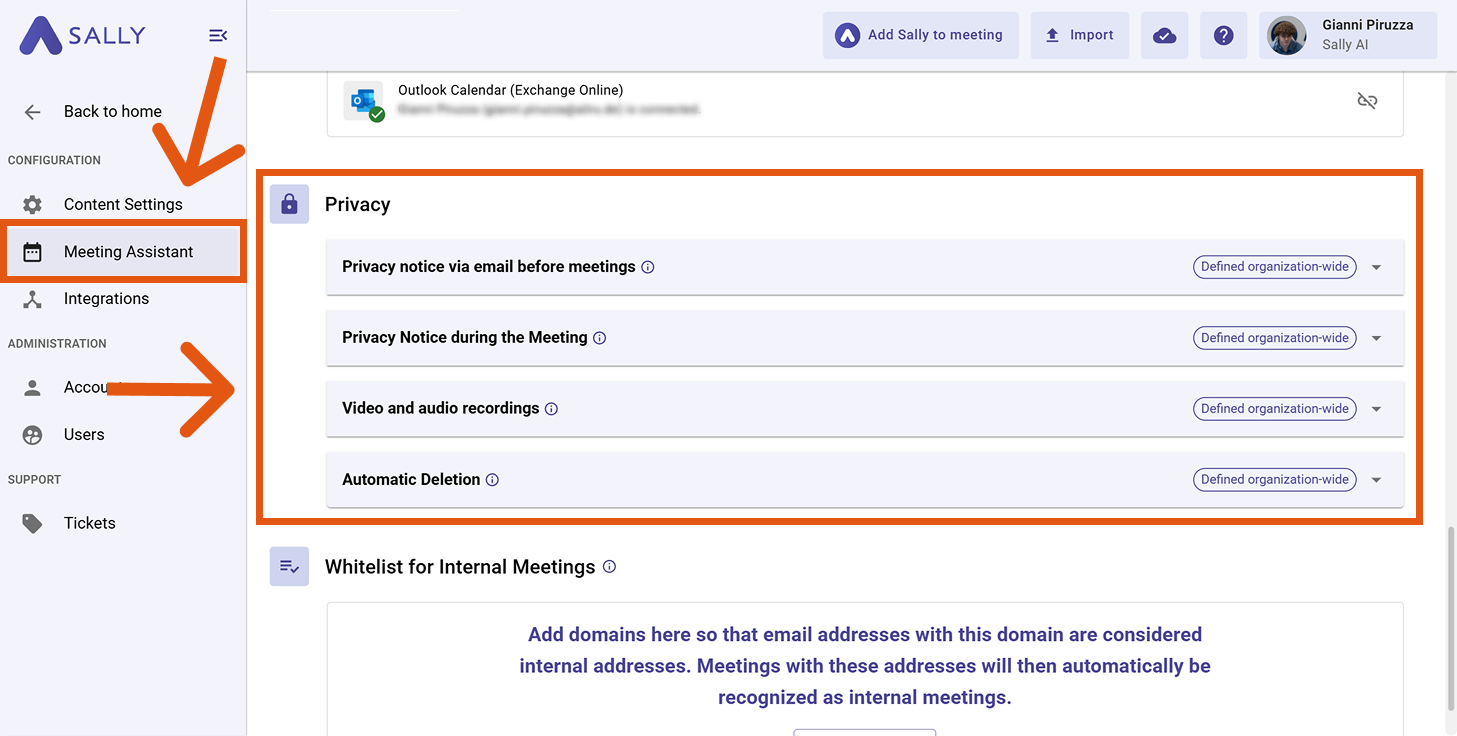
Settings marked Defined organization-wide apply to the entire organization and can typically be changed by admins only.
2. Privacy notice via email before meetings
Sally can automatically inform meeting participants by email before a meeting starts if a recording is planned.
This setting allows admins to define whether an email is sent and how consent is handled.
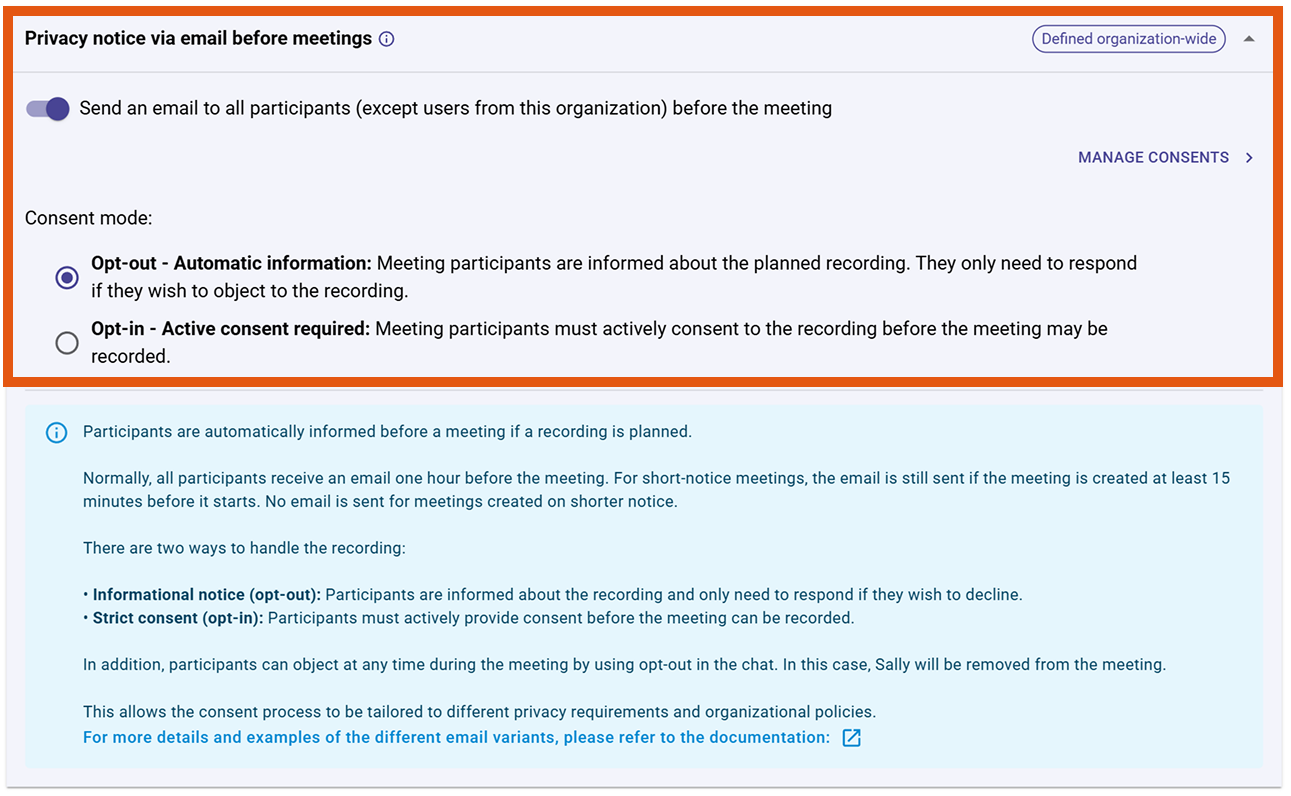
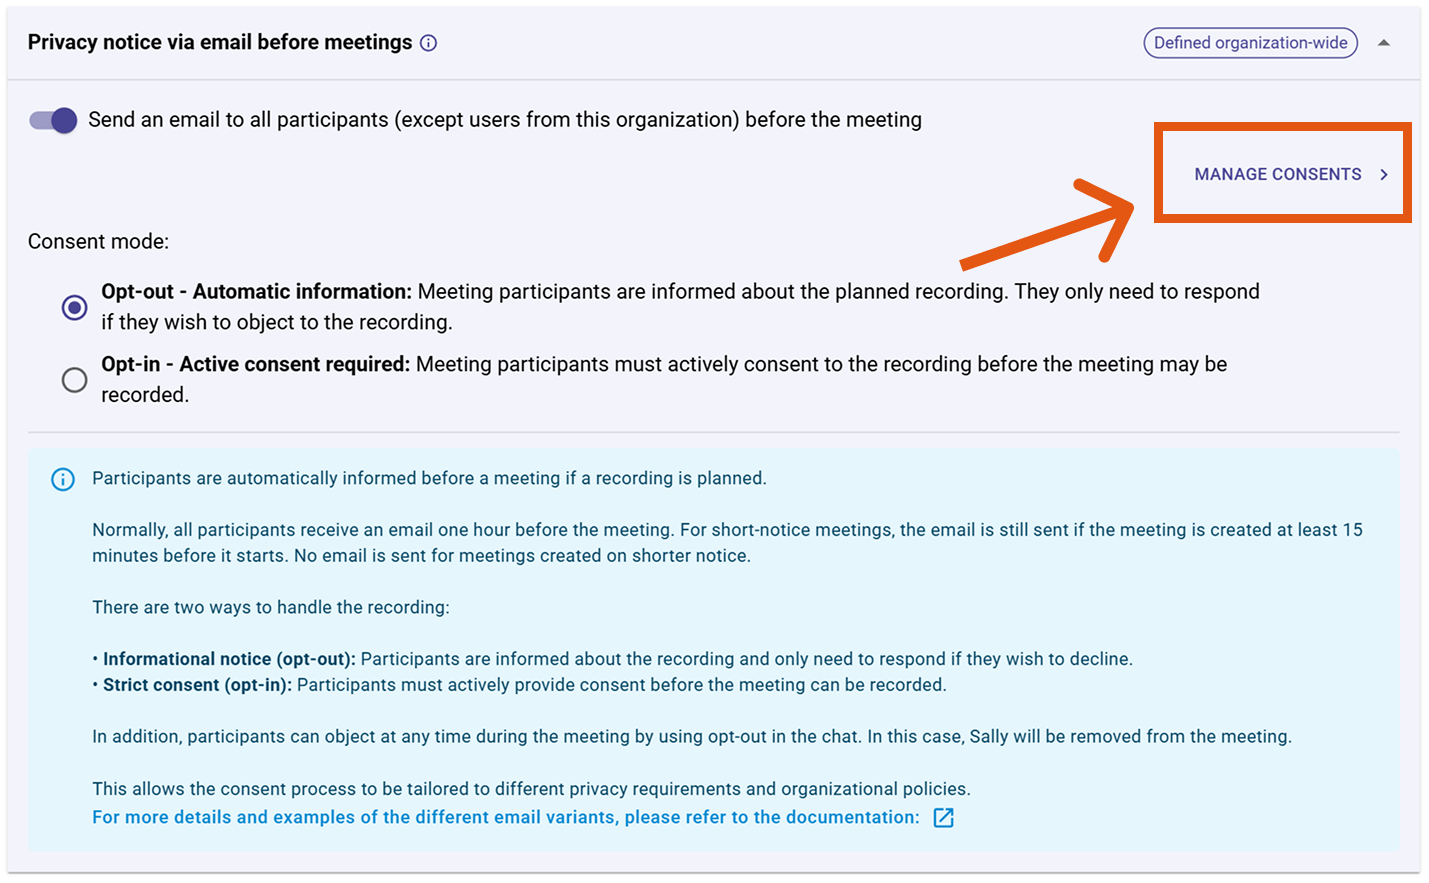
2.1. Send email before the meeting
- Send an email to all participants (except users from this organization)
When enabled, Sally sends an informational email to external participants before the meeting starts.
Internal users (based on your internal domain whitelist) do not receive this email.
2.2. Consent mode
Choose how participant consent is handled:
-
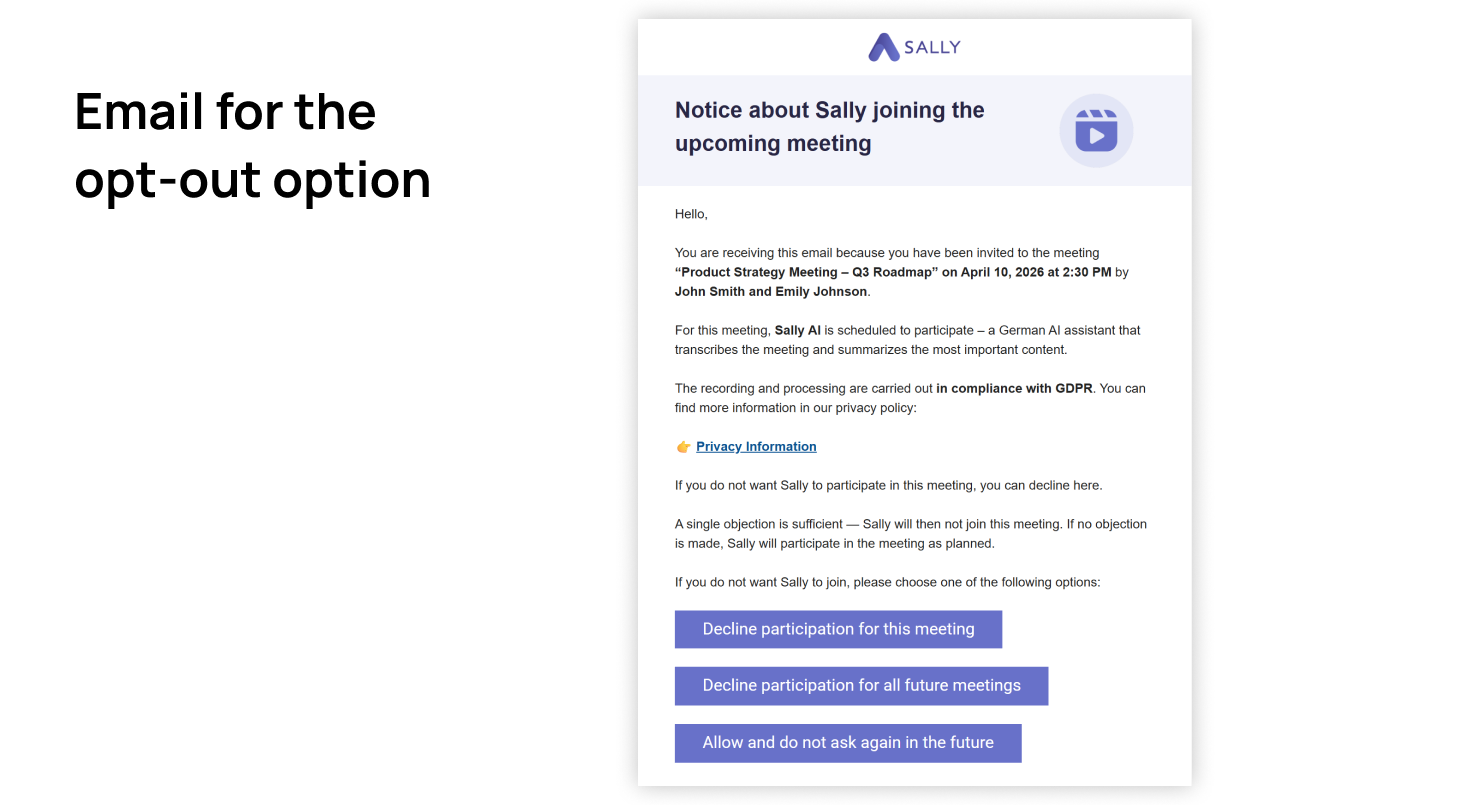
Opt-out – Automatic information
Participants are informed about the planned recording and only need to respond if they object.
Use when: Your policy allows implied consent with the option to object.This is what an opt-out email looks like:
-
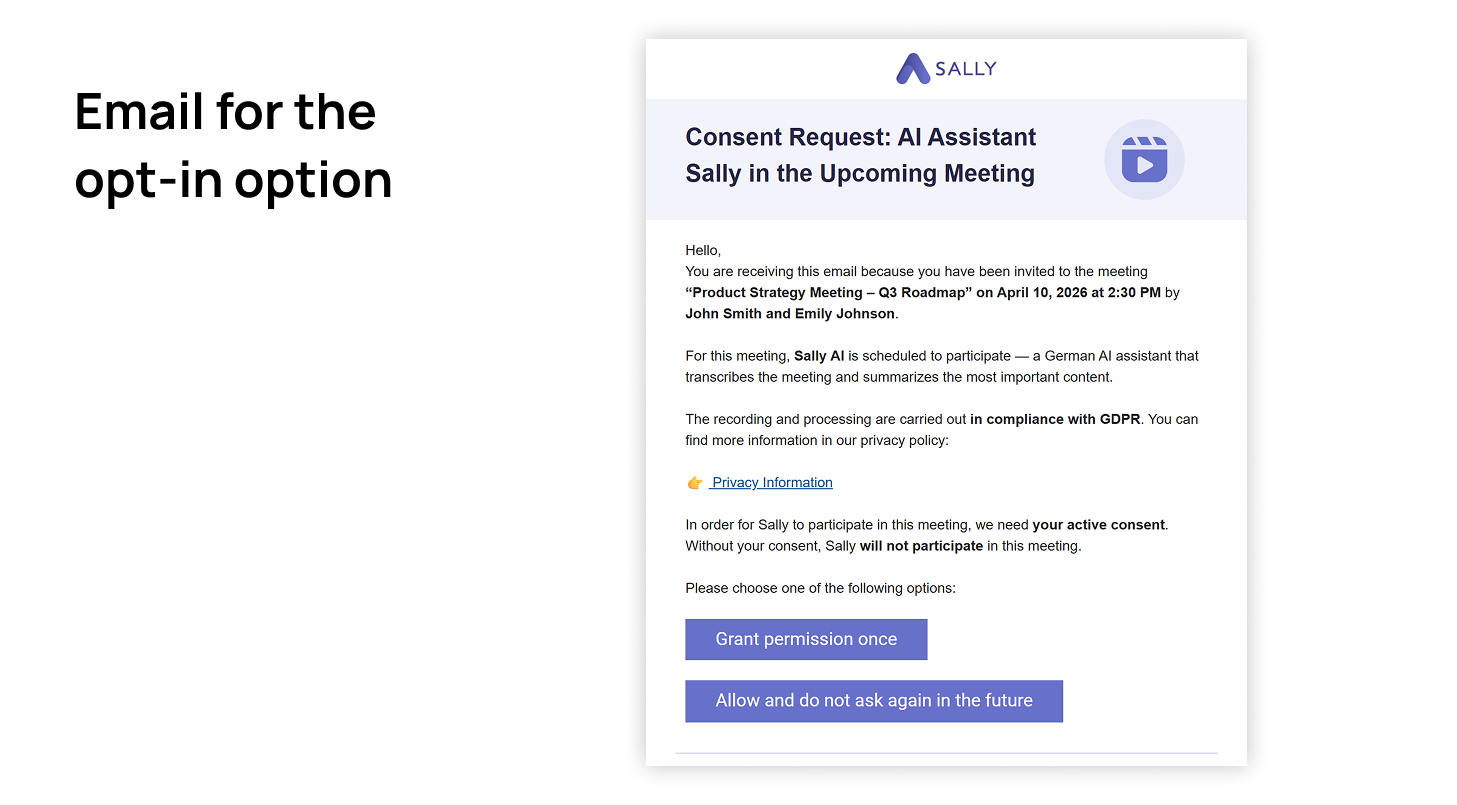
Opt-in – Active consent required
Participants must explicitly consent before the meeting can be recorded.
Use when: You operate in stricter legal or compliance environments.This is what an opt-in email looks like:
Normally, the email is sent one hour before the meeting. For short-notice meetings, the email is still sent if the meeting is created at least 15 minutes before it starts. No email is sent for meetings created on shorter notice.
Participants can object at any time during the meeting by using opt-out in the chat.
If this happens, Sally will be removed from the meeting.
2.3. Manage and adjust consents
In this section, you can view and specifically edit the consents of meeting participants. This is especially helpful if participants made their decision incorrectly by mistake or if you need to properly document consents afterward.
Editing consents without the approval of the affected individuals may violate the GDPR.
Only make changes in coordination with the respective participants and document them internally if necessary.
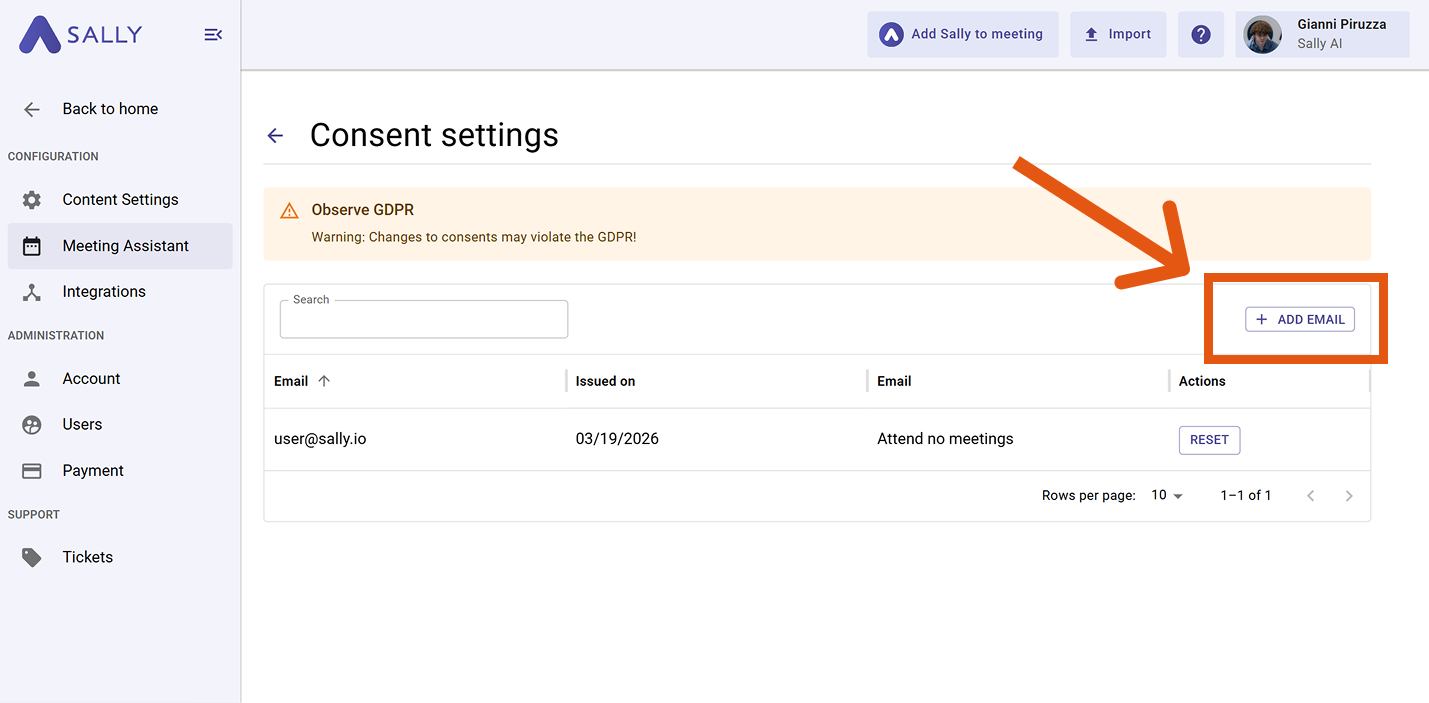
2.3.1. View consents
- In the section “Privacy notice via email before meetings”, click on “Manage consents”.
- You will be taken to an overview of all recorded consents.
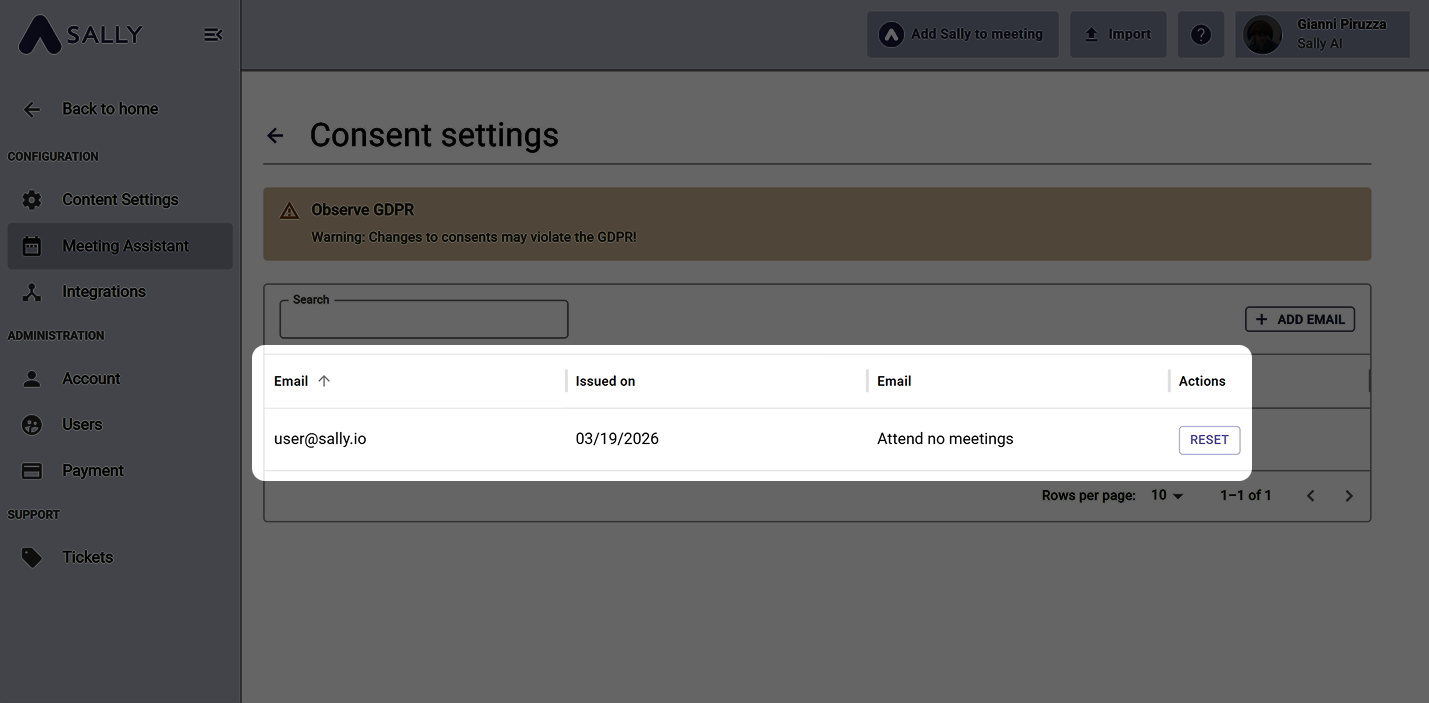
Here you can see:
- Participant’s email address
- Timestamp of the consent
- Current status (e.g. participation allowed or declined)
2.3.2. Edit consents
You have two options to adjust consents:
- Reset consent → Participant can decide again
- Manually add email → Define consent in advance (e.g. for known participants or regular partners)
2.3.2.1 Reset consent
If a participant declined by mistake, for example, you can reset their status:
- Find the respective participant in the list.
- Click “Reset” on the right.
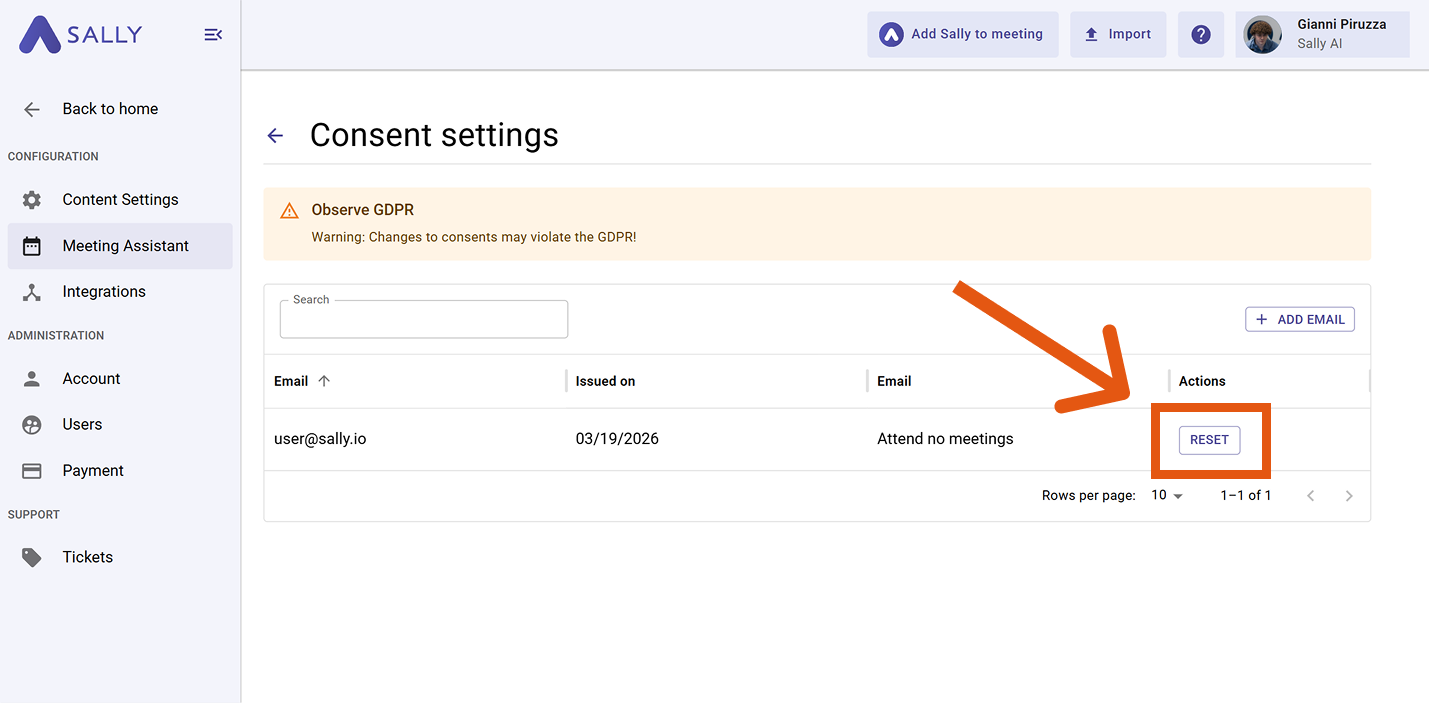
This allows the participant to provide their consent again in the next meeting.
When you reset a consent, no email is sent immediately.
The affected person will only be notified again automatically via email for the next newly created meeting and can provide their consent again.
2.3.2.2 Manually add participant
You can also set consents proactively, for example if:
- you regularly work with the same external partners
- consents have already been obtained outside of Sally (e.g. contractually)
- Click on “+ Add email”.
- Fill out the form:
- Enter email address
- Select consent status (allow or decline participation)
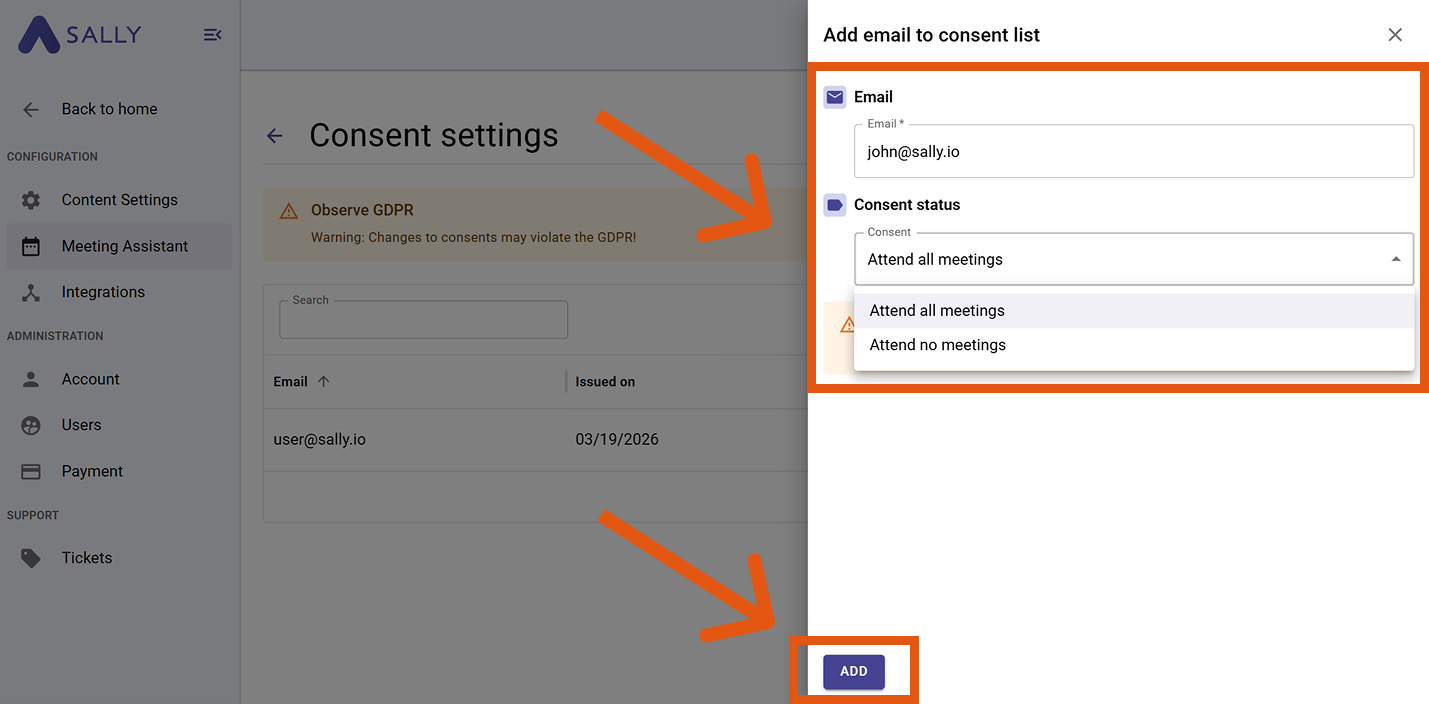
- Click “Add” to save the entry.
Use this feature sparingly and only if the consent is verifiably documented (e.g. in writing or contractually agreed).
3. Meeting privacy notice in the meeting
This section covers the privacy notice shown directly inside the meeting chat and how to configure it.
3.1 What is the meeting privacy notice (and how it looks)
The privacy notice is a short message that informs participants about Sally’s presence in the meeting and how to manage their data. It appears in the meeting chat before or during the meeting (depending on your settings).
John Doe added sally.io to the meeting (transcription enabled). Type ‘opt out’ to delete meeting data. View Privacy Policy: https://sally.io/privacy
By default, the message is shown in the user’s language. If multiple users belong to the same directory, the directory language will be applied.
Why it matters: This helps you meet transparency obligations and sets clear expectations for participants.
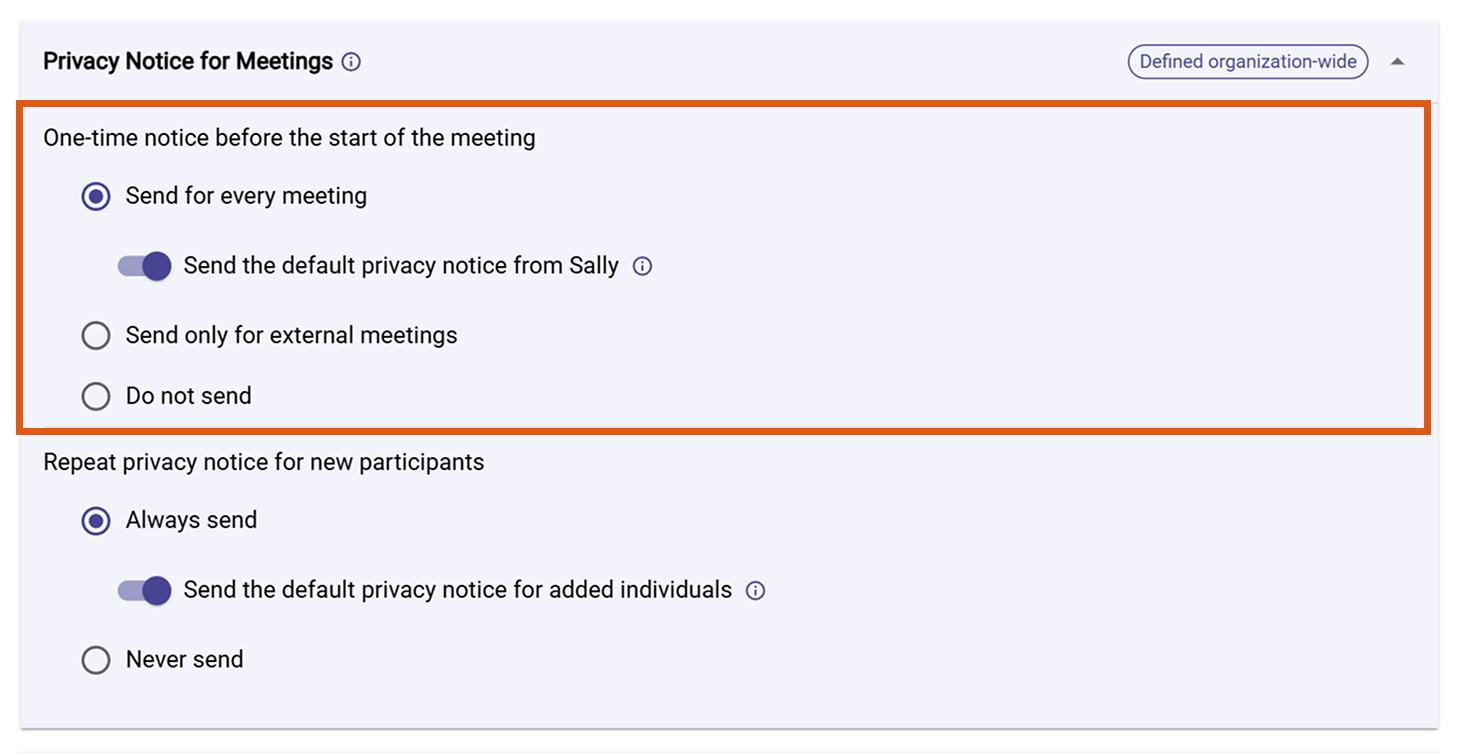
3.2 How to configure the one-time meeting privacy notice
Choose when Sally should show a one-time privacy notice before a meeting starts.
- In Privacy Notice for Meetings, pick one option:
-
Send for every meeting – Always send a notice.
Use when: You want consistent transparency for all meetings. -
Send only for external meetings – Send when participants are outside your domain(s).
Use when: Internal teams already know Sally; notify only external guests.
External vs. internal is based on your Internal Domain Whitelist. Configure it below in How to set the internal domain whitelist. All domains not on the whitelist are treated as external.
- Do not send – Never send a notice.
Use when: You provide equivalent information by other means and your legal basis allows it.
If you disable the notice, participants may not be informed about processing in the meeting. Make sure this aligns with your legal requirements.
- (Optional) Toggle Send the default privacy notice from Sally to use Sally’s standard wording.
Use when: You want a ready-to-use, compliant default.
4. How to repeat the privacy notice for new participants
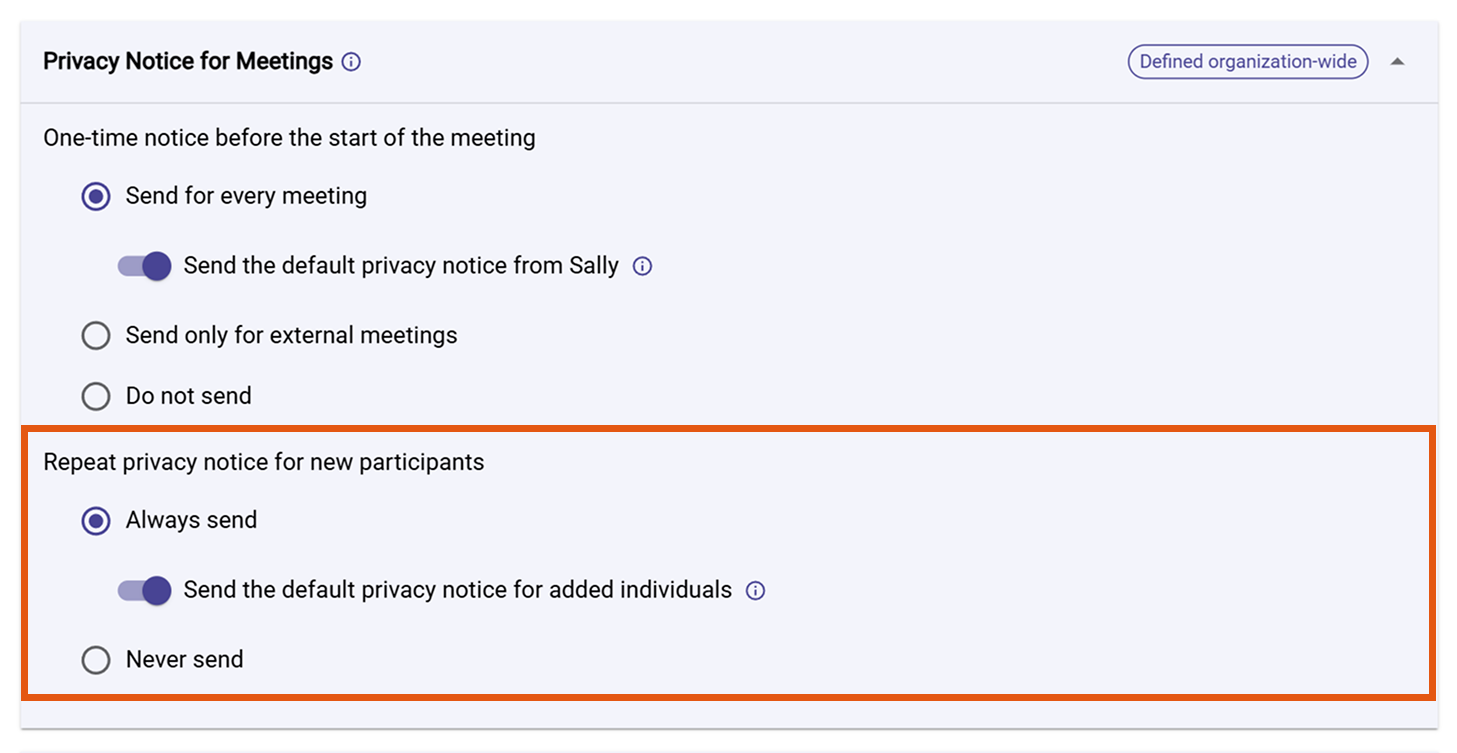
- In Repeat privacy notice for new participants, choose:
-
Always send – Always notify new joiners.
Use when: People frequently join late or are added ad-hoc. -
Never send – Do not notify new joiners.
Use when: All participants are informed through other channels.
- (Optional) Toggle Send the default privacy notice for added individuals to use Sally’s standard text for those notifications.
Use when: You prefer pre-approved wording.
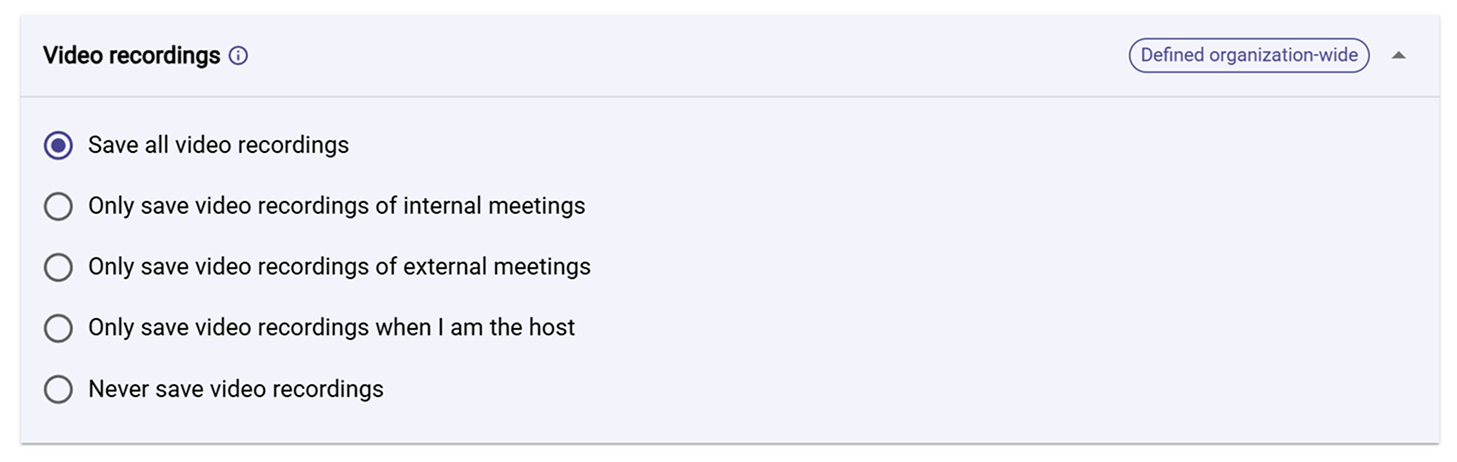
5. How to control video recordings
Decide when Sally is allowed to save video recordings.
-
In Video recordings, select one of the following:
-
Save all video recordings
Use when: You want to document all meetings completely. -
Only save video recordings of internal meetings
Use when: External conversations should not be recorded by default.infoWhen you select this option, an additional toggle appears: “Continue saving audio recordings for all meetings.”
If you don’t want audio recordings to be saved either, make sure to disable this option as well.

-
Only save video recordings of external meetings
Use when: Customer or other external conversations are your main focus.infoWhen you select this option, an additional toggle appears: “Continue saving audio recordings for all meetings.”
If you don’t want audio recordings to be saved either, make sure to disable this option as well.

-
Only save video recordings when I am the host
Use when: You want to personally decide when recordings are allowed.infoWhen you select this option, an additional toggle appears: “Continue saving audio recordings for all meetings.”
If you don’t want audio recordings to be saved either, make sure to disable this option as well.

-
Never save video recordings
Use when: Your policy does not allow video recordings.infoWhen you select this option, an additional toggle appears: “Continue saving audio recordings for all meetings.”
If you don’t want audio recordings to be saved either, make sure to disable this option as well.

Recording meetings may require consent depending on your jurisdiction and company policy.
Ensure all participants are informed and have given their consent before recording.
6. How to set automatic data deletion
Define a maximum retention period for appointments, summaries, recordings, and other meeting artifacts.

- In Automatic Deletion, open the dropdown.
- Select the retention period (the options are: Never delete, after two weeks, after three months, after 1 year, after 2 years).
- Sally will automatically delete items older than the selected period.
If you set After three months, recordings and summaries older than three months are removed automatically across your organization.
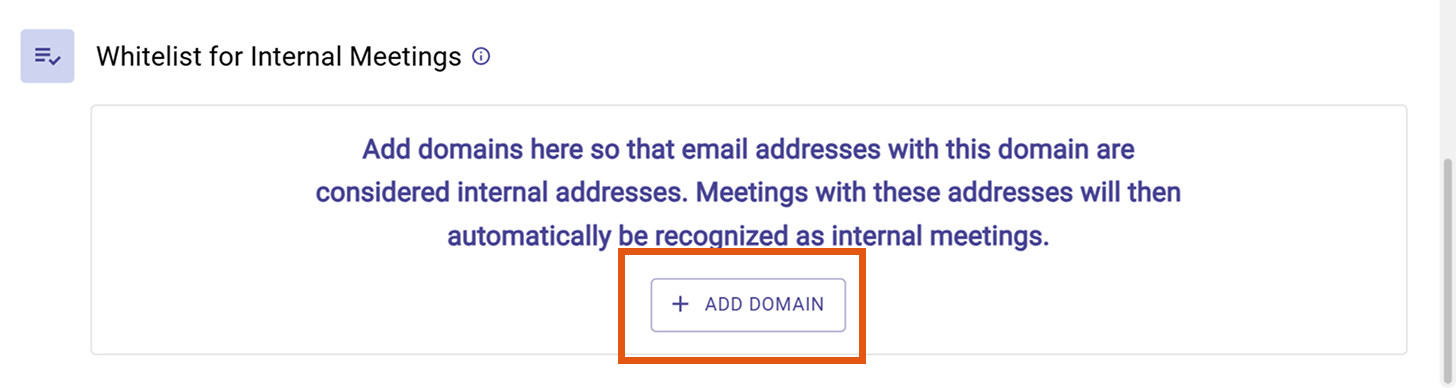
7. How to set the internal domain whitelist
External vs. internal is based on your "Internal Domain Whitelist".
Set which domains count as internal so that Sally can distinguish between internal and external meetings (used by options like “Send only for external meetings”).
- In the "Meeting Assistant" settings, scroll to "Whitelist for Internal Meetings" and click "+ Add Domain".
- Enter your company domain (e.g.,
sally.io) and click Add.
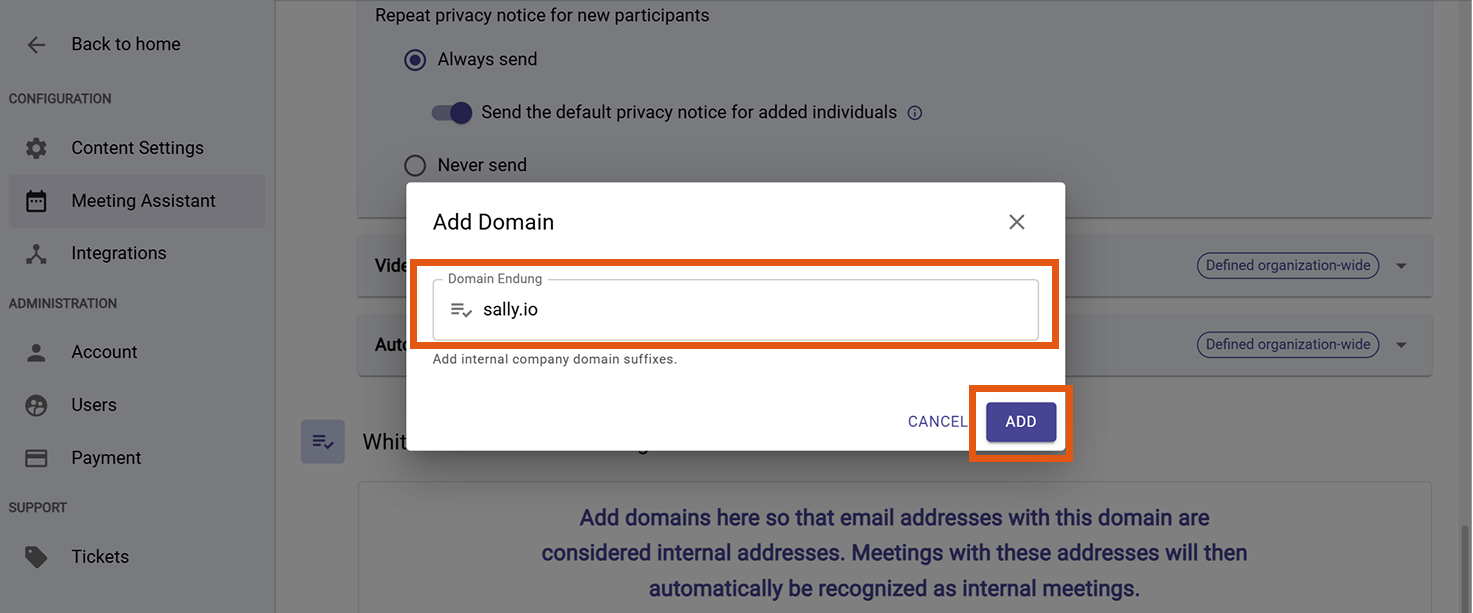
Email addresses that match any domain on this whitelist are treated as internal.
All other domains are considered external.