How to organize meetings with tags
Tags are short, colourful labels that you attach to an appointment or a recording, for example Customer, Follow up or Onboarding. In a long list of meetings you can see at a glance what each one was about, without opening every title. A meeting can carry several tags, so a customer call can be Customer and Follow up at the same time.
Tags belong to your organization account, where everyone sees the same list and anyone can add to it. You also do not have to set them all by hand: Sally sets a tag on her own as soon as a certain word appears in an appointment title. An automation even files tagged recordings into the right folder. This article shows how to create tags, assign them and use them for automations.
Quick navigation
- What tags are
- Create a tag
- Change or delete a tag
- Assign a tag
- Automatic assignment from the title
- Where tags appear
- Automations with tags
1. What tags are
A tag describes what a meeting was about. Folders are the filing system and determine where a recording lives. The two work together: the same recording can sit in a project folder and be marked as Customer.
Three things are worth knowing before you start:
- Tags are shared: They live in your organization account and are visible to all members, so a tag you create is available to your colleagues as well.
- Tags belong to the meeting: You add them to an appointment or a recording, and that is where they stay.
- Tags can drive automations: A rule can watch for certain tags and act as soon as the summary is ready.
2. Create a tag
You manage tags centrally in the content settings. That is where you set a tag's name, its colour and whether Sally assigns it automatically.
Whatever you create here is visible to every member of your organization account, and anyone can extend the list as well. Tags are not private; they are shared across the account.
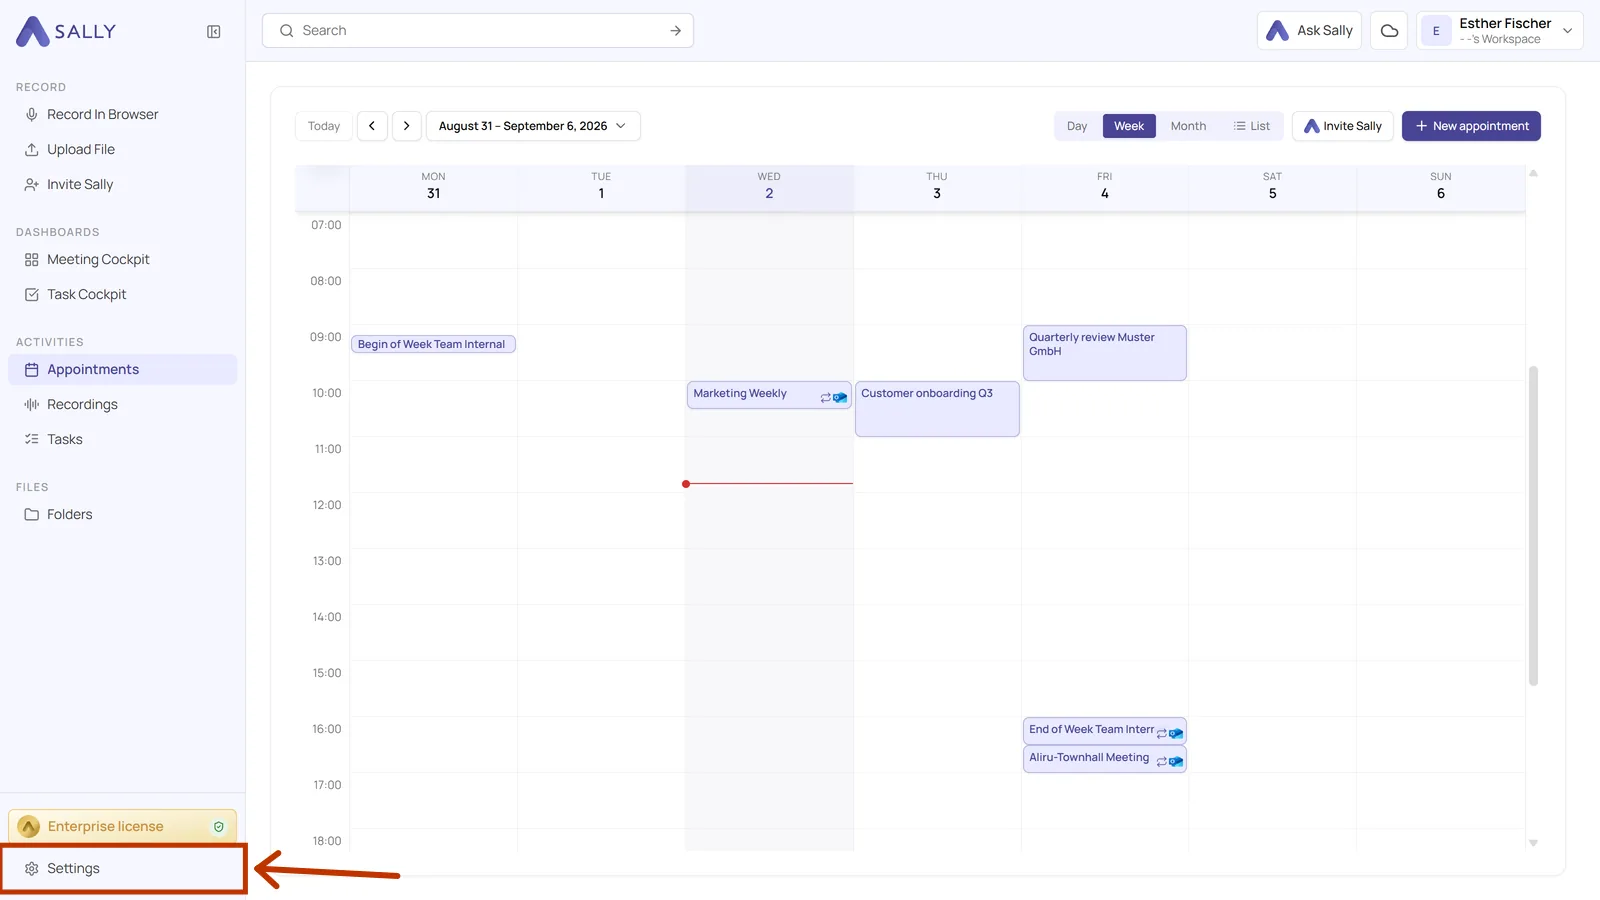
- Open Settings at the bottom of the left sidebar.
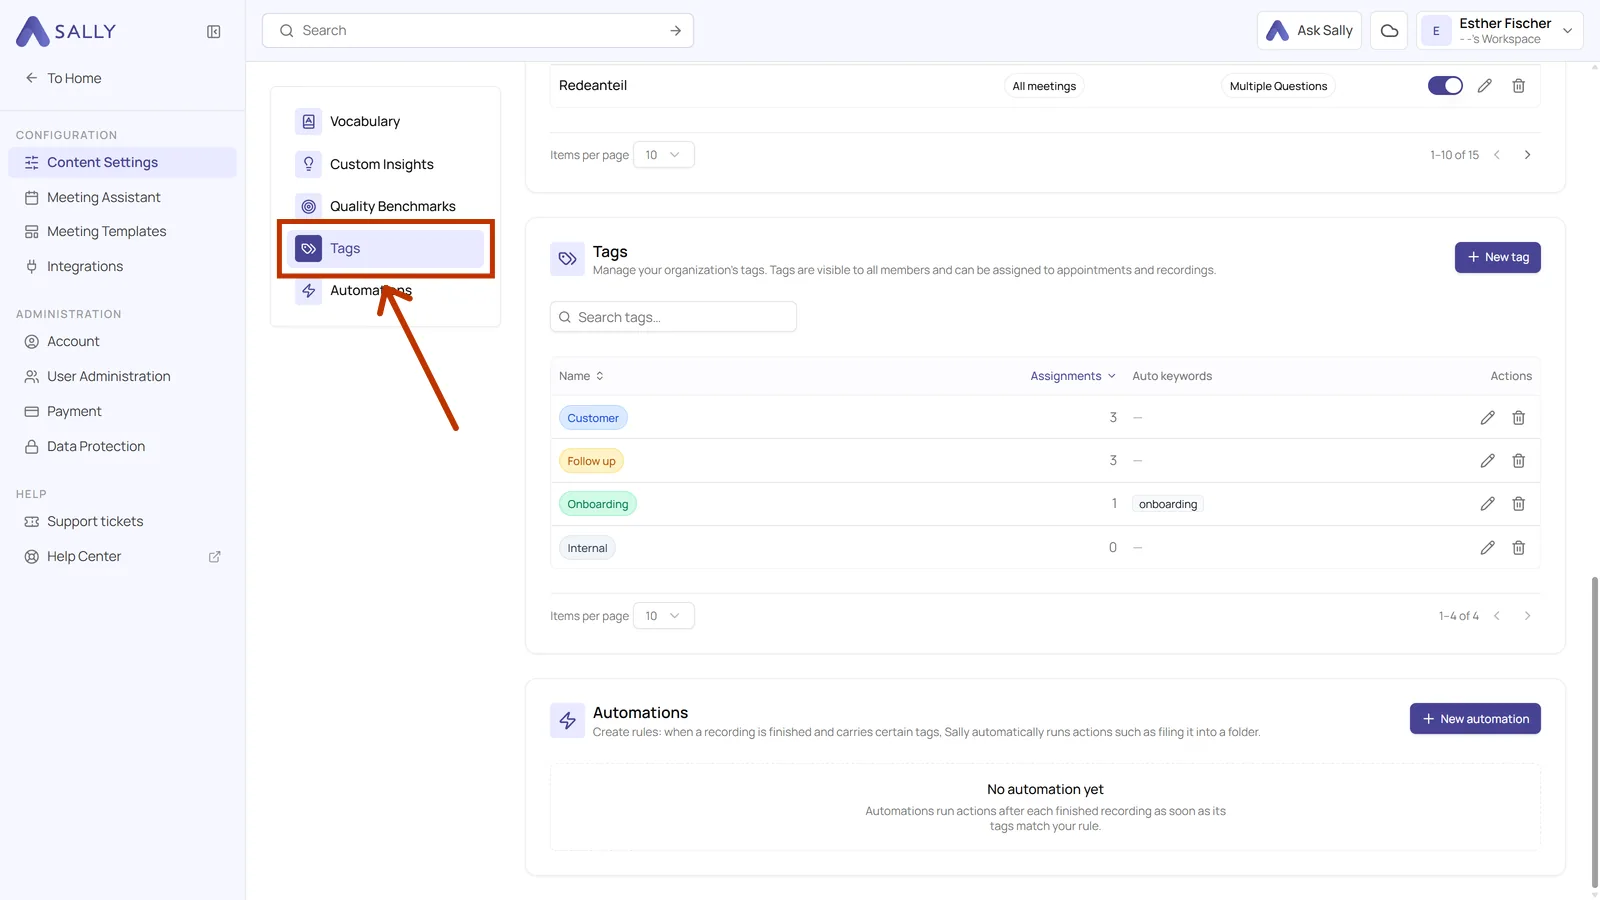
- Under Configuration, open Content Settings and pick the Tags tab.
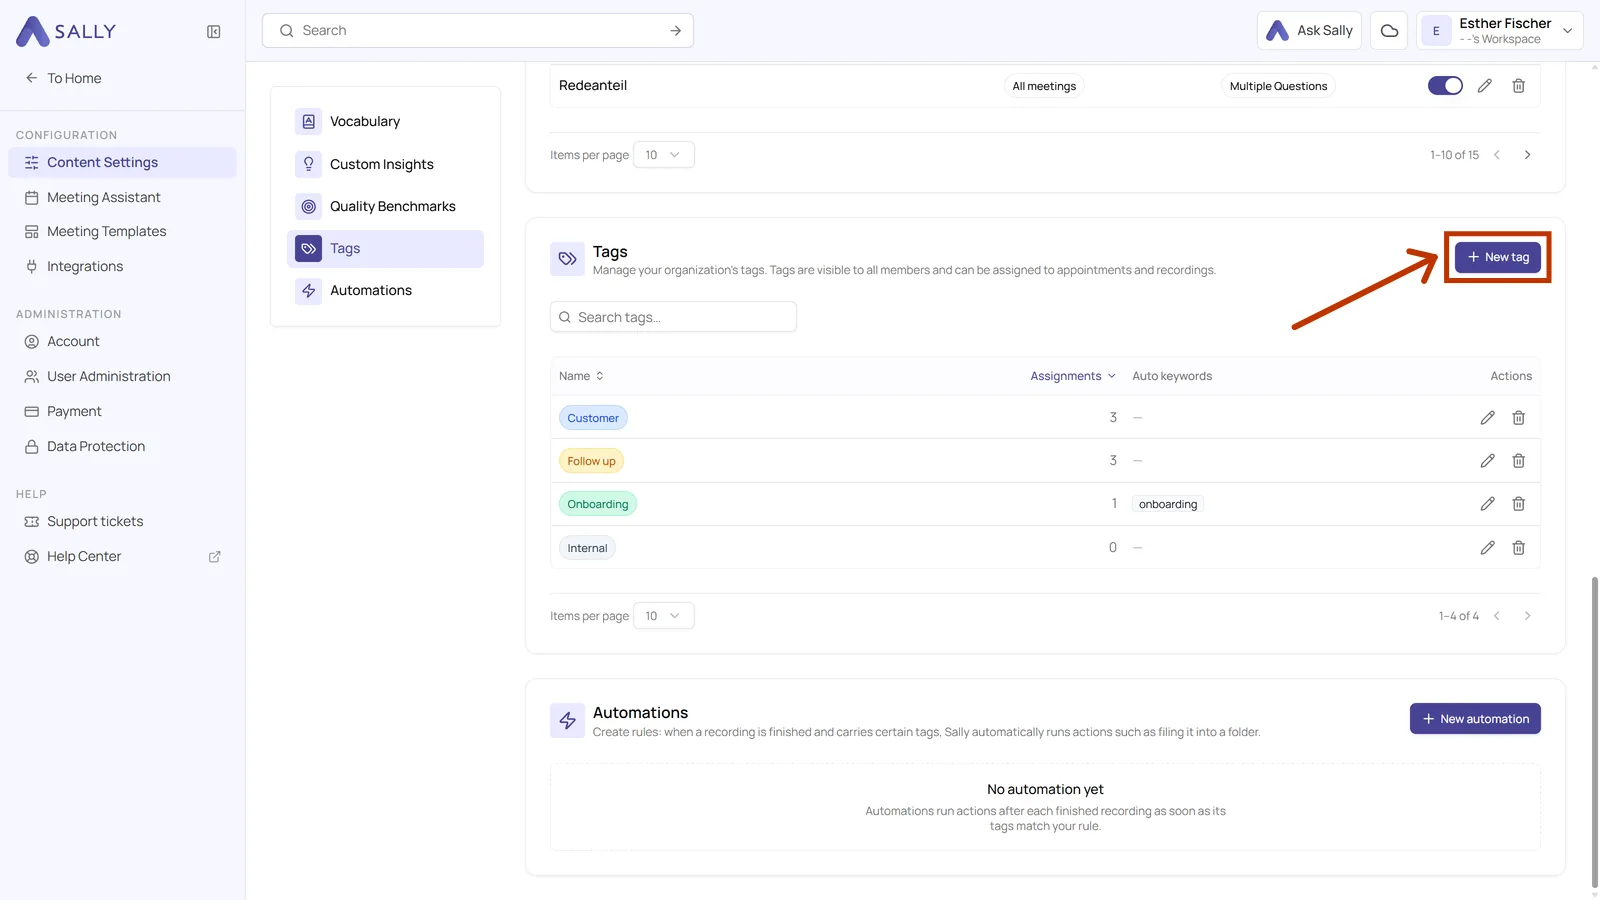
- Click New tag at the top right.
-
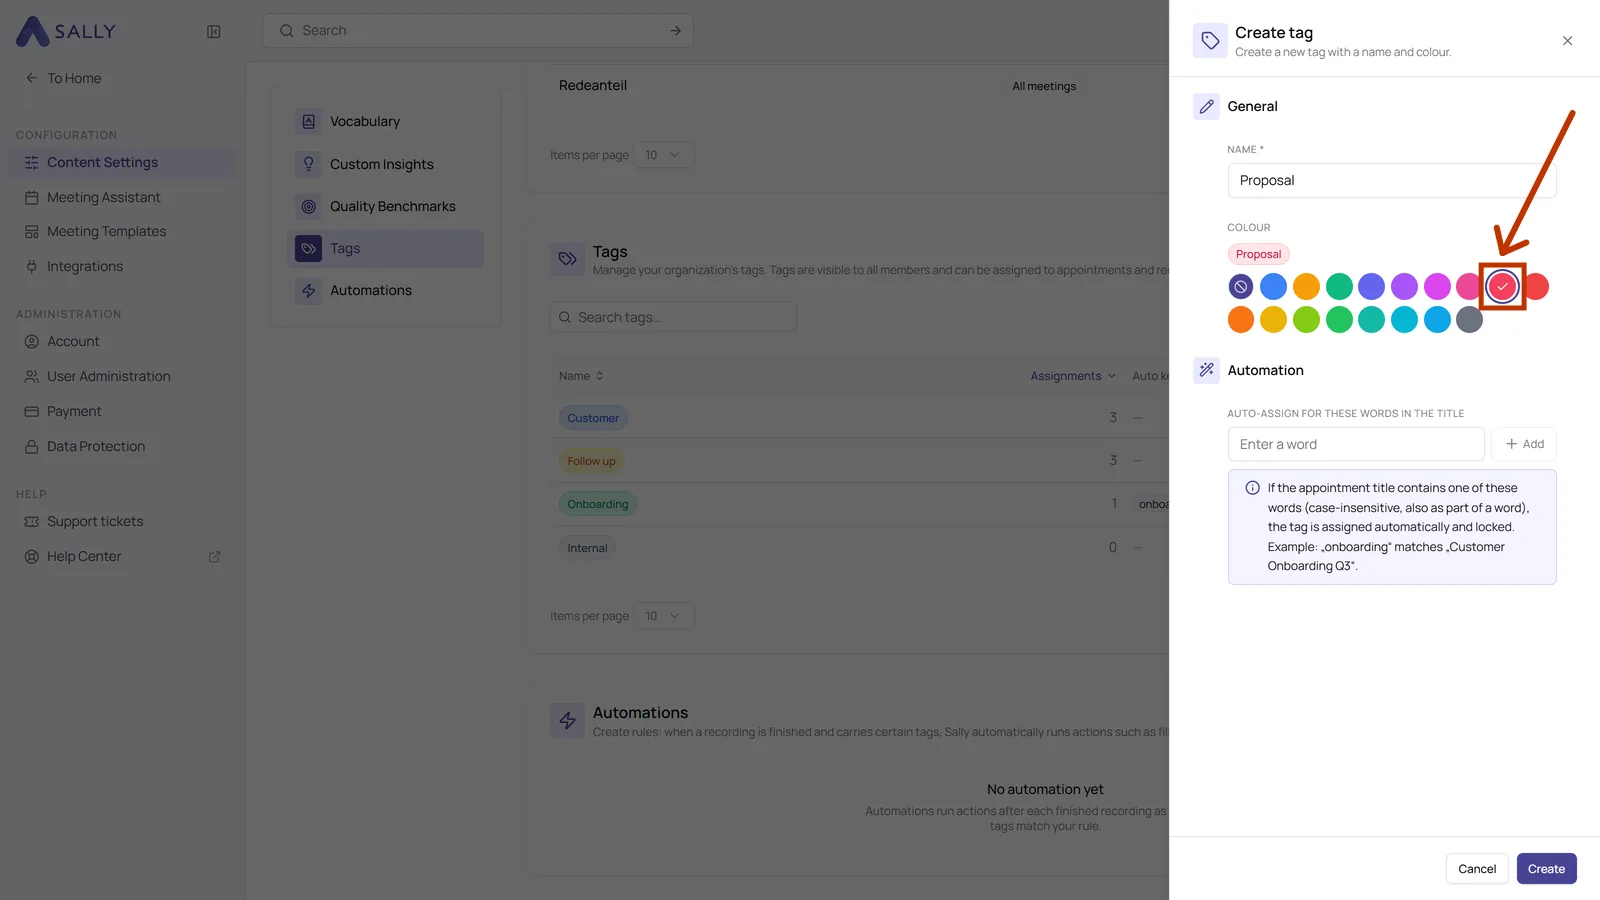
Enter a Name. It is the only mandatory field. Keep it short, ideally a single word, otherwise your lists quickly look cluttered.
You can then pick a Colour. The preview above the palette shows what the tag will look like on a meeting, and No colour keeps it in Sally's default purple.
-
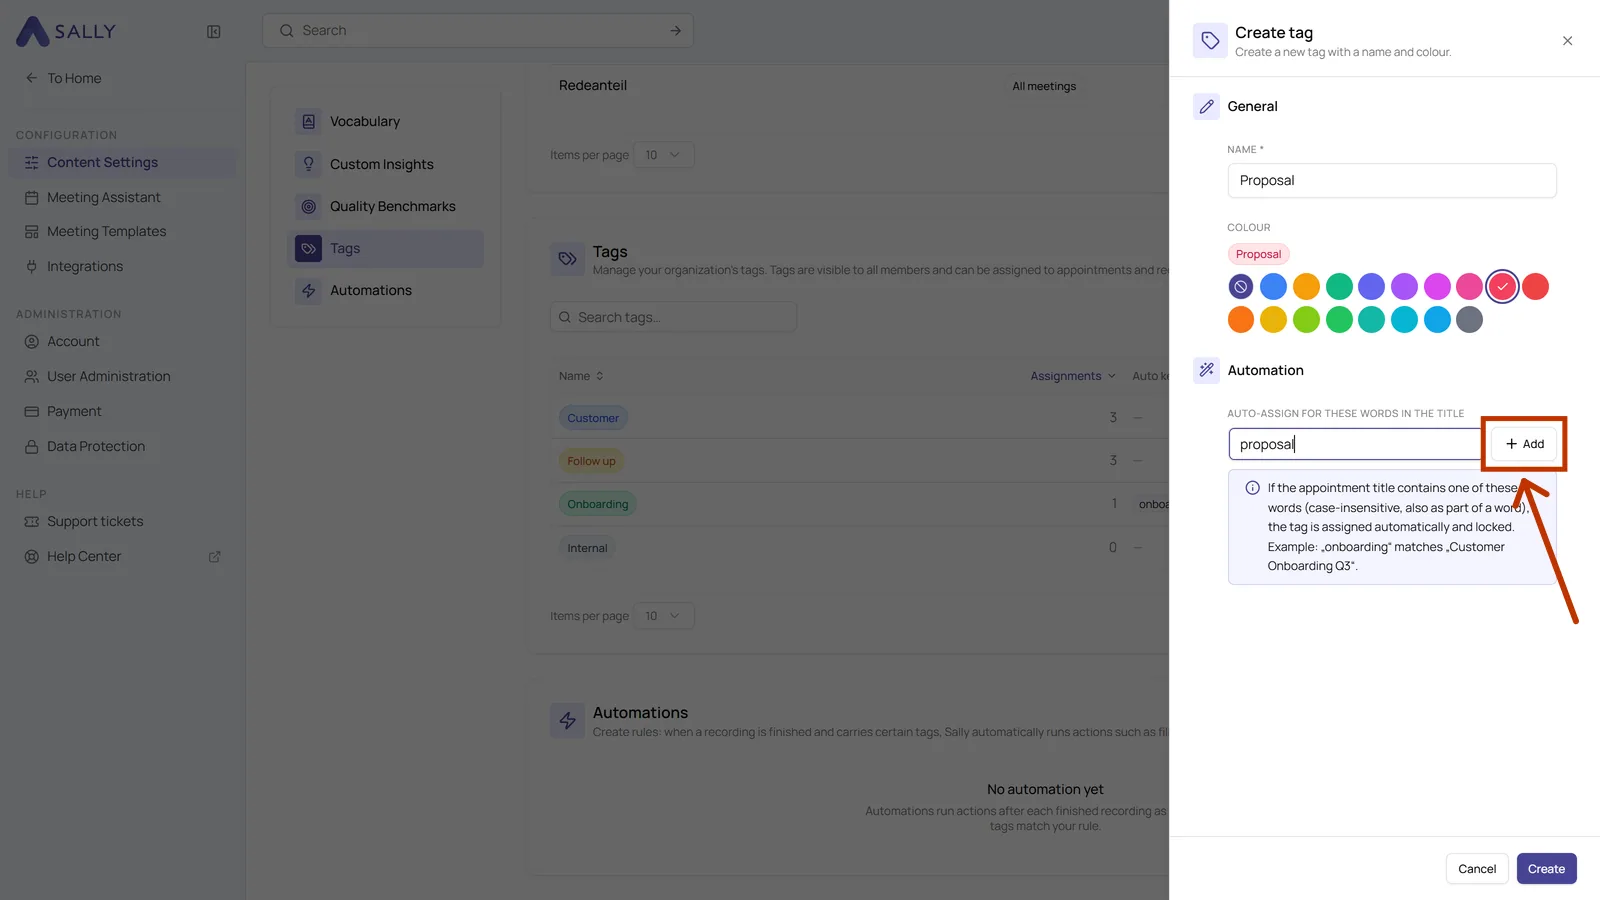
(Optional) Under Automation you can store a keyword that shows up in your appointment titles, for example
proposal. Then click Add.From now on Sally sets the tag on every appointment whose title contains that word, including "Proposal review Q3". Automatic assignment from the title has the details. Without a keyword you assign the tag yourself, as described in Assign a tag.
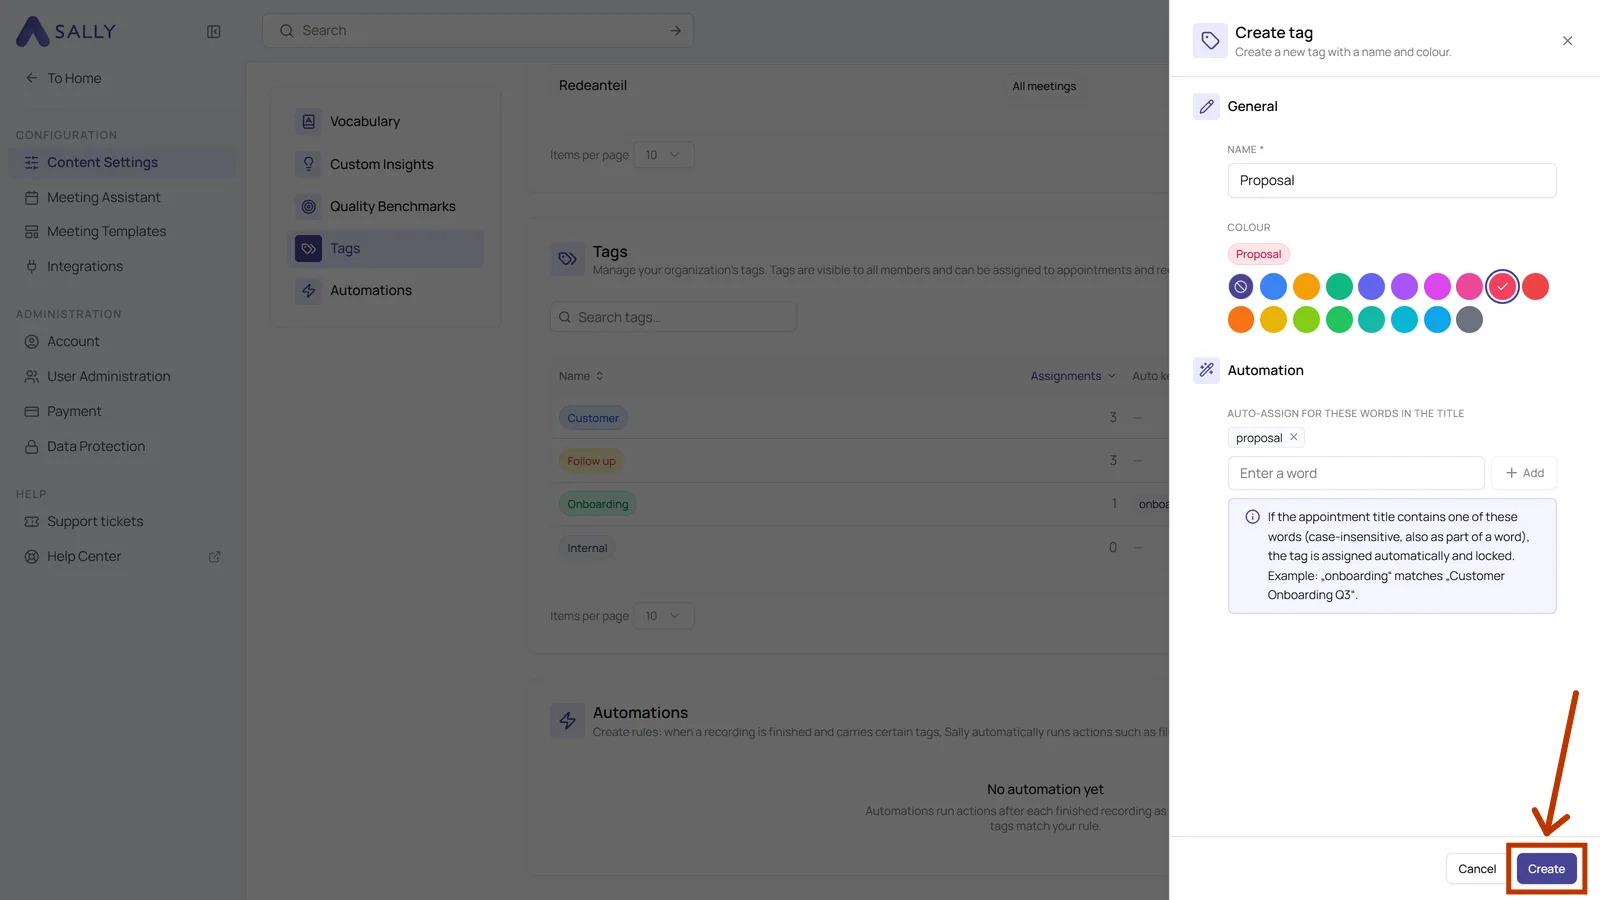
- Click Create.
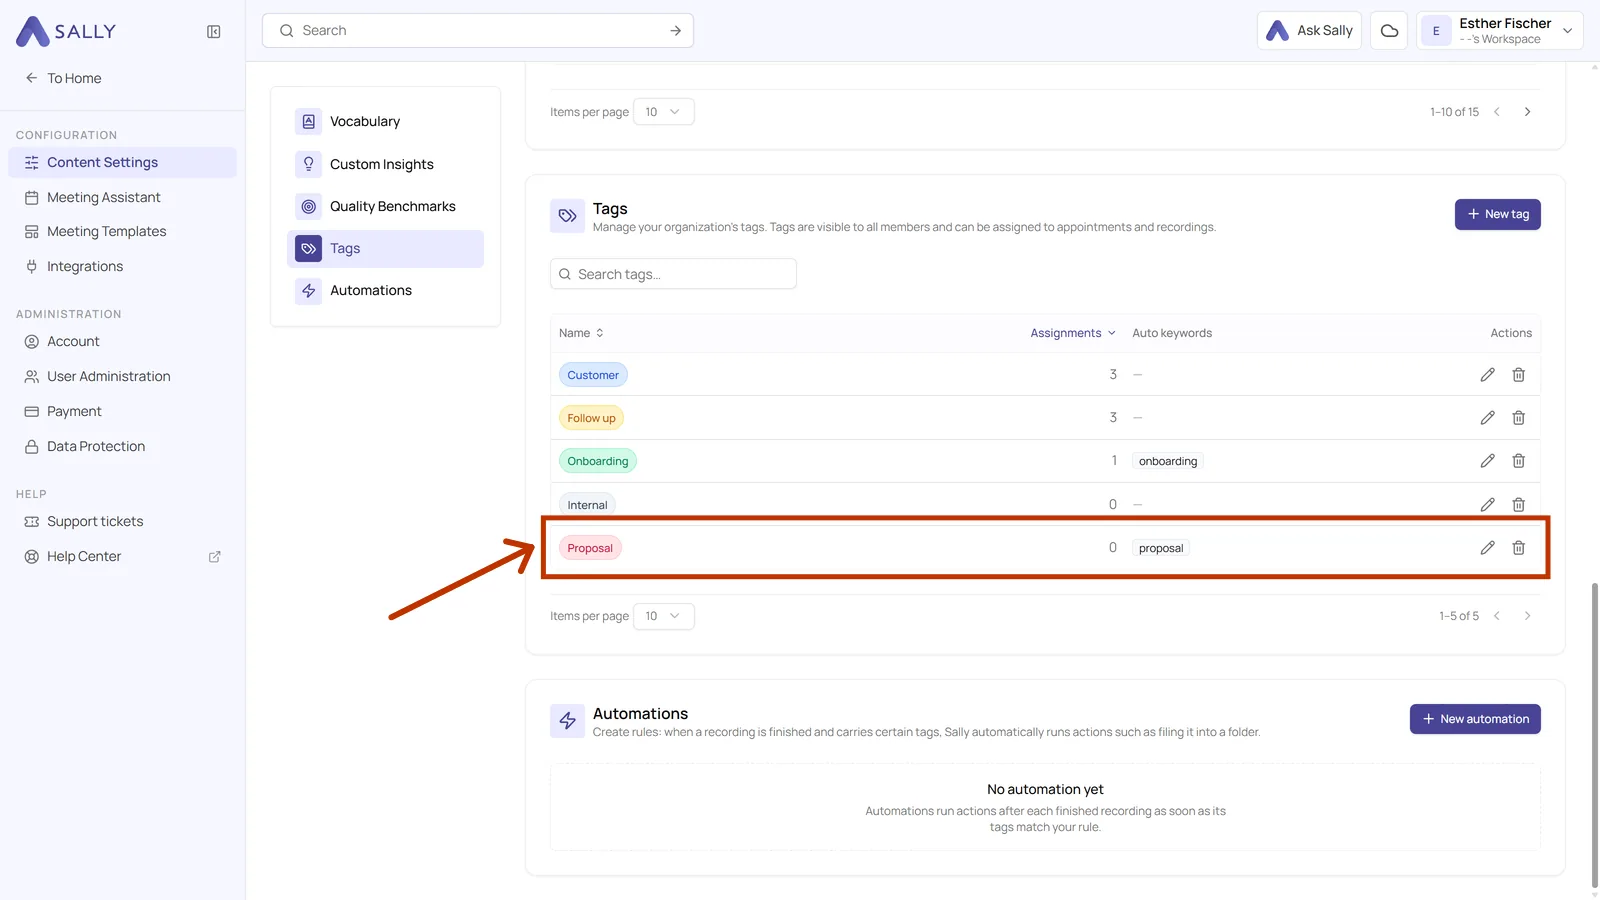
The tag is available immediately: in the central list and in the selection panel on every appointment and recording. The list shows it with the number of assignments and its automatic keywords. The search field above helps once the list grows.
A handful of clear tags beats twenty similar ones. Agree on the wording with your team before everyone adds their own variant of "customer".
3. Change or delete a tag
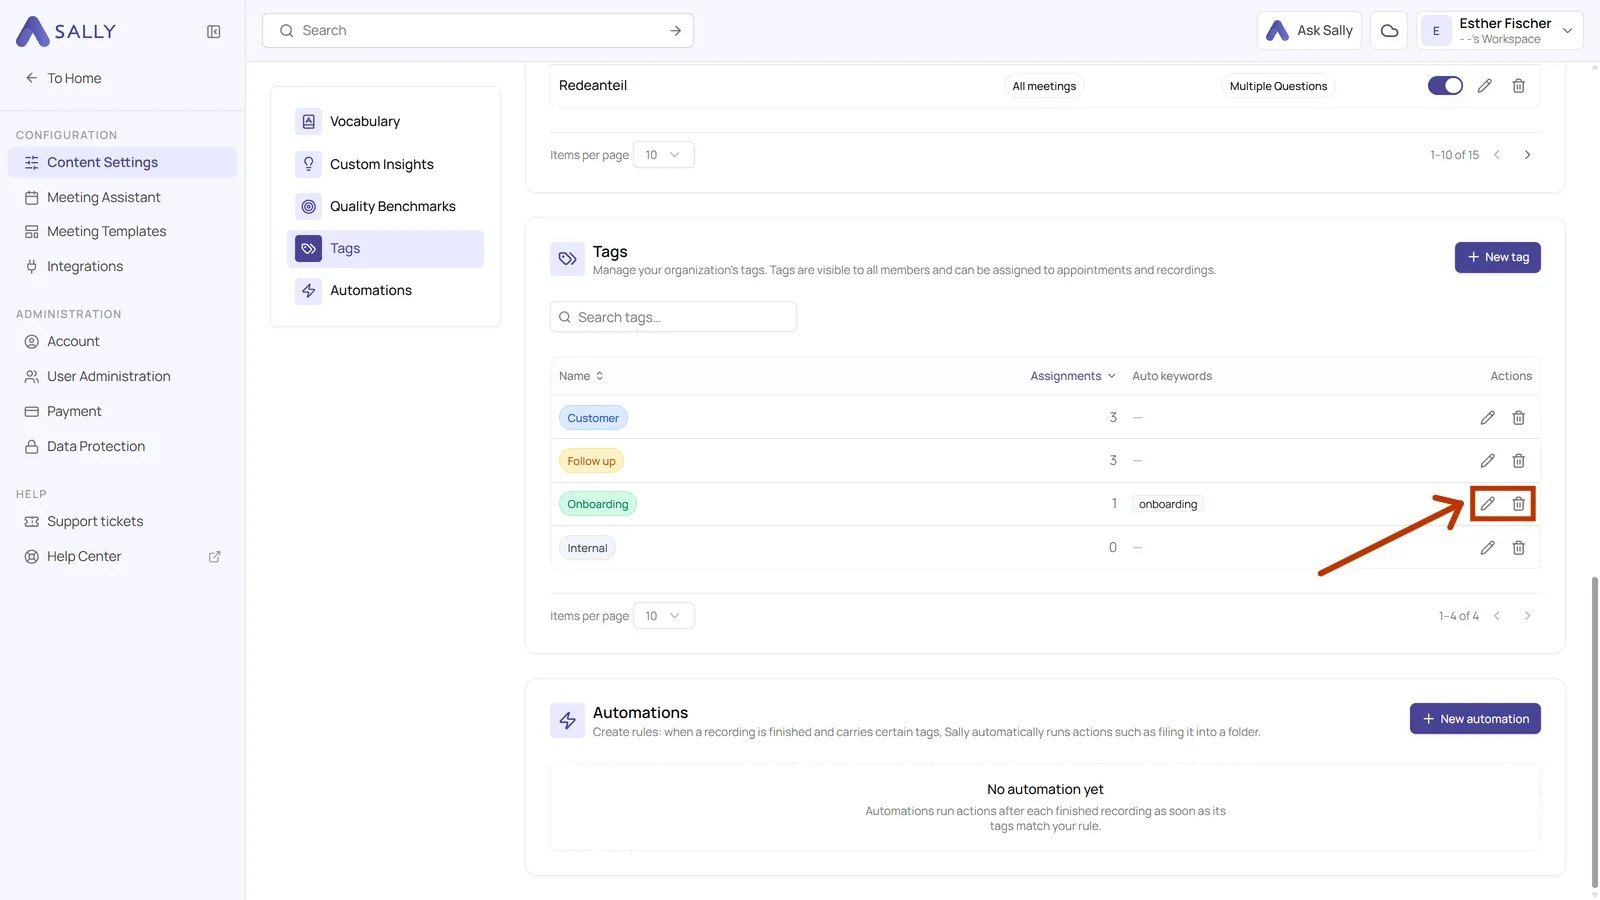
Every row in the list has two actions on the right: a pencil for editing and a bin for deleting.
-
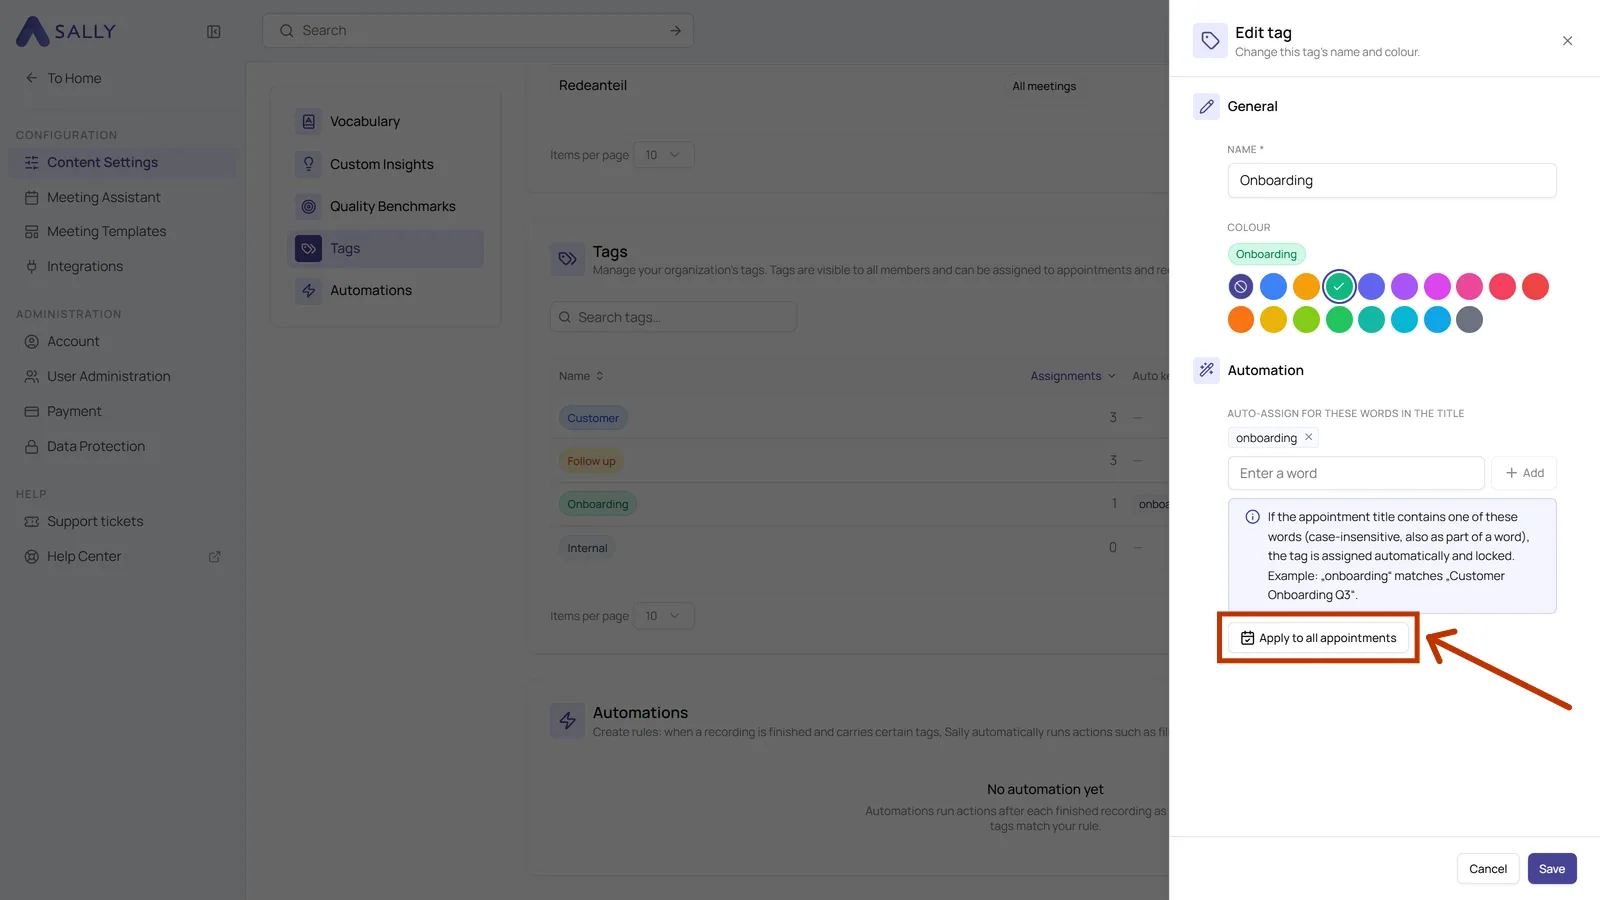
The pencil opens Edit tag, where you change the name, the colour and the automatic keywords. A renamed tag keeps all its assignments, so the new name shows up on every meeting that already carries it.
-
The Apply to all appointments button applies only to the automation keywords, not to the name or the colour. Clicking it sends Sally through your existing appointments. Where a title contains the keyword, she adds the tag. If you skip that click, the new keyword only applies to appointments added to your calendar from then on.
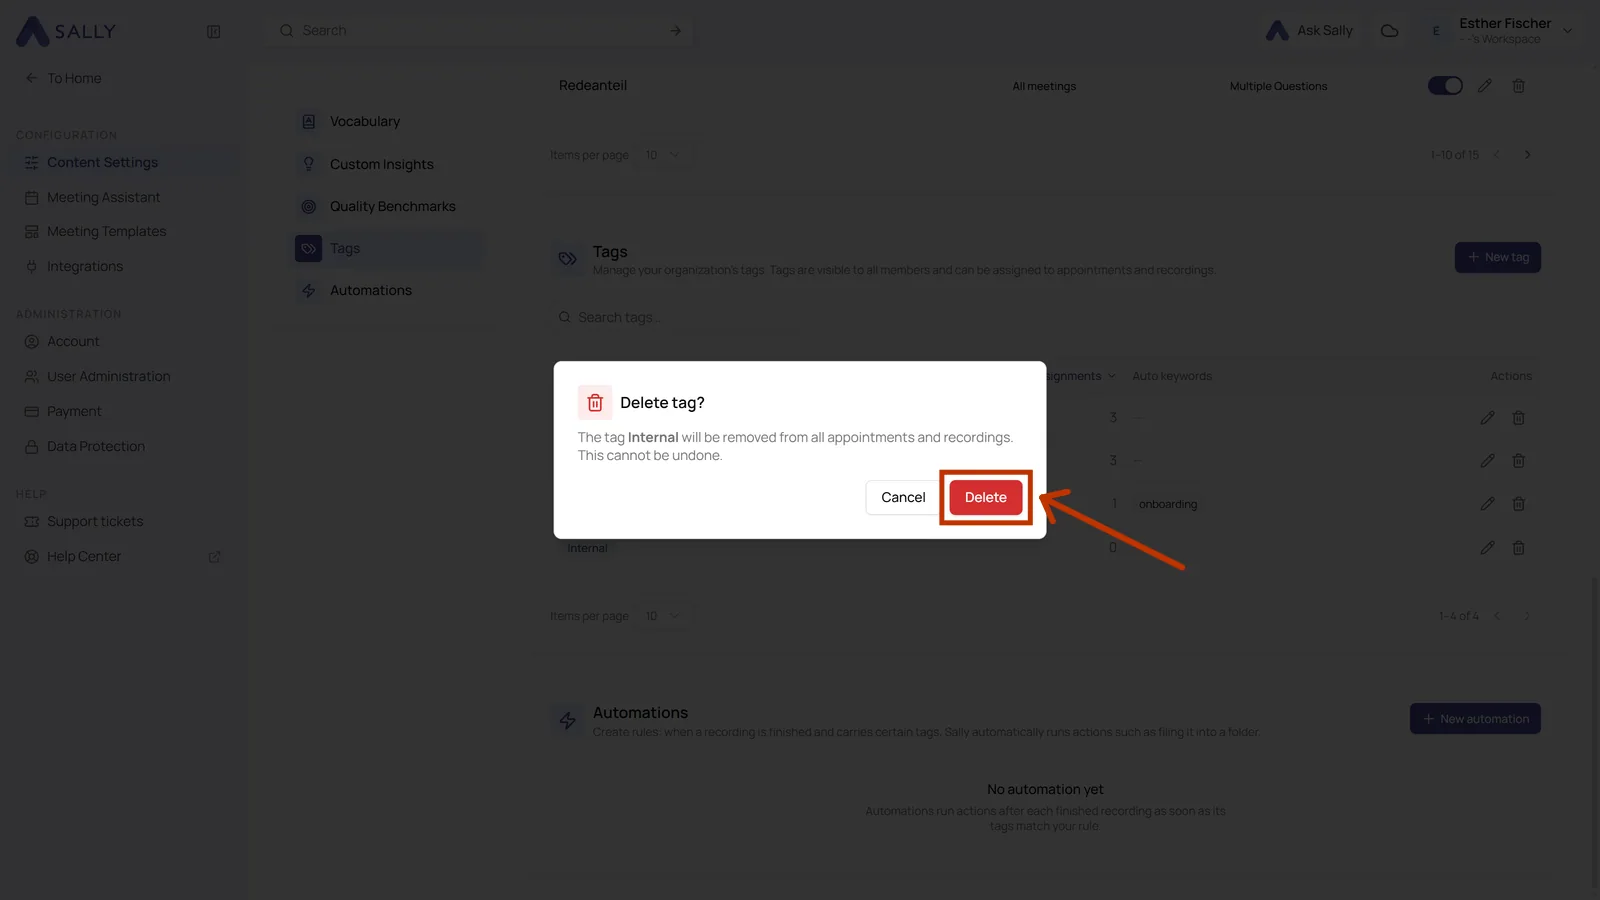
- The bin asks for a confirmation first, because deleting takes the tag off every appointment and recording that carries it. That step cannot be undone. A tag you create later with the same name starts at zero assignments.
If a tag is only worded badly, rename it. The assignments stay, and your colleagues see the new name right away.
4. Assign a tag
You add tags in the appointment or the recording itself, not in the settings.
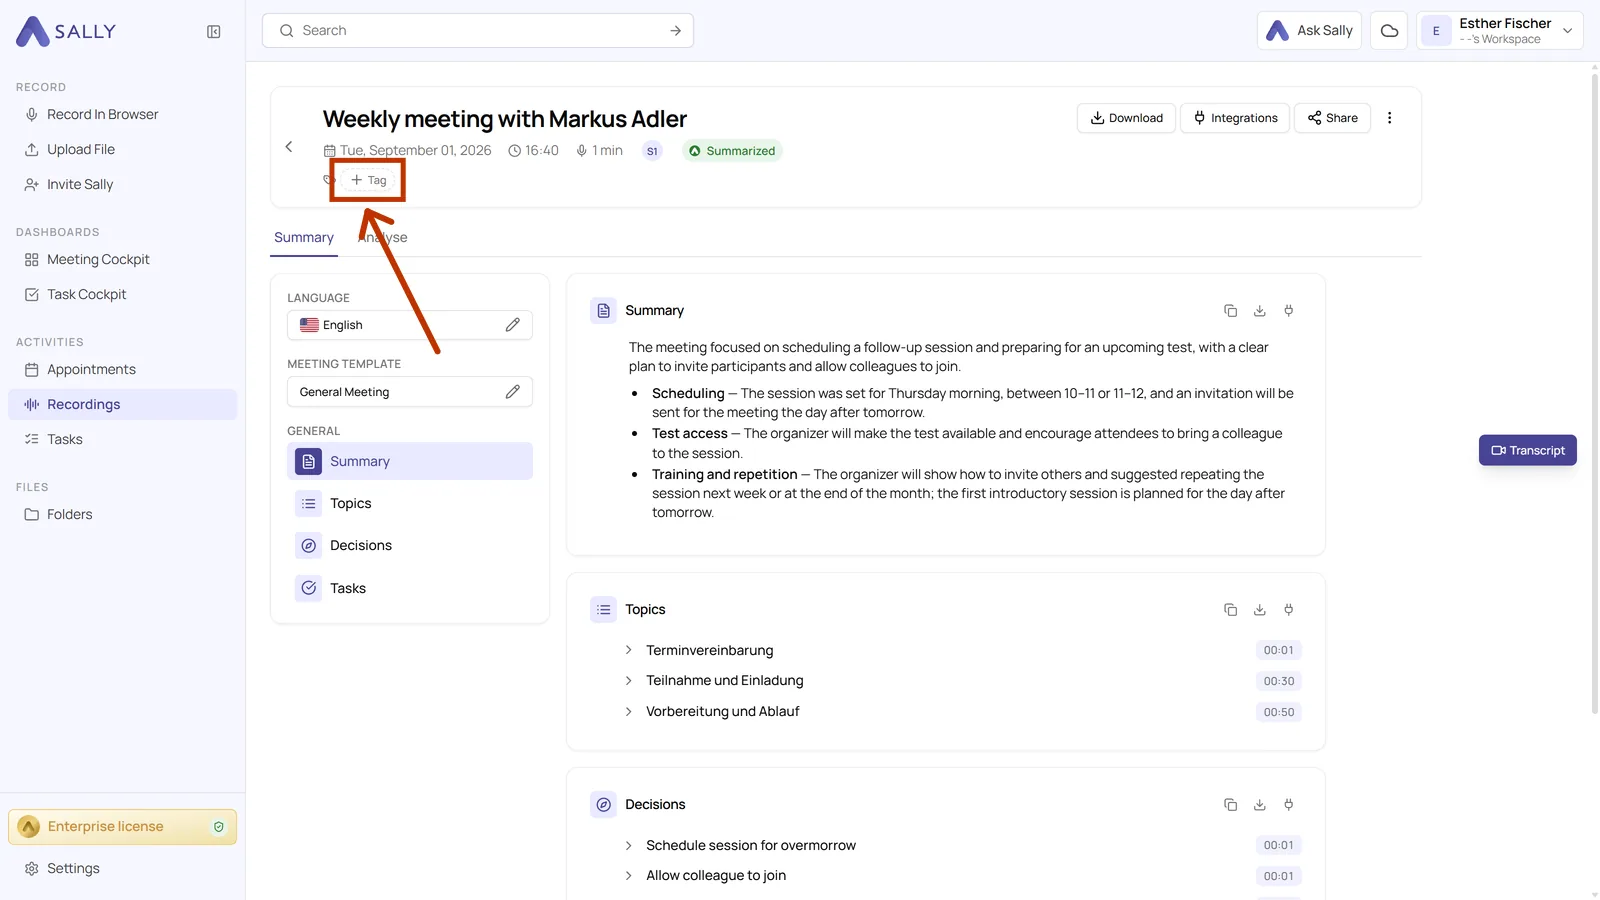
- Open an appointment or a recording and click + Tag under the title.
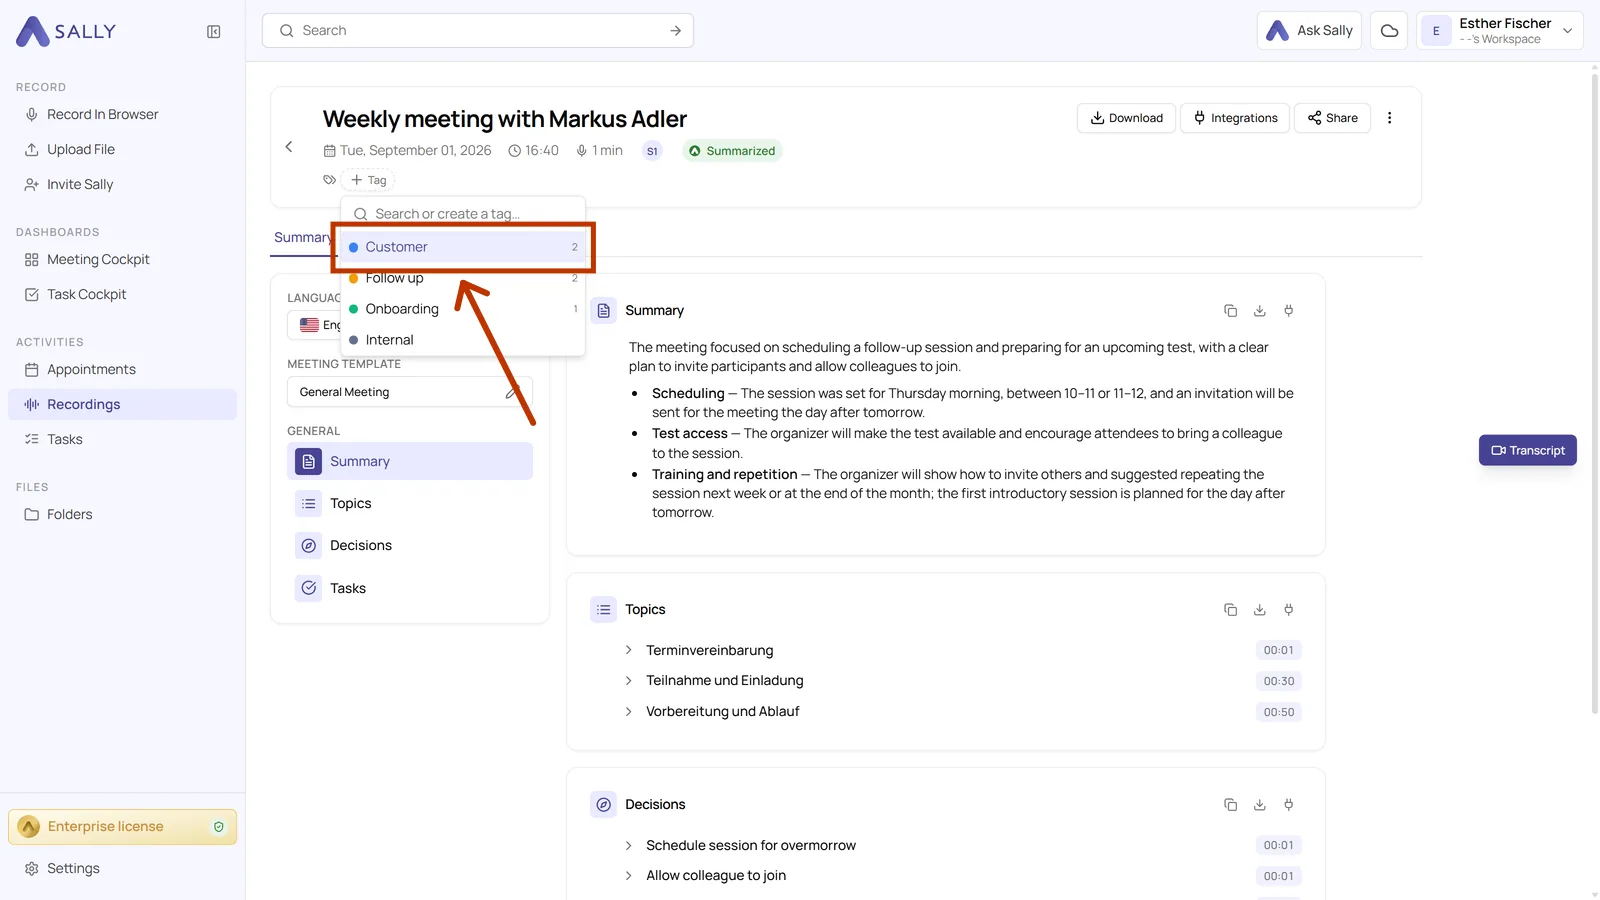
- Pick a tag from the list. The coloured dot shows its colour, and the number on the right tells you how often the tag is already in use. The panel stays open, so you can assign several tags one after another.
- If the tag you need does not exist yet, type the name into the search field. Sally offers to create it. The new tag appears in the shared list immediately.
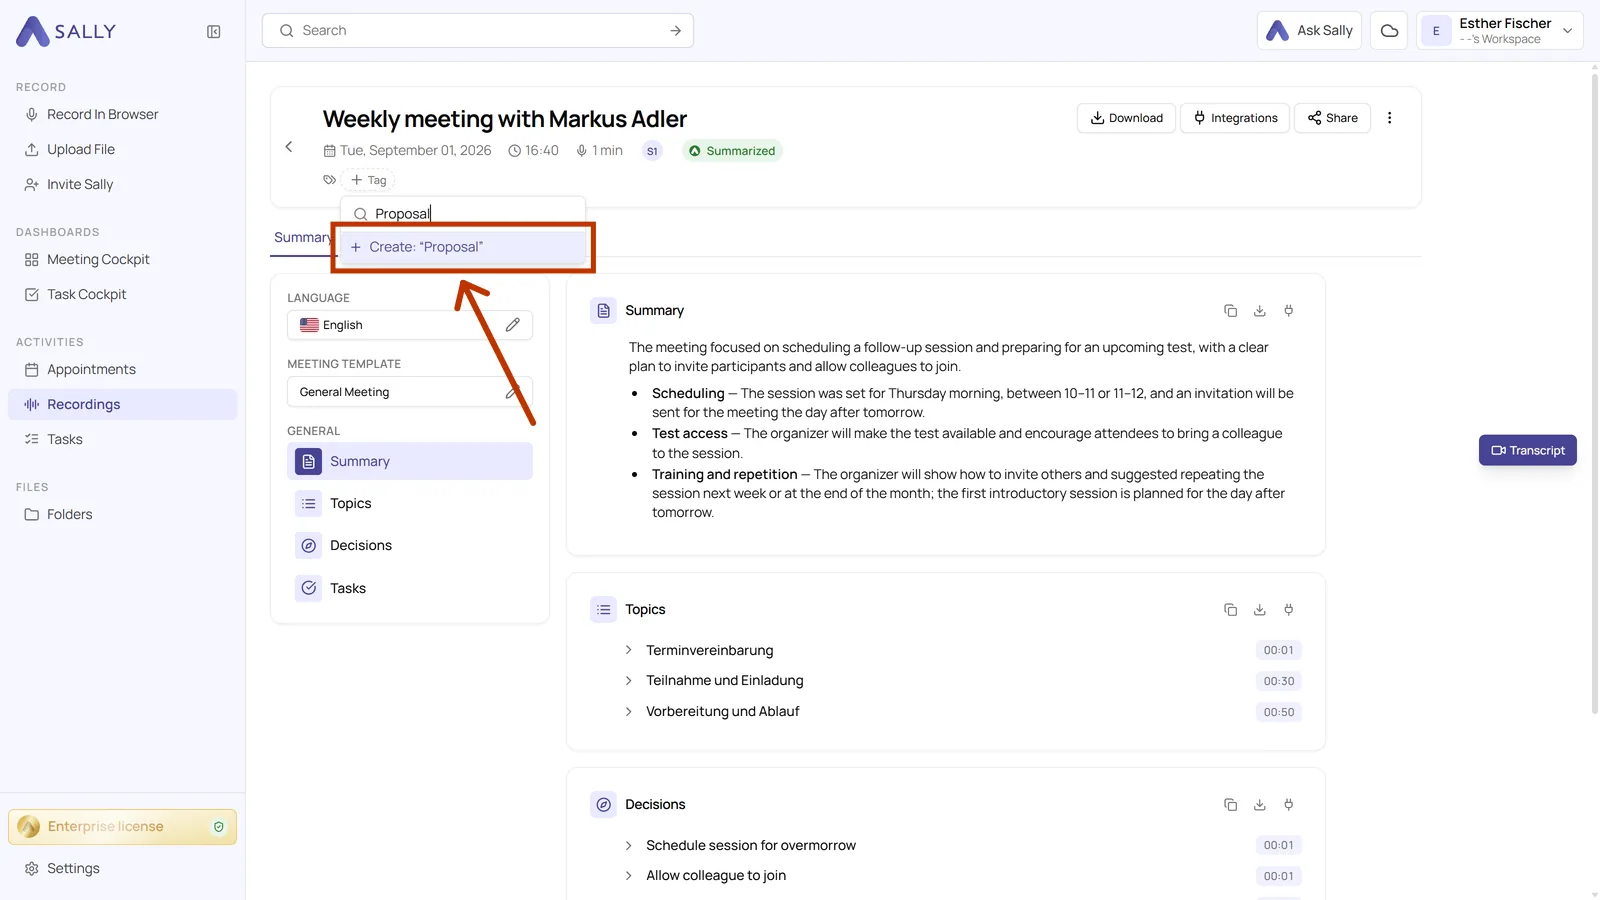
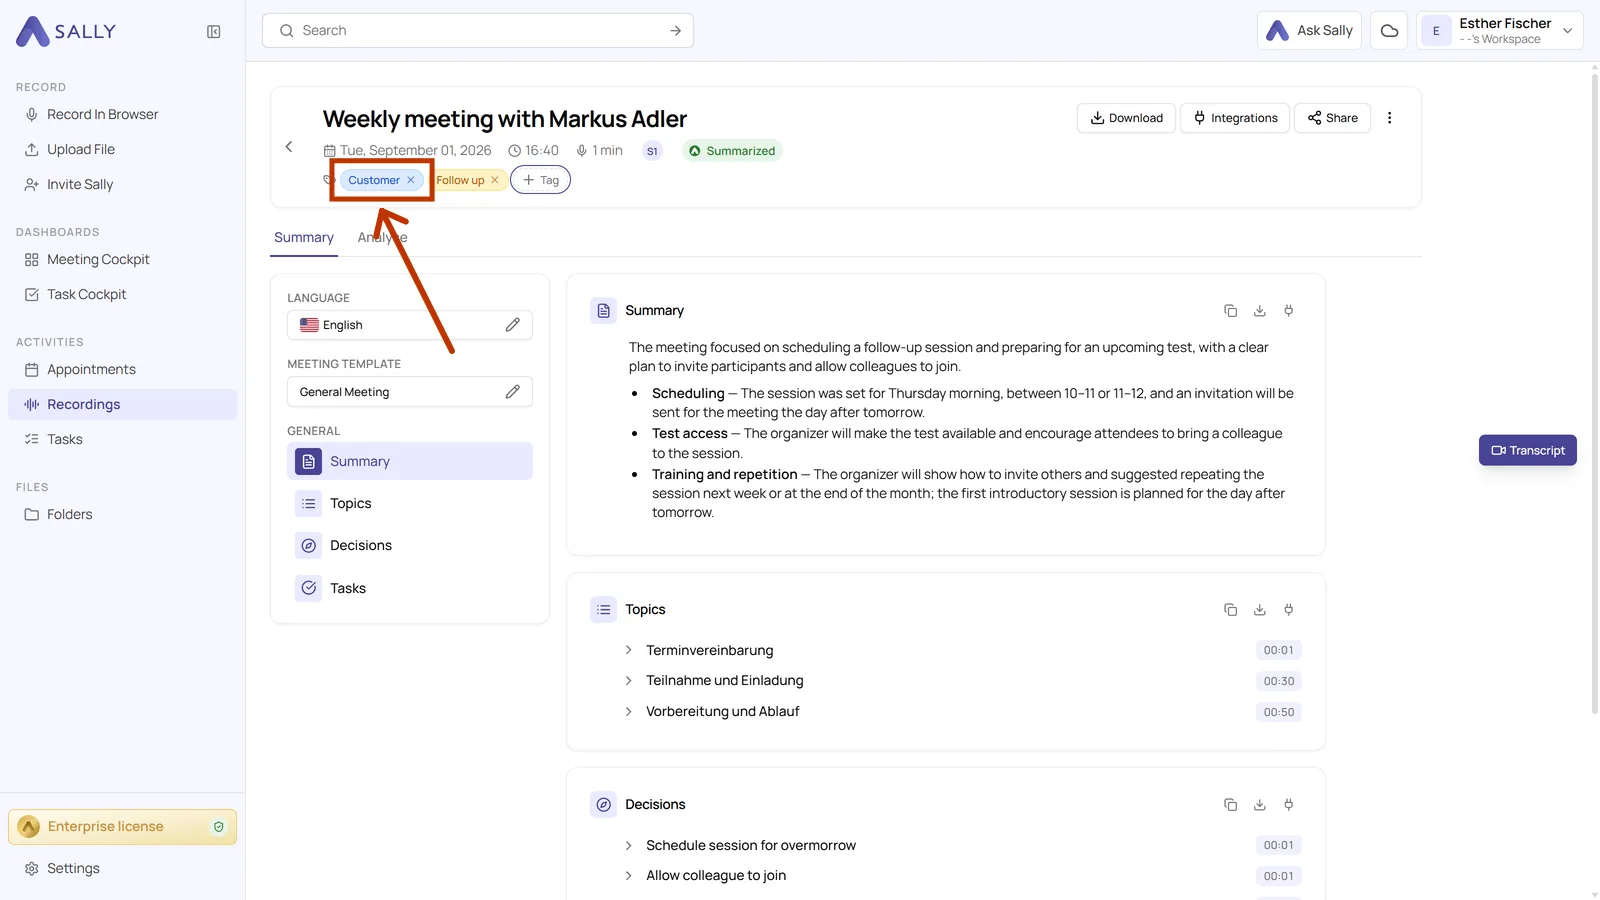
- Assigned tags show up as coloured labels below the title. The x on a tag removes it from this meeting. The tag itself stays.
5. Automatic assignment from the title
Sally can assign tags for you. To do that, a tag needs a keyword that you entered under Automation when creating or editing it.
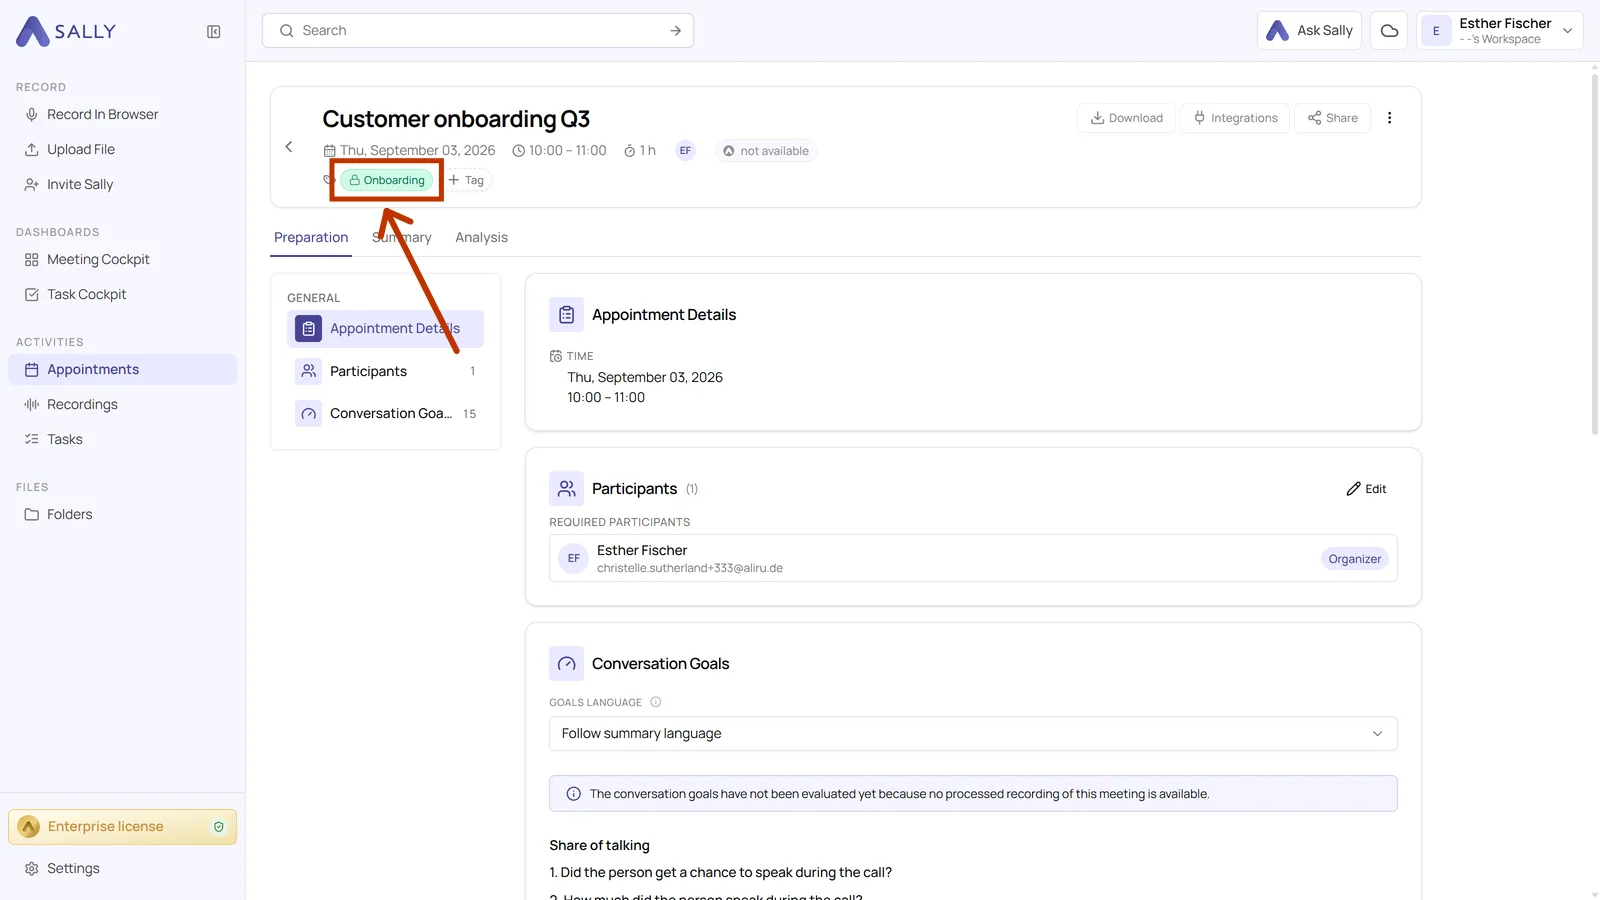
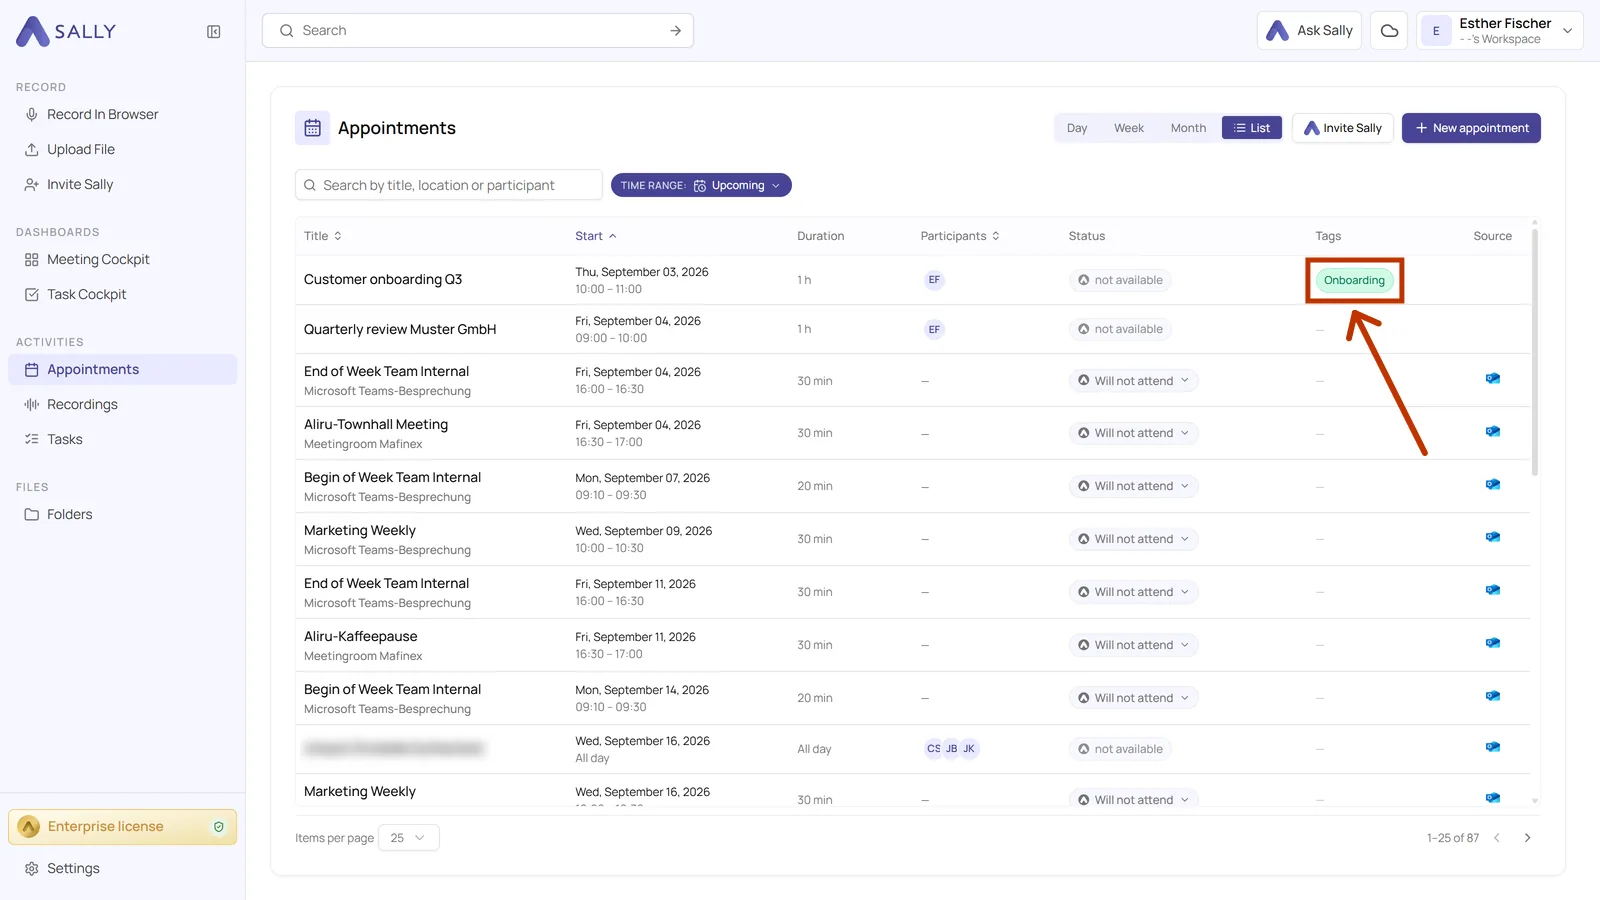
An example: the tag Onboarding has the keyword onboarding. The appointment "Customer onboarding Q3" carries that word in its title, so it already shows the tag without anyone assigning it. This happens before the meeting even starts.
Tags without a keyword are left alone. You keep assigning those yourself.
An automatically assigned tag is locked. It shows a small padlock instead of the x, so nobody removes it by accident. It stays on the meeting even when you change the title later or remove the keyword from the tag. If you really need it gone, the only way is deleting the tag, which takes it off every meeting.
If you enter a keyword later on, Sally only applies it to new appointments. What is already in your calendar does not get the tag on its own. Open the tag with the pencil and click Apply to all appointments, and Sally works through your existing appointments, adding the tag wherever a title contains the keyword. Change or delete a tag shows where to find it.
6. Where tags appear
Tags travel with the meeting and show up in the lists you work in every day.
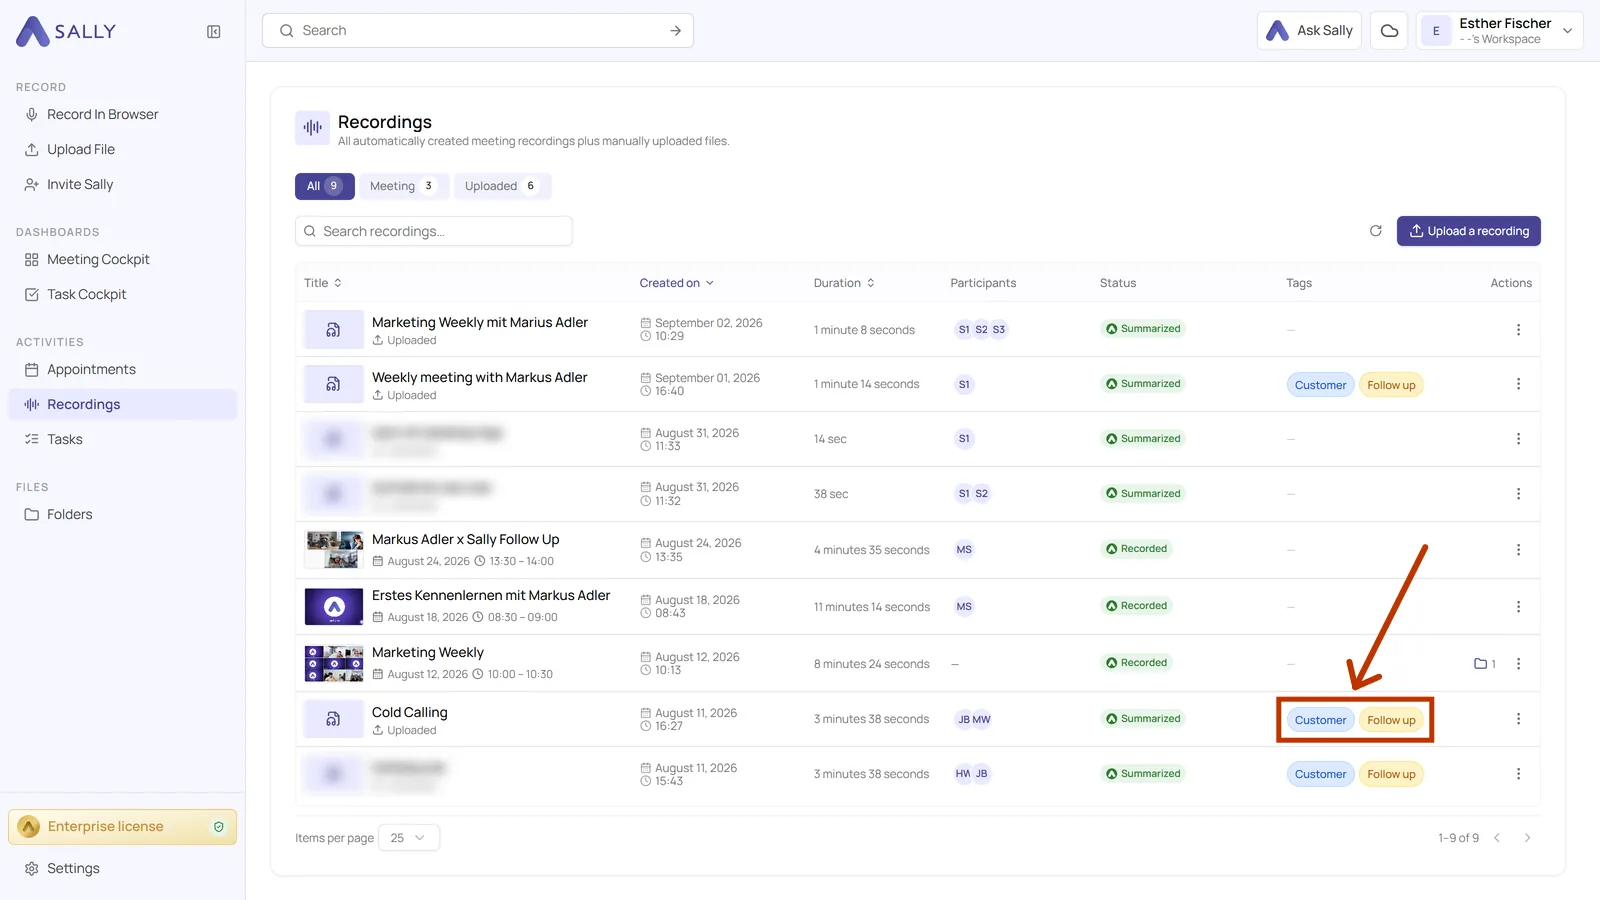
Under Recordings the Tags column shows which tags each recording has, which makes a long list much easier to scan.
The list view of Appointments has the same column, so an upcoming meeting shows its tags long before a summary exists.
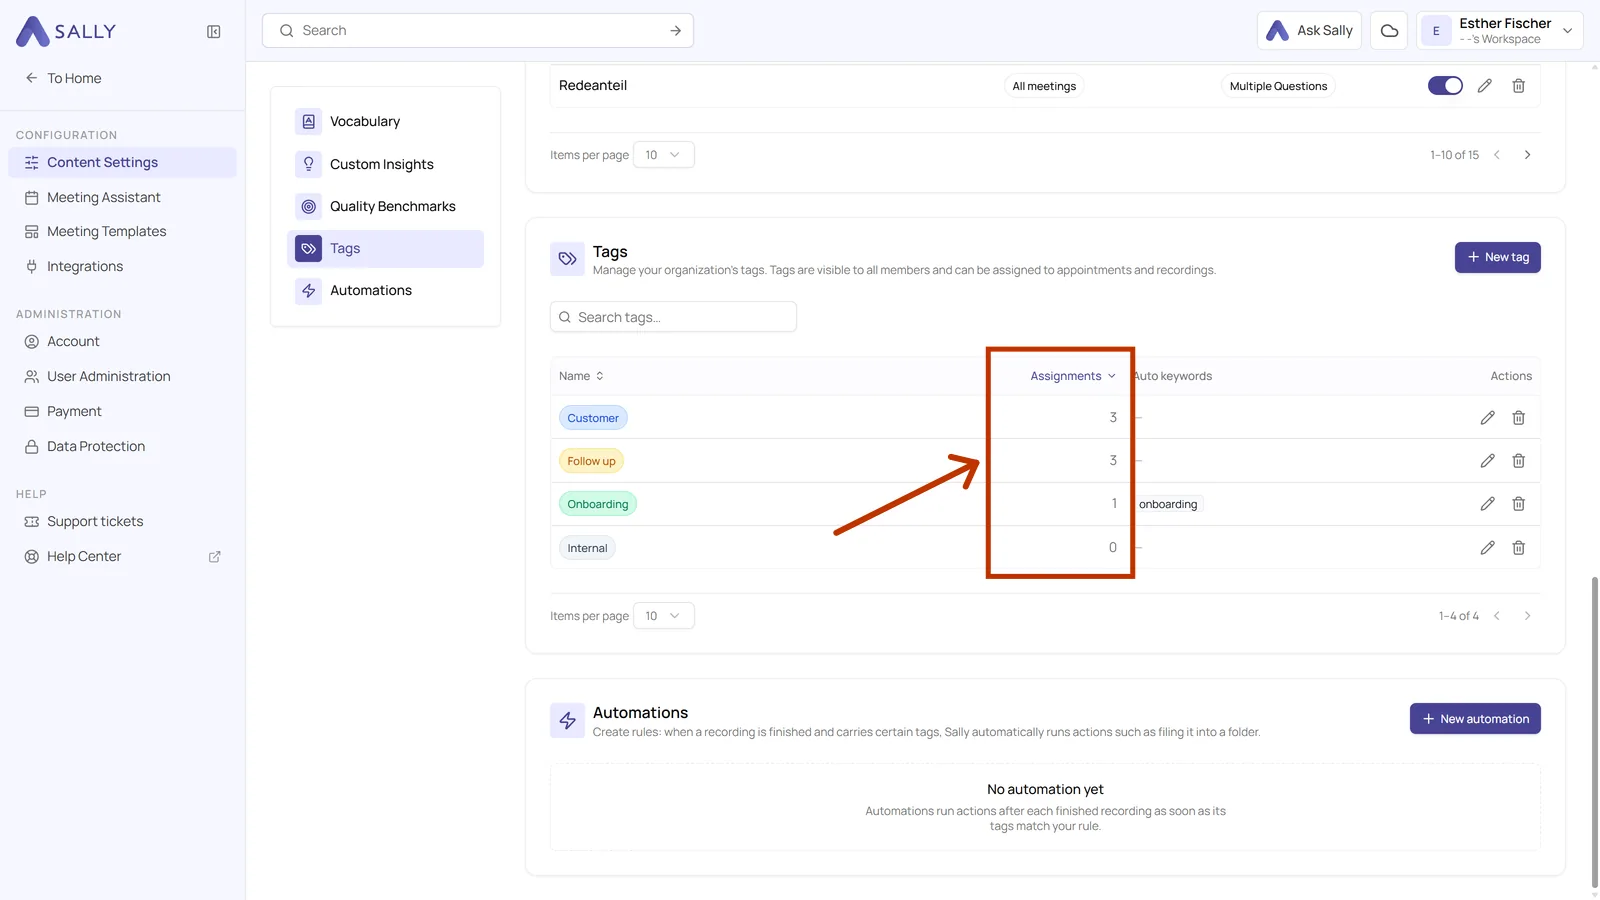
The central list for your tags adds the Assignments column. It counts how many appointments and recordings carry a tag. A 0 means nobody uses that tag, so you can delete it.
7. Automations with tags
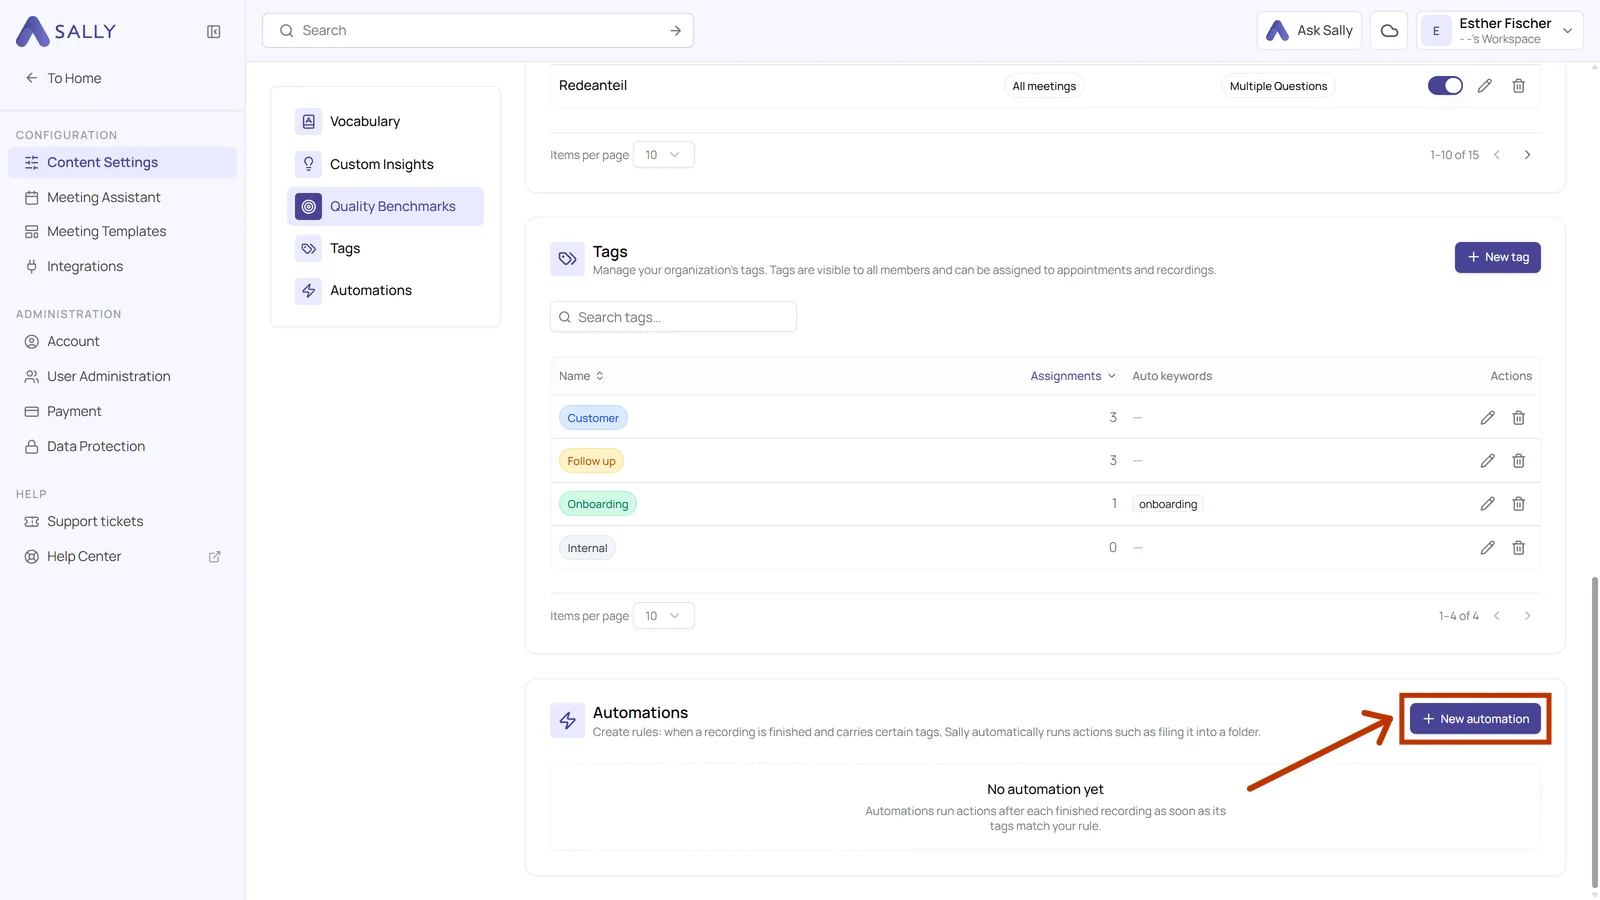
With an automation, Sally does something for you as soon as the summary of a recording is ready. You decide which tags a recording needs for the rule to apply. You find the automations in the content settings, directly below the tags.
- In the Automations section, click New automation at the top right.
-
Give the rule a Name. Applies to offers two choices: Personal covers your own recordings only, Organization-wide covers every recording in the account. Only admins can create an organization-wide rule. The Trigger is fixed at Summary is ready and only tells you when Sally runs the action.
-
Under When, add the tags a recording needs before the rule applies. Two tags in the same box mean a recording needs both, for example Customer together with Follow up.
Add OR group creates a second box. It counts as an alternative: the rule applies as soon as one of the two boxes matches.
-
Under Then, pick the Action, for example Add to folder, and select the target folder. Add action chains more actions to the same rule.
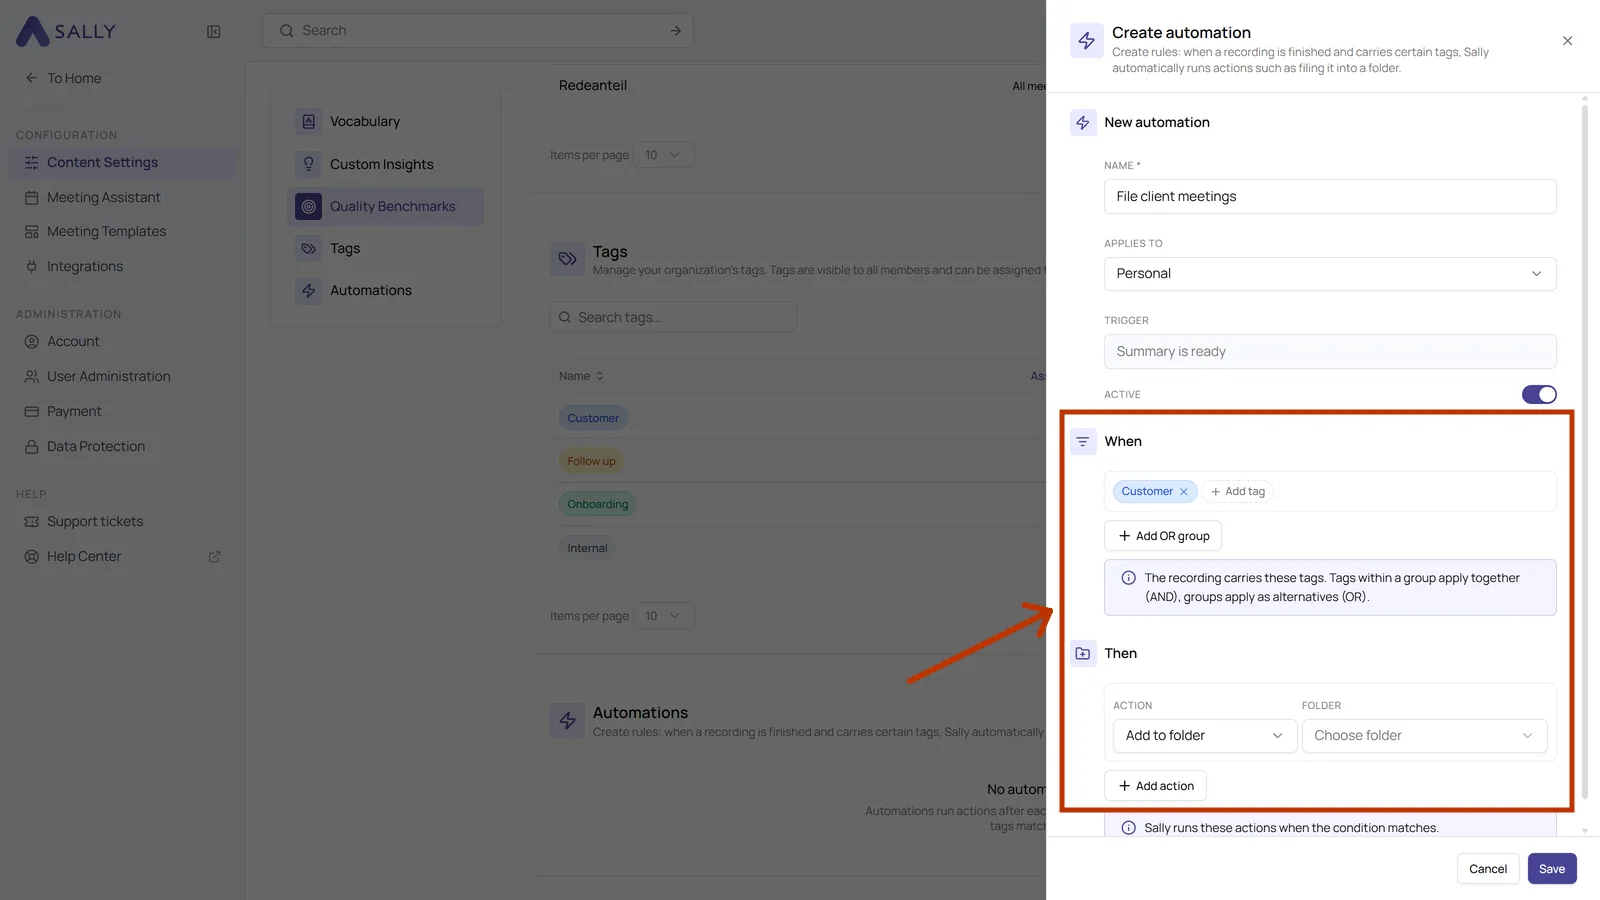
Every client call that needs a follow-up should end up in the folder "Follow-ups".
- When: one box with the tags Customer and Follow up. A recording needs both.
- Then: the action Add to folder with the folder "Follow-ups".
To cover onboardings as well, click Add OR group and put the tag Onboarding into the second box. Then one matching box is enough.
Once the rule is active, your filing stays tidy without further effort. It makes no difference whether you tag a meeting yourself or Sally sets the tag from the keyword in the title. The folders fill up on their own, and you find the recording where you expect it.