How to set up SCIM integration in Sally AI
SCIM (System for Cross-domain Identity Management) lets you automatically connect Sally with your Identity Provider (IdP). This way, users and groups are always kept in sync without manual updates.
Quick navigation
- What is SCIM and why use it with Sally AI?
- How do I set up SCIM in Sally AI?
- Where do I enter SCIM credentials in my IdP?
- Which fields does Sally expect?
- Provider specific pitfalls
- What is the final configuration step in Sally?
- Error messages and what they mean
- What happens when users are deactivated or deleted?
- FAQ: SCIM in Sally
- 9.1. What happens if there are more users in a group than available licenses?
- 9.2. How does license priority work if a user is in multiple groups?
- 9.3. What happens if a user is in no license group at all?
- 9.4. Can I assign single users instead of groups?
- 9.5. Do I need to reconfigure SCIM if new groups are added in my IdP?
- 9.6. How often does the sync run?
- 9.7. Can I disable SCIM once it's active?
- 9.8. Why does a user get a new, empty account at sign-in?
- 9.9. Do I have to create my users again after switching externalId?
- 9.10. We provision through Okta but sign in with Microsoft. What do we have to do?
- 9.11. What happens if I remove someone from a SCIM group?
1. What is SCIM and why use it with Sally AI?
SCIM is an open standard for user and group provisioning. It allows you to automatically transfer account information from your Identity Provider to Sally.
Instead of manually creating, updating, or removing users, SCIM ensures that:
- New employees get access to Sally immediately.
- Existing user details stay up to date.
- Users who leave your company lose access automatically.
By connecting once through SCIM, your IdP becomes the single source of truth. Groups and licenses can still be managed centrally in your IdP, while Sally always reflects the latest state. That means less admin work, fewer mistakes and consistent access for your team.
2. How do I set up SCIM in Sally AI?
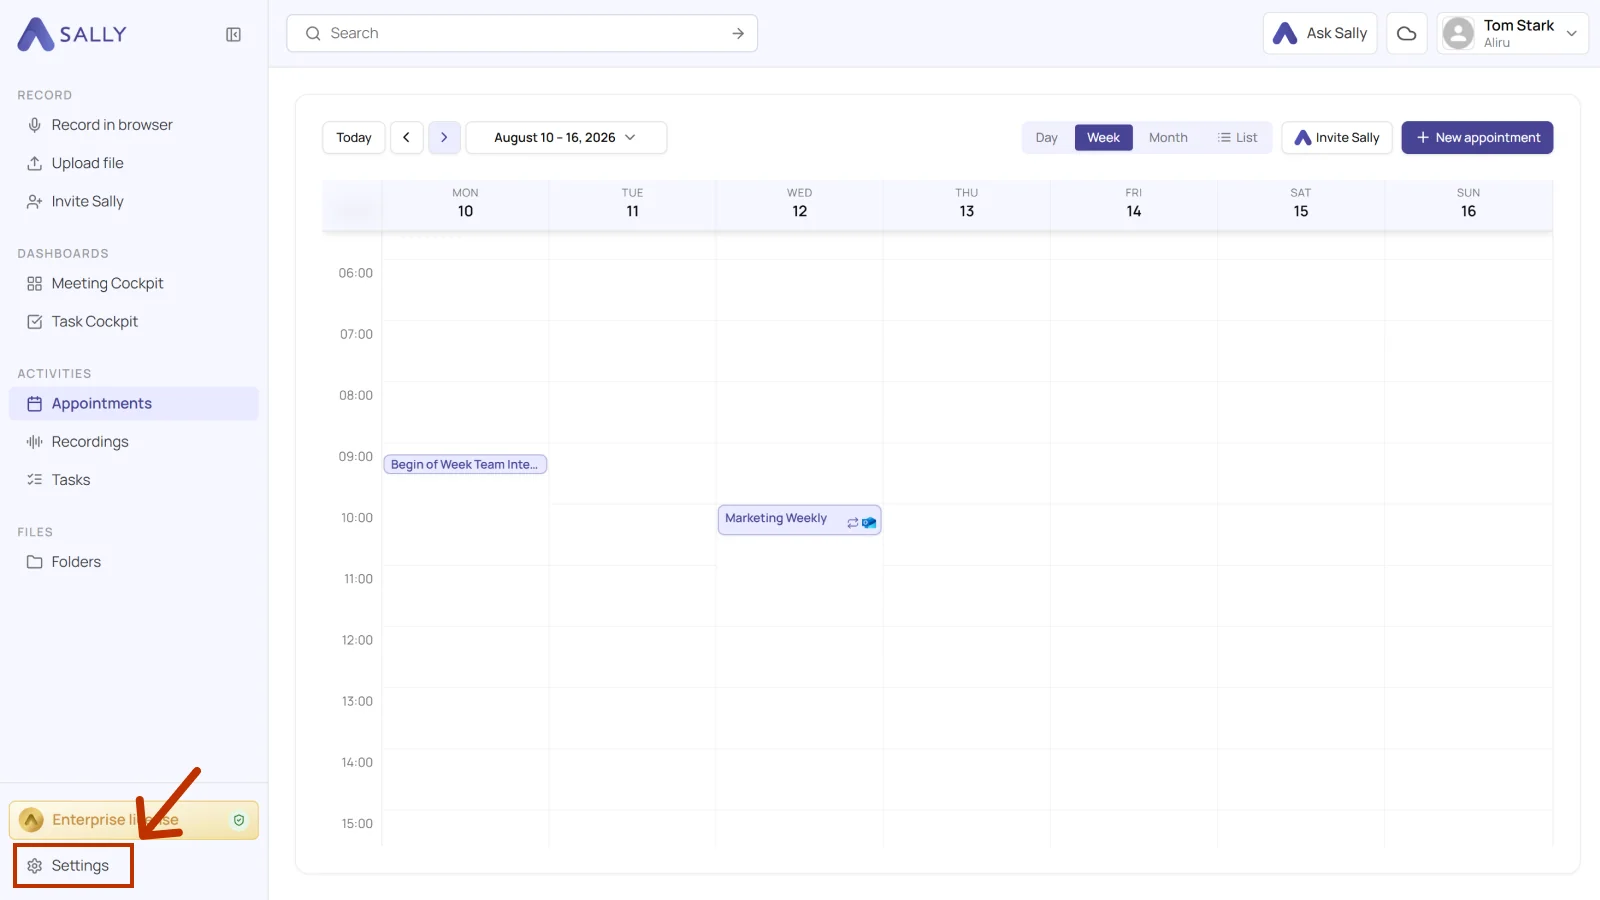
- Open Settings at the bottom of the left sidebar.
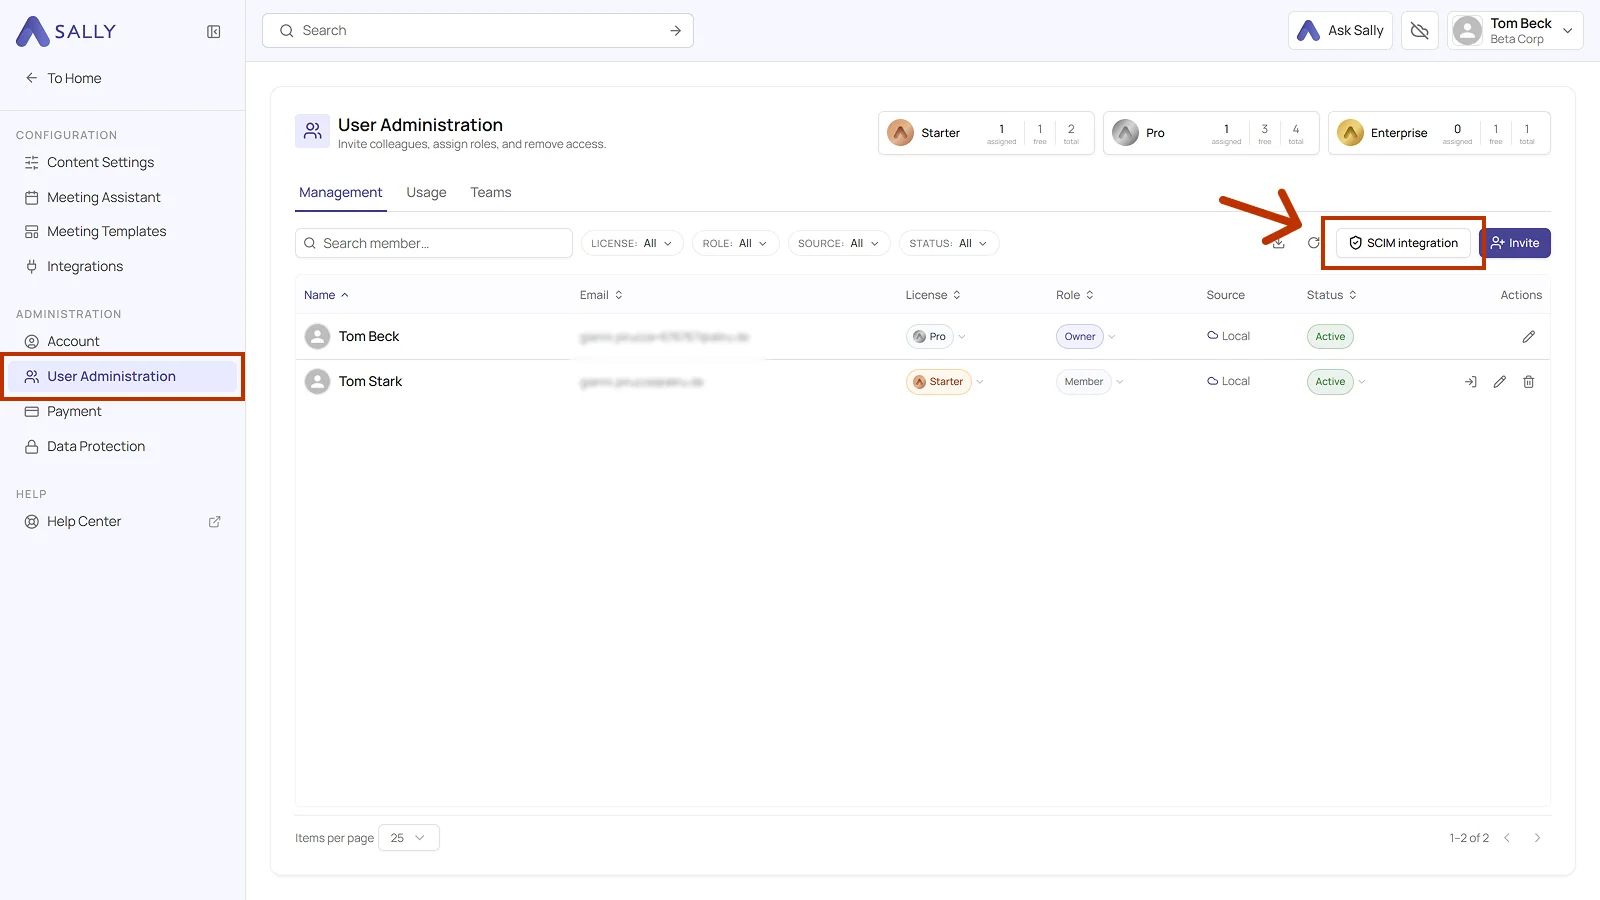
- Under Administration, open User Administration.
- Click SCIM integration above the member list on the right.
- The Connect SCIM integration panel opens on the right. Pick your system under Identity provider and click Set up SCIM, or Cancel to stop.
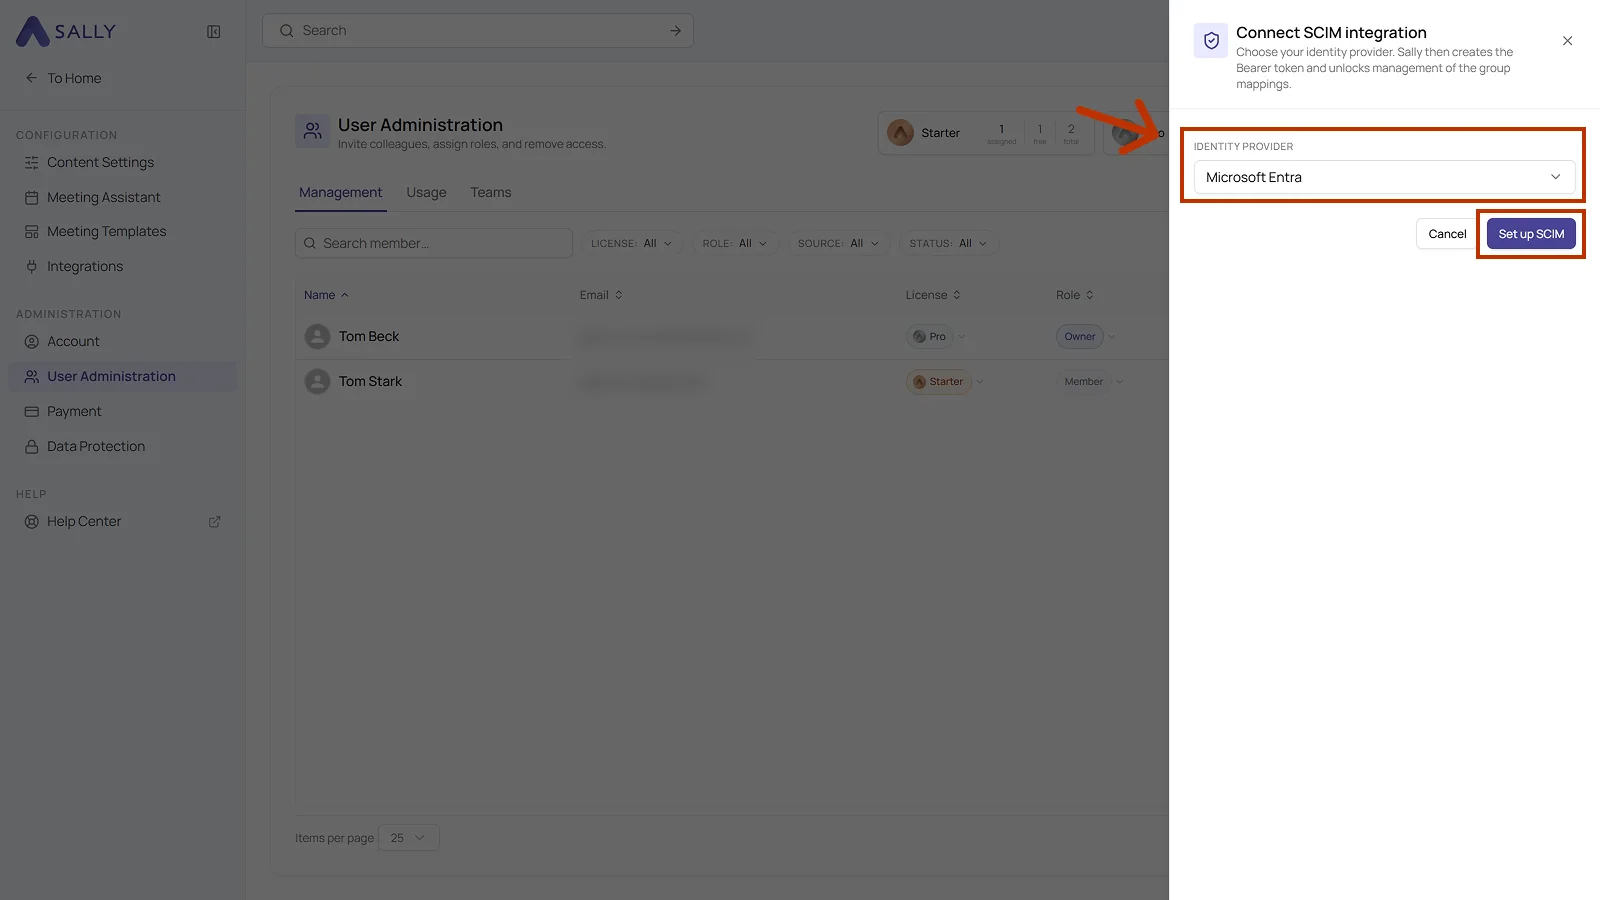
- Microsoft Entra (Azure AD)
- Google Workspace
- Okta
- OneLogin
- PingOne
- Sally creates the credentials and opens SCIM management: Identity provider. Under Credentials you get the SCIM tenant URL and the Bearer token, each with an icon to copy it. Copy both, you need them in your identity provider in the next step.
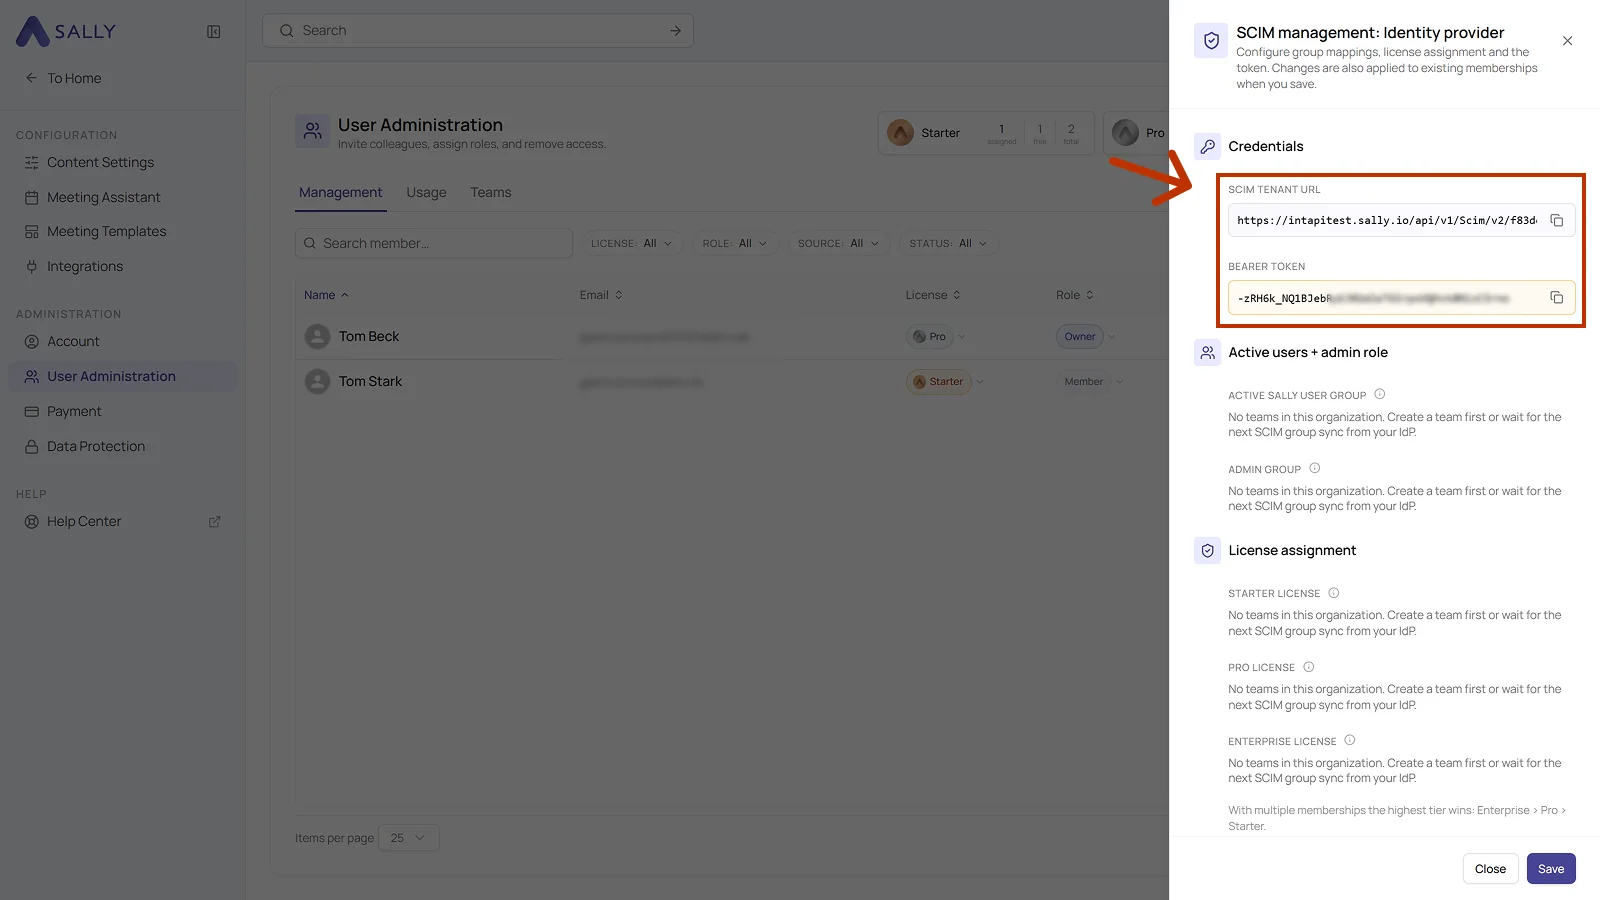
Now it's time to enter these credentials in your Identity Provider.
Jump directly to the instructions for your tool:
3. Where do I enter SCIM credentials in my IdP?
Until this step is done, groups won't appear in Sally, since the IdP hasn't started syncing yet.
3.1 Microsoft Entra (Azure AD)
Follow these steps to connect Sally via SCIM in Microsoft Entra:
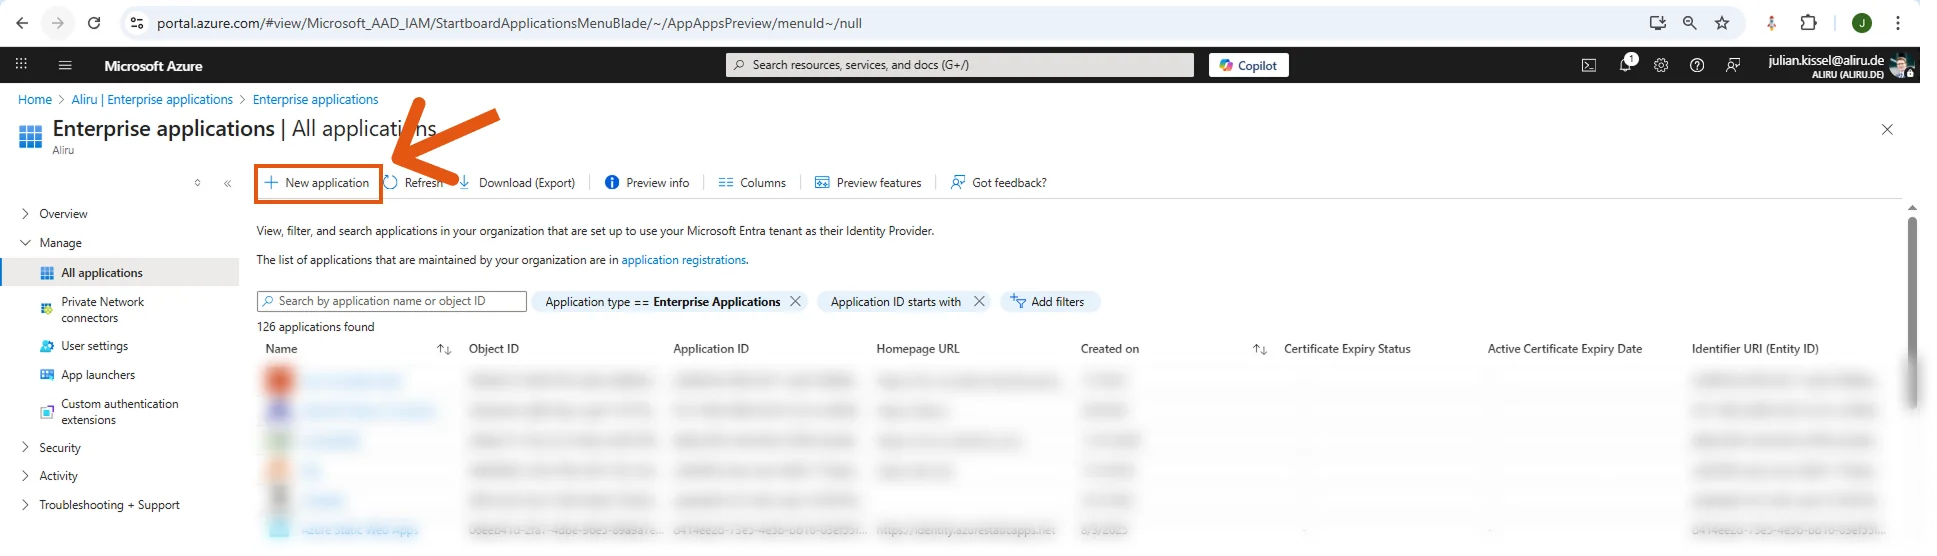
- In the Azure portal, go to "Enterprise Applications" and click on "+ New application".
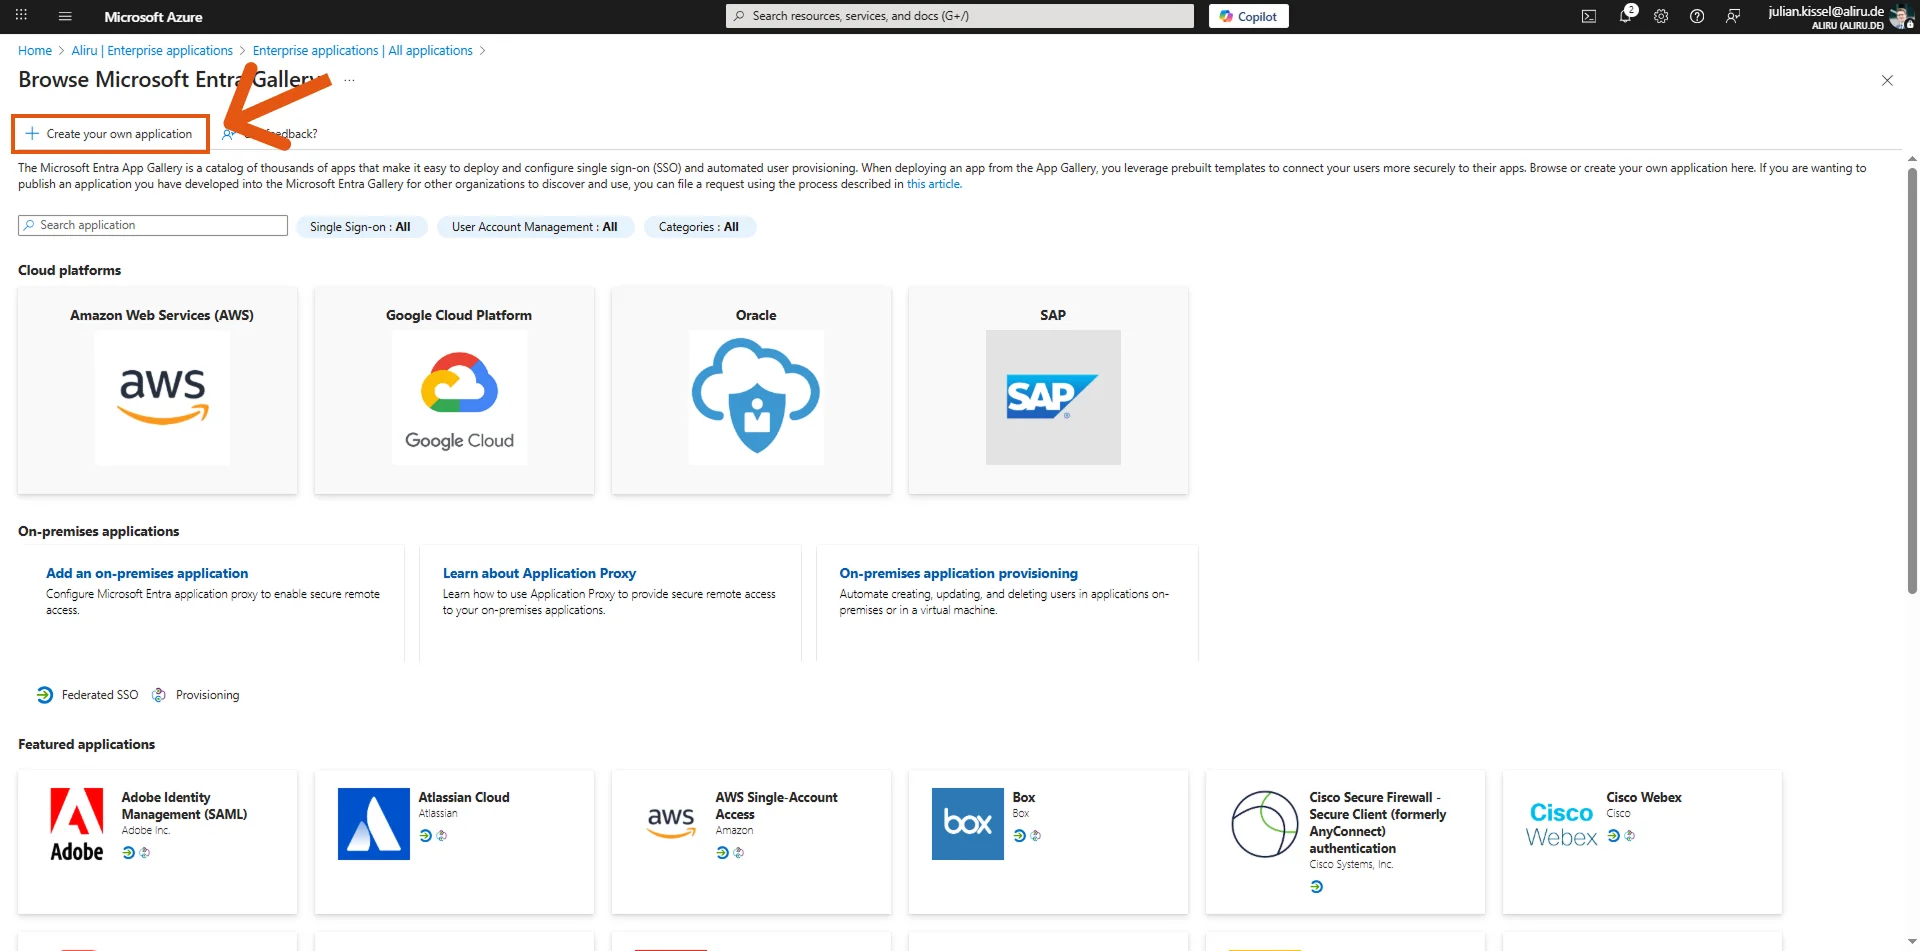
- Select "Create your own application".
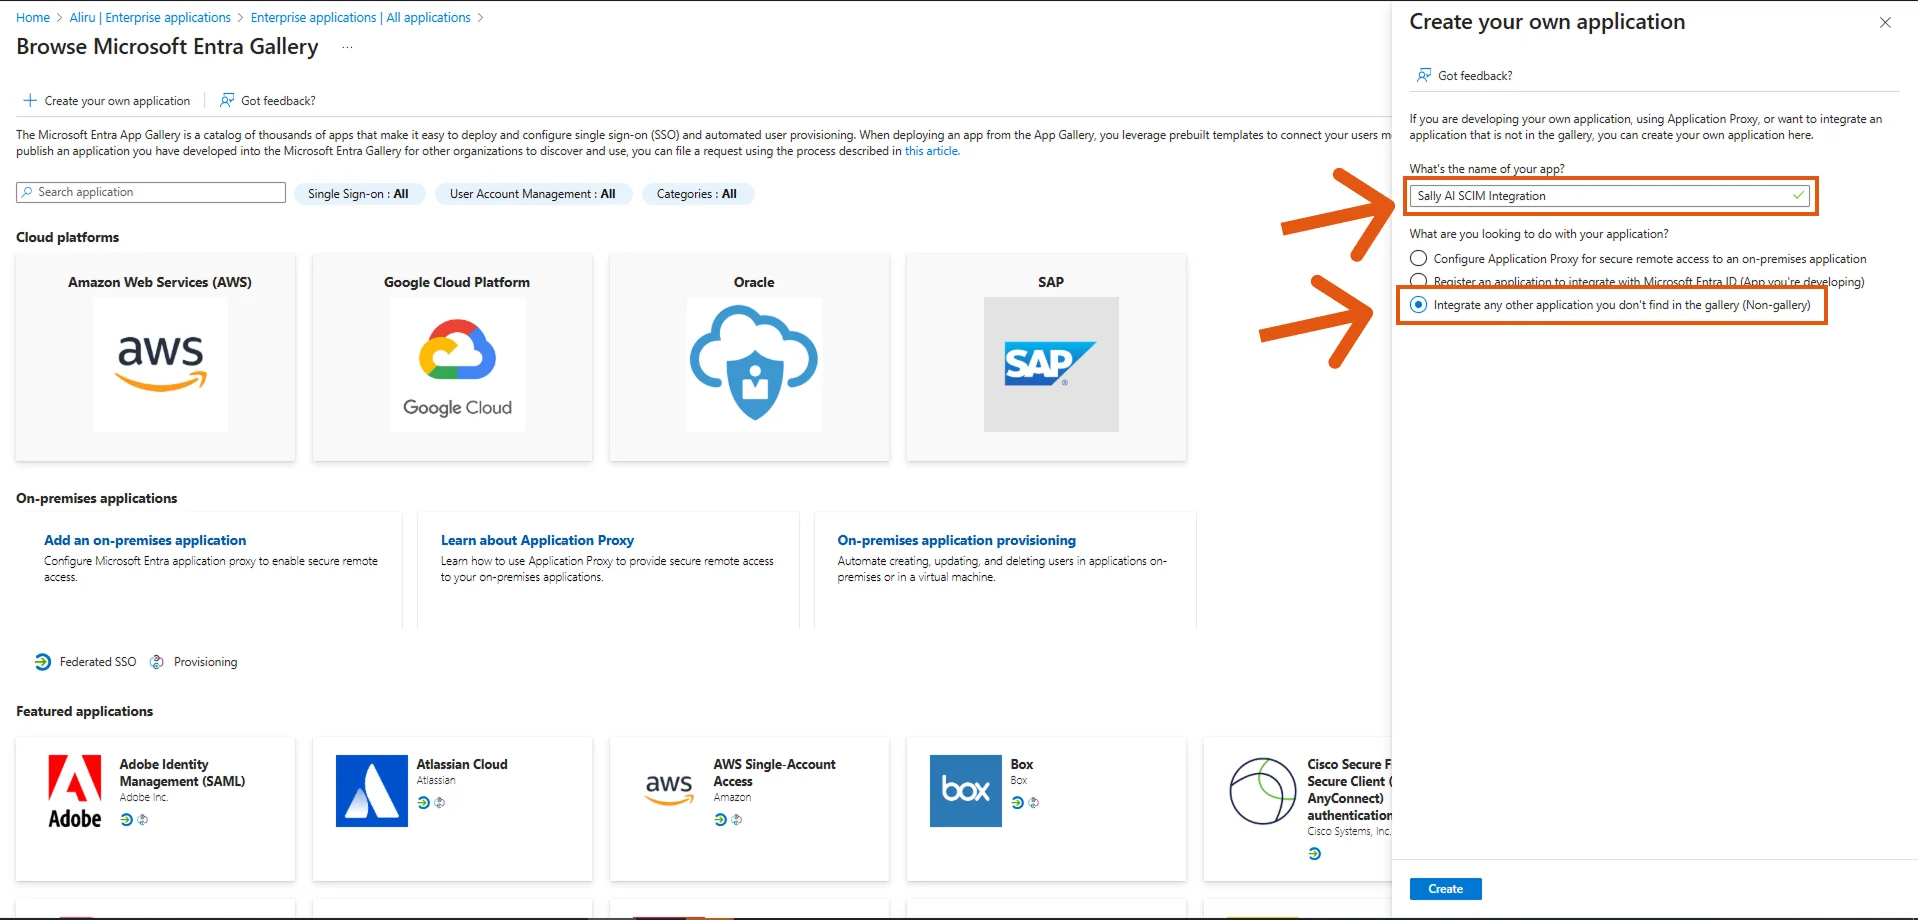
- Give the app a name (e.g., Sally AI SCIM Integration) and choose "Integrate any other application you don't find in the gallery (Non-gallery)". Then click Create.
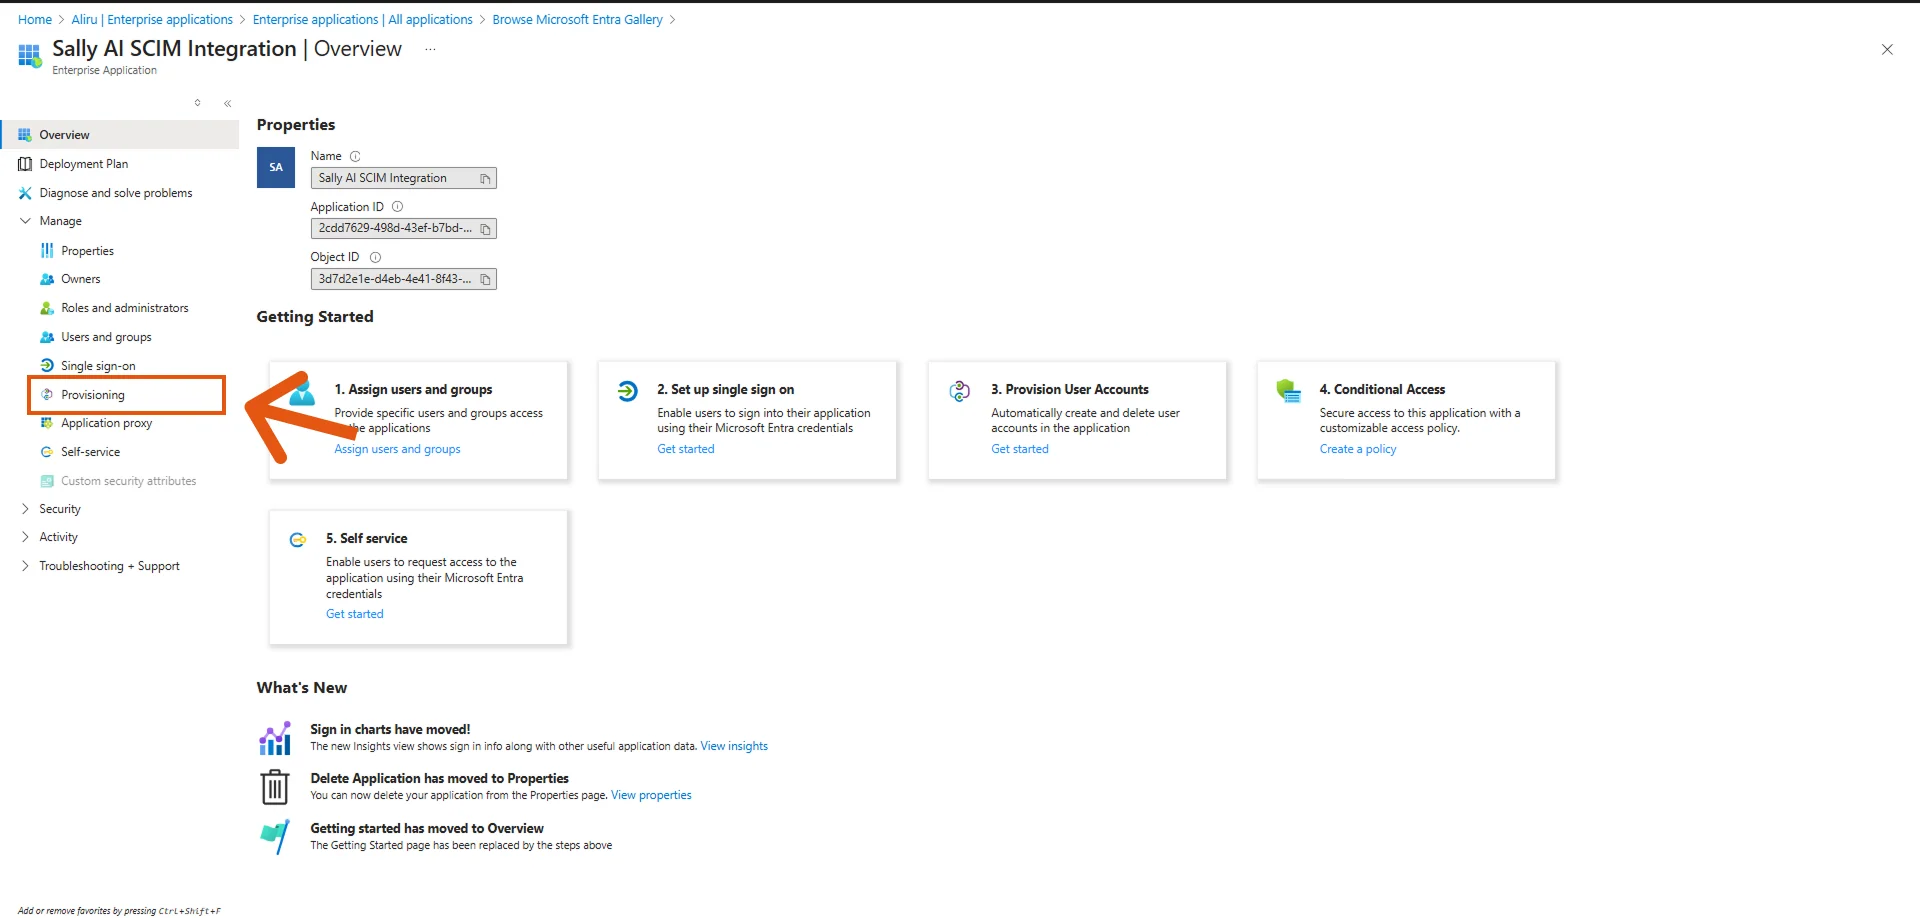
- Once the application is created, open it and go to Provisioning.
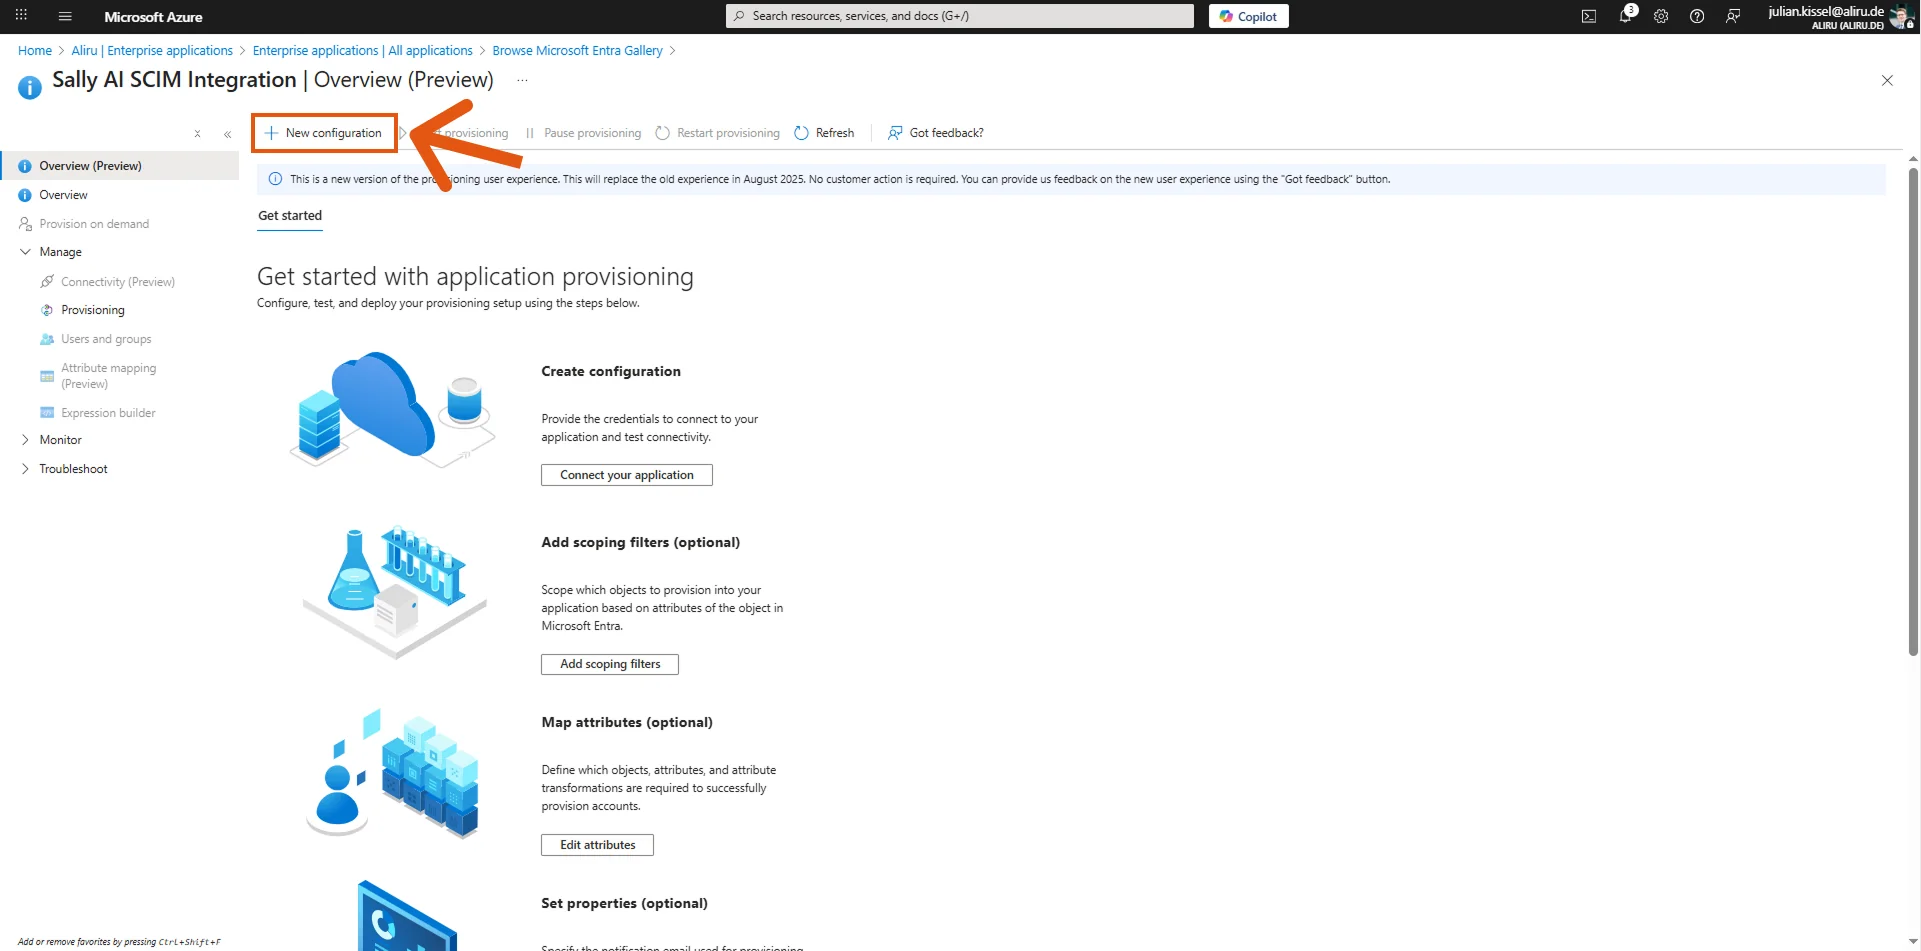
- Click on "+ New configuration".
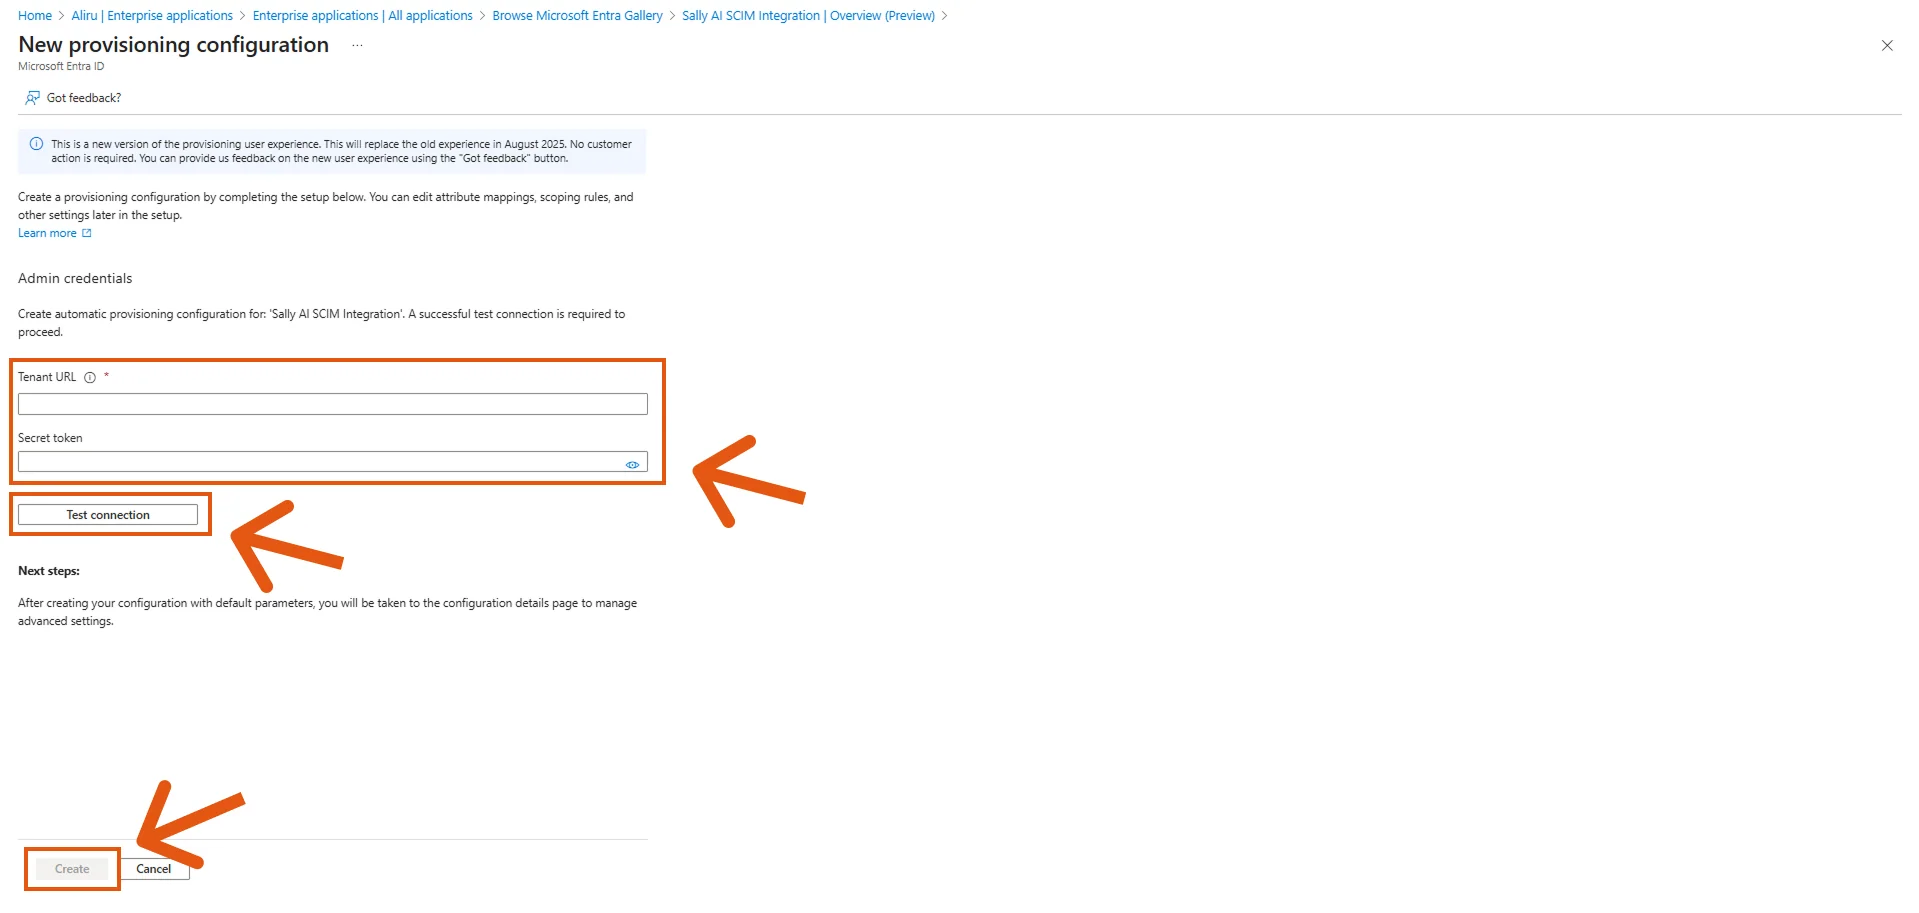
- In the new configuration screen, enter the Tenant URL and Secret Token you copied from Sally. Click "Test connection" and then Create.
-
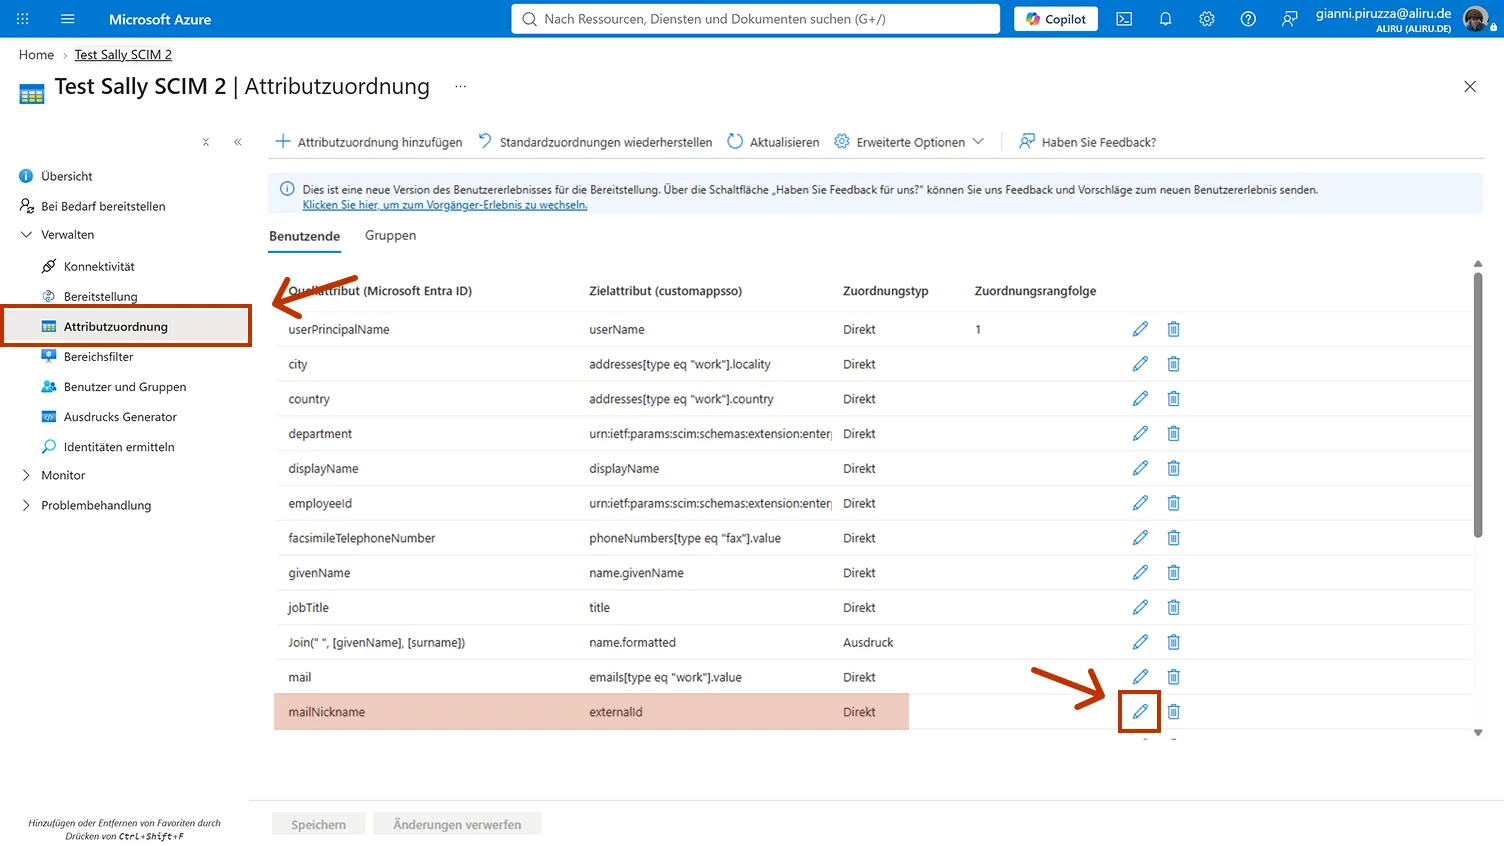
Before you start provisioning, check the attribute mapping. On the left under Manage, open Provisioning, then Attribute mapping, and switch to the Users tab. The list shows every mapping, with the source attribute from Entra on the left and the target attribute in Sally on the right.
-
Find the row whose target attribute is
externalId. By default the source attribute ismailNickname, which does not work for Sally. Click the pencil at the end of that row.
- In Edit attribute mapping, change the Source attribute from
mailNicknametoobjectId. The Mapping type stays Direct.
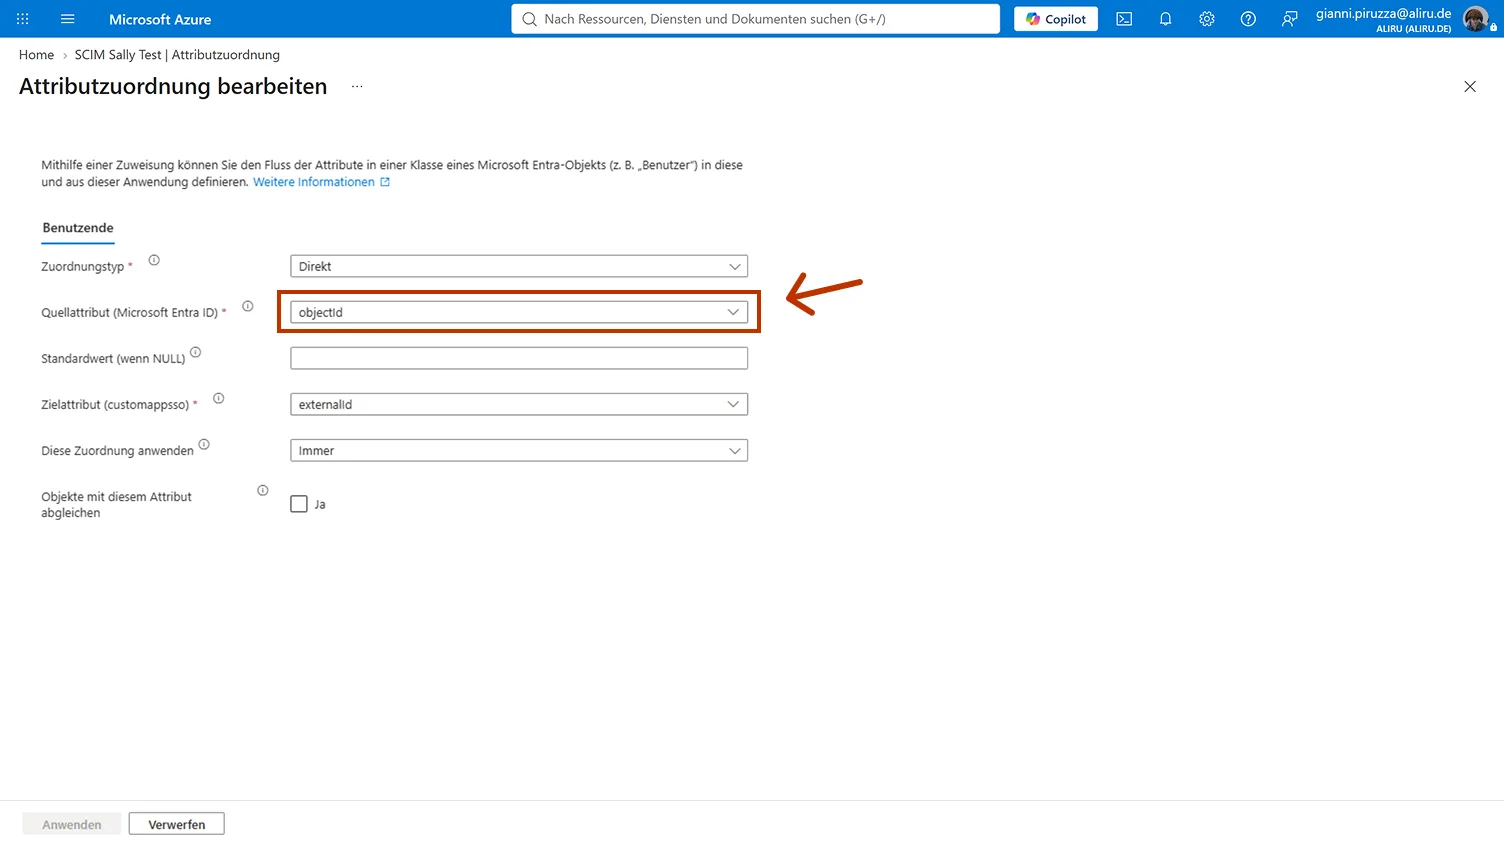
externalId is the immutable identifier Sally uses to recognise a user at sign-in. If the alias mailNickname stays in place, the match never takes effect and provisioned users can end up with a second, empty account at sign-in. There is more on this under Why Sally needs this identifier.
-
Leave Match objects using this attribute switched off.
userNamestays the matching attribute, a second one would break the matching. -
Confirm with OK and click Save above the mapping list.
-
While you are in the list, check the first row as well: the target attribute
userNameshould haveuserPrincipalNameas its source attribute.
A change to the mappings makes Entra run a full sync on its next cycle. All users that were already provisioned get their object ID delivered afterwards, so nobody has to be created again. Depending on your settings the next cycle starts within about 40 minutes. If you want it faster, use Provision on demand for a single user or Restart provisioning for everyone. To confirm the change went through, open an entry in the Provisioning logs in Entra and check the tab with the transferred attributes: externalId should now hold the object ID and no longer the alias.
- Now assign the groups that should be provisioned to Sally to this profile.
Only groups are supported for provisioning to Sally, not single users.
- Finally, start the provisioning by clicking on "Start provisioning".
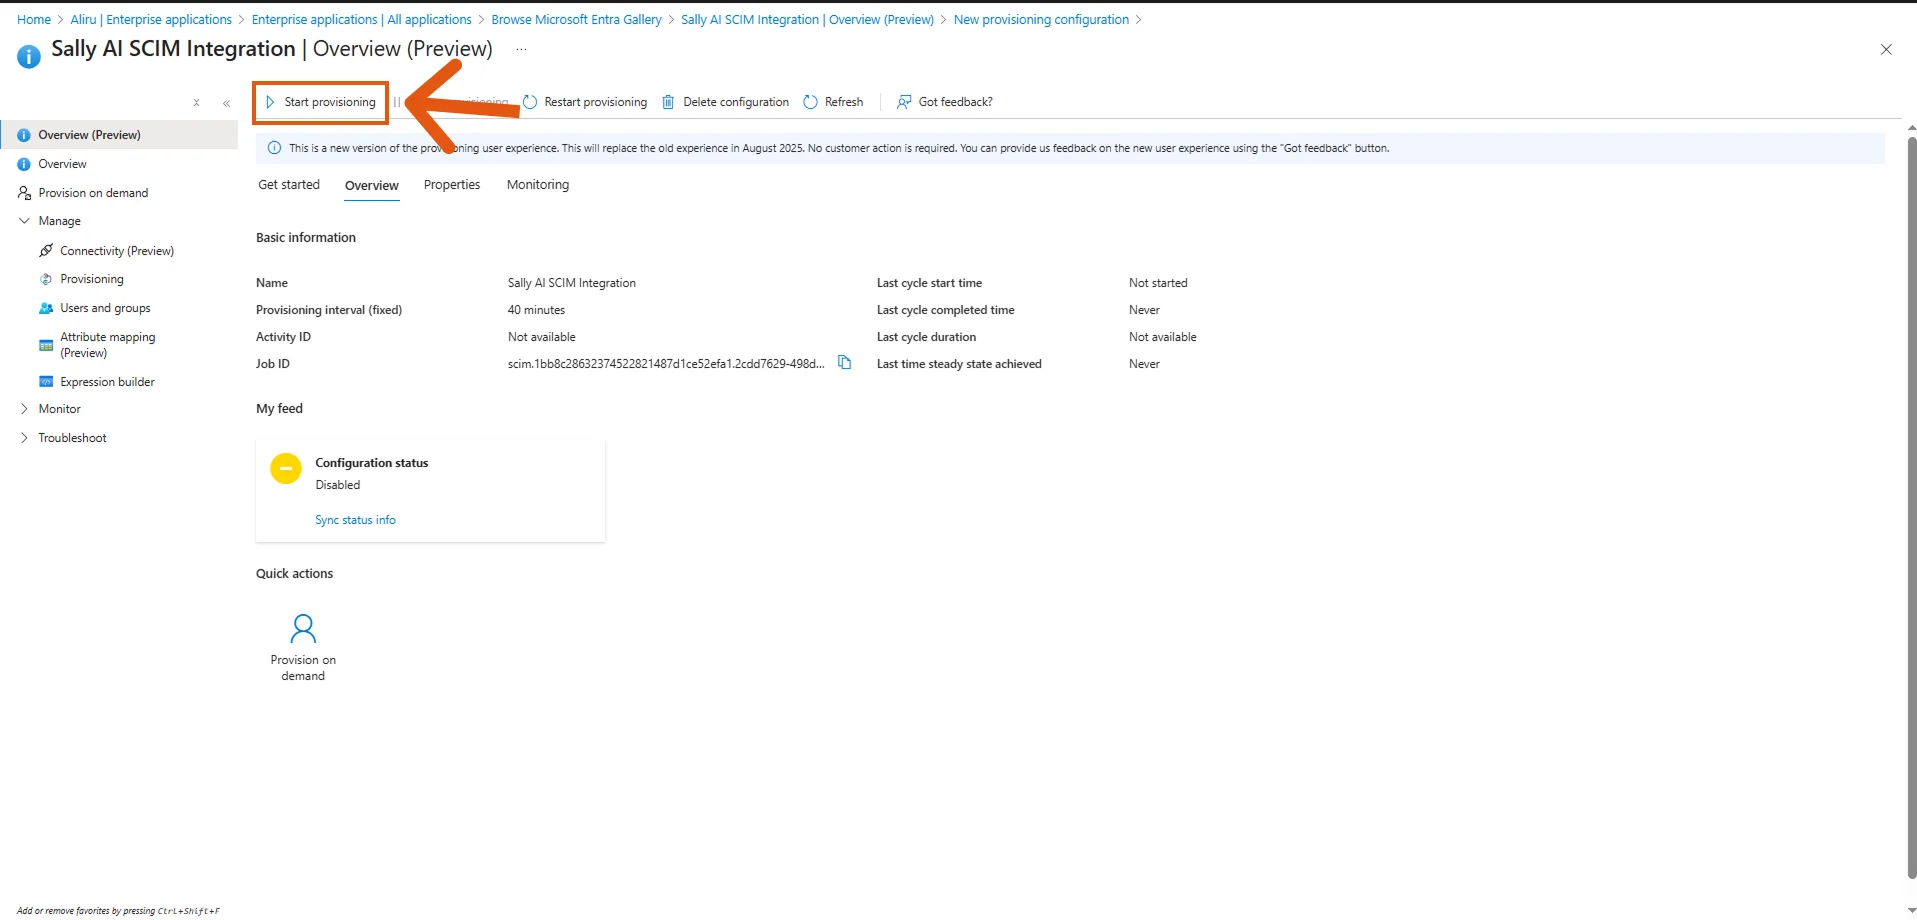
- After provisioning has started, return to Sally and complete the setup by assigning the correct groups and licenses. You can find the detailed instructions in Final step in Sally.
3.2 Google Workspace
- Open Admin Console → Apps → Web and mobile apps.
- Add a new custom SCIM app.
- Enter Tenant URL and Token.
- Assign groups for provisioning.
- After provisioning has started, return to Sally and complete the setup by assigning the correct groups and licenses. You can find the detailed instructions in Final step in Sally.
3.3 Okta
- Go to Applications → select your Sally app.
- Open Provisioning tab.
- Enter Tenant URL and Token.
- Enable provisioning features (create, update, deactivate users).
- After provisioning has started, return to Sally and complete the setup by assigning the correct groups and licenses. You can find the detailed instructions in Final step in Sally.
3.4 OneLogin
- Navigate to Apps → SCIM Provisioning.
- Paste Sally's Tenant URL and Token.
- Map groups and save.
- After provisioning has started, return to Sally and complete the setup by assigning the correct groups and licenses. You can find the detailed instructions in Final step in Sally.
3.5 PingOne
- Go to Connections → Provisioning.
- Add a new SCIM connection.
- Provide Tenant URL and Token.
- Test and activate.
- After provisioning has started, return to Sally and complete the setup by assigning the correct groups and licenses. You can find the detailed instructions in Final step in Sally.
4. Which fields does Sally expect?
The instructions above show where you create the connection. For provisioning to actually run through afterwards, the attribute mapping in your identity provider has to match the fields Sally knows. This is where most errors come from: if a required field points to a source that is empty on some accounts, provisioning fails for exactly those accounts, and nobody knows where to look.
4.1 Required fields when a user is created
The two fields that matter
Sally needs two pieces of information from your identity provider, each in a specific form. If one of them is wrong, provisioning appears to run through, but the user is either not created at all or gets a second, empty account at their first sign-in instead of the account that was already provisioned.
1. userName has to be an email address.
Sally takes the value of userName one to one as the user's email address and stores it lowercased. The recommended source is the user principal name (userPrincipalName), because it is filled on every account.
If your provider sends something else here, for example a GUID or a user name without a domain, Sally can neither create the user nor find them again on the next lookup. The lookup is the quiet part: Sally correctly answers "no match" and nothing stands out in the log. The attempt to create the user does fail visibly, with userName must be a valid email address. in your provider's provisioning log, see Error messages.
2. externalId has to be the immutable identifier of the user.
That is the technical identifier your identity provider assigns to a user permanently. It changes neither when the name changes nor when the address changes. In Microsoft Entra ID it is the object ID (objectId), in the form f47ac10b-58cc-4372-a567-0e02b2c3d479.
Your provider sends this same identifier when a user signs in to Sally. Sally compares the two and identifies the user beyond doubt, no matter which address they type into the sign-in window and no matter whether their address has changed in the meantime.
Entra does not use the object ID here by default, it uses mailNickname. You have to switch this default to objectId once, otherwise the match never takes effect. The steps are part of the walkthrough for Microsoft Entra (Azure AD).
What Sally expects in externalId per provider
| Provider | Set externalId to | Example value |
|---|---|---|
| Microsoft Entra ID | objectId, the object ID of the user | f47ac10b-58cc-4372-a567-0e02b2c3d479 |
| Google Workspace | the immutable user ID from Google | 104928374651029384756 |
| Okta, OneLogin, PingOne | the immutable user ID of that provider | 00u1a2b3c4d5E6f7G8h9 |
The match through the identifier works when the sign-in to Sally runs through the same provider that does the provisioning. If you provision through Okta, for example, but your users sign in with their Microsoft account, then these are two different identifiers. Sally falls back to comparing the email address automatically, you don't have to do anything for that.
All fields Sally reads when a user is created
| SCIM field | becomes in Sally | Required |
|---|---|---|
userName | email address, lowercased | yes, has to contain an @ |
externalId | immutable identifier on the membership | strongly recommended, see above |
name.givenName | first name | no |
name.familyName | last name | no |
active | access blocked yes or no | no, the default is active |
userName has to be mapped to a field that is filled on every account. The usual choice is the user principal name, in other words the primary email address. If the mapping points to a field like mail, every account without a mailbox fails, for example shared and resource accounts.
4.2 Why Sally needs this identifier
Without the identifier, the email address is all Sally has to recognize who is signing in. That works in most cases, but it has three gaps:
- A user signs in with a different address than the one provisioned through SCIM, for example with an alias or with their old address after a rename.
- An address is handed to a different user later on.
- Your provider sends an address at sign-in that is not stored in the directory in that form.
In all of these cases Sally does not find the provisioned account and creates a new, empty one instead. That user then sees neither their license nor their role nor their recordings.
With the identifier this does not happen. Sally compares the identifier from the sign-in with the externalId from provisioning and lands on the right account directly. The address is then only the fallback.
If the externalId is recognizably not an immutable identifier, an alias or an address for example, Sally does not use it for the sign-in and keeps working through the address comparison. Nothing breaks, you only lose the extra certainty.
4.3 Fields Sally accepts and ignores
Sally accepts the following fields but deliberately does not store them:
phoneNumbers- all fields of the enterprise extension, for example
department,managerandemployeeNumber
There is no error message for these, the values are simply not stored because Sally has no fields for them. So don't go looking for data that was never meant to arrive.
5. Provider specific pitfalls
5.1 Microsoft Entra (Azure AD)
externalIdpoints tomailNickname. That is Entra's default and the most common reason why a user gets a second account at sign-in although they were provisioned through SCIM long ago.mailNicknameis the alias in front of the @ and changes along with a rename. Switch the source attribute toobjectId, see steps 7 to 12 under Microsoft Entra (Azure AD).userNameis mapped to a technical identifier. IfuserNameholds a GUID or a short code instead of an email address, Sally cannot create the user and never finds them again on later lookups. In your provider's log the lookup does not look like an error, because Sally correctly answers "no match".- The mapping for
userNamehas to point to the user principal name. If it points tomail, every account without a mailbox fails. - Entra additionally sends the schema
urn:ietf:params:scim:schemas:extension:enterprise:2.0:User. That is normal, Sally accepts it and ignores it. - The scope is usually set to "sync only assigned users and groups". A group that is mapped but not assigned to the enterprise application is not transferred.
- After a correction, the change only takes effect on the next run, so after roughly 40 minutes. Objects that keep failing go into quarantine, and then only a restart of the provisioning helps.
5.2 Google Workspace
In your mapping, check that userName points to the primary email address and that this field is filled on all provisioned accounts.
5.3 Okta
In your mapping, check that userName points to the primary email address and that this field is filled on all provisioned accounts.
5.4 OneLogin
In your mapping, check that userName points to the primary email address and that this field is filled on all provisioned accounts.
5.5 PingOne
In your mapping, check that userName points to the primary email address and that this field is filled on all provisioned accounts.
6. What is the final configuration step in Sally?
After you have added the Tenant URL and Token to your Identity Provider and started the provisioning, the connection between your IdP and Sally is live.
What is left is to finish the setup in Sally and say which groups and licenses count. Users coming from your IdP then get the right role and license on their own.
Sally lets you assign multiple IdP groups per role and per license tier. You don't have to merge everything into one big umbrella group: you can map several groups from your IdP to the same category and even combine categories (for example, the same group can activate users as standard users and grant them a Pro license).
Follow these steps:
- Open User Administration and click Manage SCIM in the top right corner. That is what the button is called once SCIM is set up.
- Under Active users + admin role, map your IdP groups to Sally roles:
- Active Sally user group → Select one or more groups whose members should get access as standard users.
- Admin group → Select one or more groups whose members should have administrator rights in Sally.
- Under License assignment, link IdP groups to the Starter license, the Pro license, or the Enterprise license. You can pick multiple groups per license tier, so membership in any of them controls which license users receive in Sally.
If the selected groups combined contain more users than the number of available licenses, Sally will automatically purchase additional licenses.
These licenses are billed immediately, so make sure your group sizes align with your subscription plan.
The other way round also matters: a user who is in no license group is still created, but receives no license and cannot record. So make sure every group that gets access is also mapped to a license tier.
- Scroll further down the panel to the Behavior section. Send welcome email on creation decides whether Sally sends newly provisioned users a welcome email.
- SCIM sync active lets you pause the connection to your identity provider without resetting the token.
- Click Save to apply the configuration. As the note at the top of the panel says, saving also applies the changes to existing memberships.
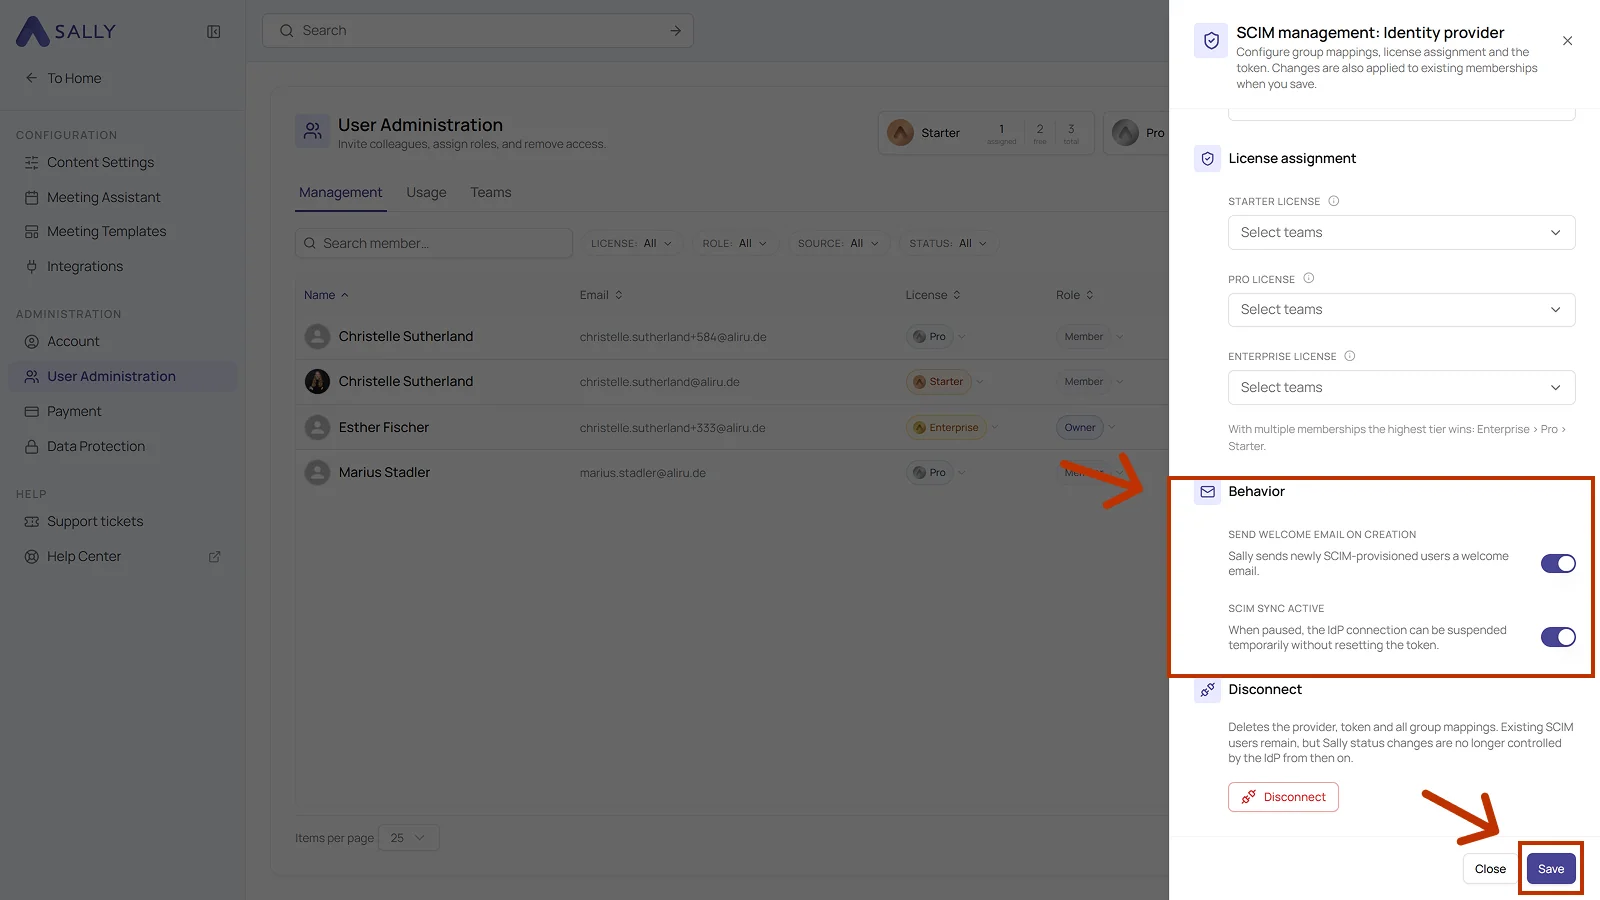
As long as no groups have arrived from your identity provider, every field reads: "No teams in this organization. Create a team first or wait for the next SCIM group sync from your IdP."
- After saving, all members provisioned via SCIM will appear in your user list in Sally.
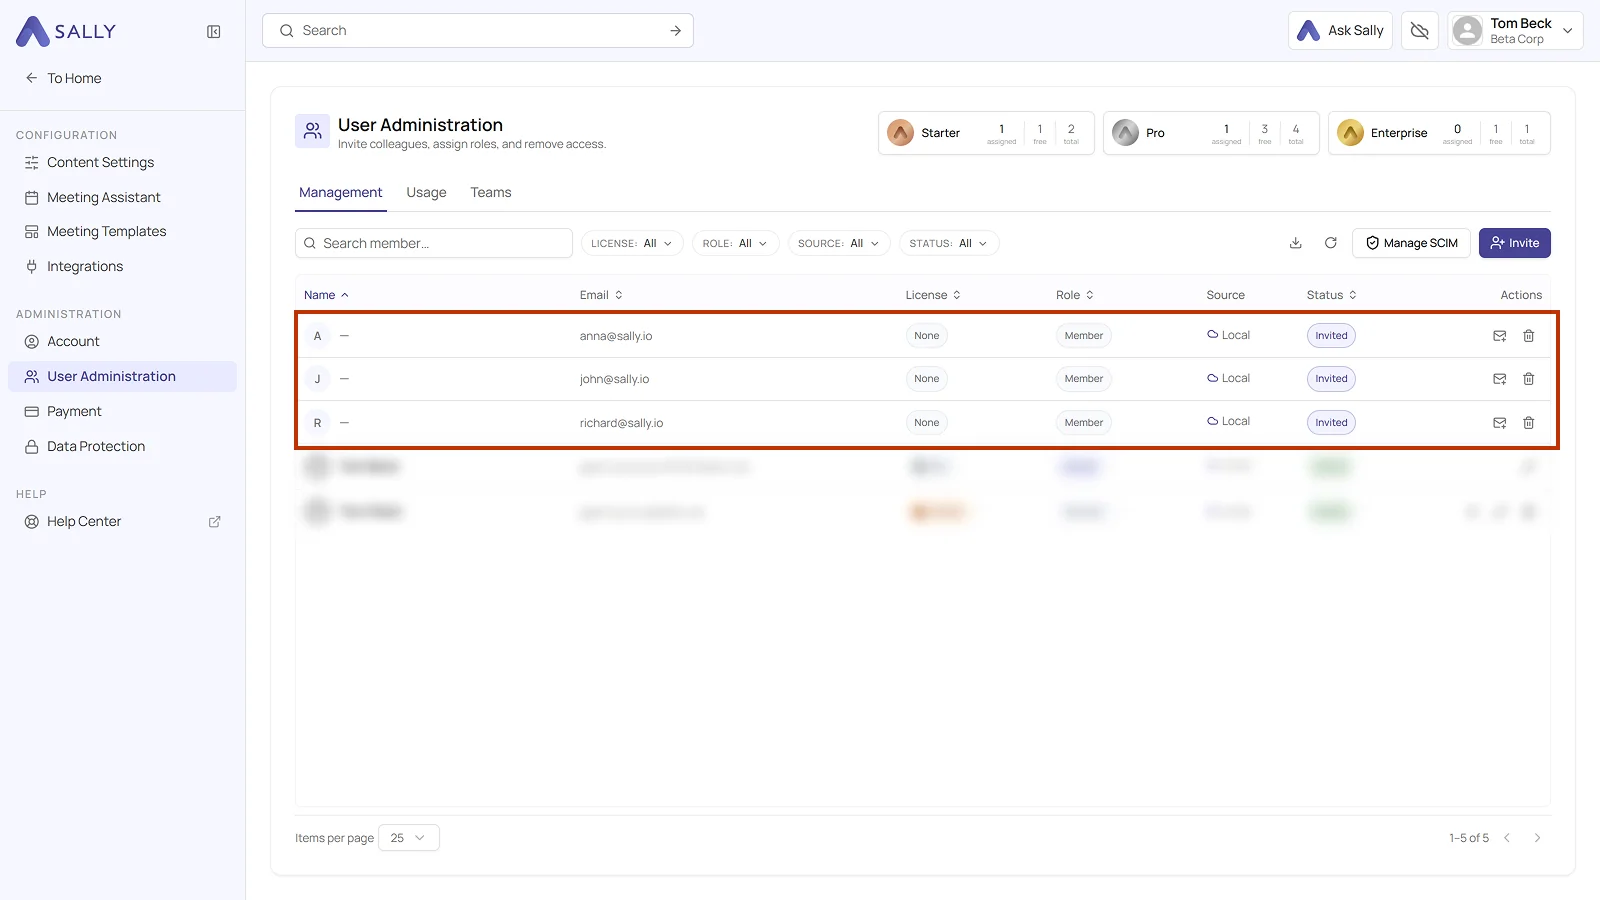
The new people show up without a name at first, with Invited in the Status column and None under License. Name and license fill in once someone accepts the invitation.
Because Sally supports multiple groups per category, you don't need one oversized group for the whole company. A few patterns that work well in practice:
- Group by department or team: Keep separate IdP groups for Sales, Marketing, Support, etc. Assign all of them as Active Sally user group and, if they all use the same license, also as the matching license group. Adding a new team later is just a new group, not a new configuration.
- Use a dedicated admin group: Keep Sally admins in a small, focused group (e.g. Sally Admins or IT Leads). Members of that group get admin rights on top of their regular user role.
- Model license tiers as explicit groups: Create IdP groups like Sally Starter, Sally Pro, Sally Enterprise. Upgrading a user is then a single membership change in your IdP, with no changes needed in Sally.
- Combine both approaches: Use departmental groups to control who gets access, and a smaller tier group (e.g. Sally Pro) on top to upgrade selected power users to a higher license.
The more granular your groups, the easier it is to change access or licenses later, entirely from within your IdP.
7. Error messages and what they mean
If provisioning fails, your identity provider shows Sally's response in its provisioning log. These are the messages Sally returns and what is behind each one.
| Message | Meaning | What to do |
|---|---|---|
userName is a required field. | the field is missing from the request | check the mapping, the source has to be filled on every account |
userName must be a valid email address. | value without an @ | the mapping points to a name field instead of the address |
displayName is a required field. | group without a name | check the group mapping |
User … not in directory. | the user does not belong to this organization | usually an outdated token |
DirectoryId in URL does not match the token. | address and token belong to different organizations | copy both again, together |
8. What happens when users are deactivated or deleted?
8.1 Deactivating
If your directory sets a user to inactive, their access to this organization is blocked. The account and its recordings are kept. Set the user back to active and access returns immediately.
8.2 Removing someone from a SCIM group
Sally withdraws access. The person is blocked and loses their license, so they can no longer sign in, and the license seat is free for someone else right away.
Their content stays: recordings, summaries and tasks belong to the company account, not to the individual person. Nothing is deleted.
If you add the person back to the group later, they get access and license back automatically on the next sync. You don't have to fill anything in again.
The same applies if you remove the person from the Sally application in your identity provider entirely, or if you delete the group there.
Who this does not affect
- Members you created in Sally by hand. The rule applies exclusively to members who came in through SCIM. Anyone who never came through SCIM stays untouched and is still managed by your Sally administrators.
- The owner of the company account. The owner is never locked out. Otherwise a change in your identity provider could lock you out of your own account.
8.3 Keeping someone in Sally anyway
Change what you need on that person by hand: status, role or license in User Administration. As soon as you do that, Sally keeps them as a local member permanently. The directory does not touch them afterwards, so your setting stays and is not overwritten on the next sync. In the Source column they are listed as Local from then on.
The other way round it is locked: as long as someone is in a SCIM group, role, license and status come from your directory, and that is where you change them. A manual change in Sally would otherwise be gone again by the next sync.
If the person comes back into a group in the directory later, SCIM takes them over again.
8.4 Deleting a person along with their data
This is deliberately a separate, manual step and never happens automatically. User Administration has Remove permanently for it. If the person is not a member of any other Sally account afterwards, their user account is deleted irrevocably. This cannot be undone, and your directory will create them as a new user on its next run.
8.5 Which roles the directory can assign
An owner is never managed through the directory. Sally only assigns administrator and member through it. That way an account always keeps someone who cannot be locked out by a change in an external system.
9. FAQ: SCIM in Sally
9.1 What happens if there are more users in a group than available licenses?
If the groups assigned to a license tier contain, in total, more users than you currently have licenses for, Sally will automatically purchase additional licenses.
These licenses are billed immediately to ensure all users get access.
9.2 How does license priority work if a user is in multiple groups?
When a user belongs to multiple SCIM license groups, Sally will always assign the lowest license tier. For example: if a user is in both the Starter group and the Pro group, the user will only receive a Starter license.
9.3 What happens if a user is in no license group at all?
A user who is in none of the license groups is still created in Sally and can sign in, but receives no license. Without a license they cannot record.
So check that every group you assign as an active Sally user group is also mapped to a license tier.
9.4 Can I assign single users instead of groups?
No. SCIM provisioning in Sally works exclusively with groups from your Identity Provider.
This ensures consistency and avoids manual exceptions.
9.5 Do I need to reconfigure SCIM if new groups are added in my IdP?
No. As long as SCIM is active, any new groups created in your Identity Provider can be added directly in Sally under Active users + admin role or License assignment without restarting the setup. You can map as many groups as you need per category, so new teams or license tiers only require picking them in the multi-select.
9.6 How often does the sync run?
Provisioning runs automatically in cycles (based on your IdP's schedule). In Microsoft Entra, for example, provisioning typically runs every 40 minutes.
Changes in your IdP (like adding or removing users) will appear in Sally after the next sync.
9.7 Can I disable SCIM once it's active?
Yes, and there are two ways to do it, both in the SCIM management panel:
- Switch off SCIM sync active in the Behavior section. That pauses the connection while the token stays in place.
- Use Disconnect at the bottom of the panel. That deletes the provider, the token, and all group mappings.
Already provisioned users remain in Sally in both cases until you remove them manually. After disconnecting, your identity provider no longer controls status changes in Sally. What happens to individual users on deactivation and deletion is covered in Deactivating and deleting.
9.8 Why does a user get a new, empty account at sign-in?
Most likely because externalId does not hold the immutable identifier of the user, or because they sign in with a different address than the one that was transferred. Switch externalId to the object ID as described under Microsoft Entra (Azure AD) and let provisioning run once. If the second account already exists, get in touch with us and we will move the sign-in over to the right account.
9.9 Do I have to create my users again after switching externalId?
No. A change to the mappings makes Entra run a full sync automatically, and all existing users get the identifier delivered afterwards. With other providers you may have to start a full sync by hand once.
9.10 We provision through Okta but sign in with Microsoft. What do we have to do?
Nothing. The two identifiers are different in that case, Sally detects this and works through the comparison of the email address. Do pay extra attention that the address in userName is the same one your users sign in with.
9.11 What happens if I remove someone from a SCIM group?
Sally blocks their access and frees the license seat, but keeps all content. Adding them back to the group restores access and license on the next sync. The details, including the exceptions and how to keep someone as a local member, are in Deactivating and deleting.