How to Connect Bitrix24 CRM with Sally AI
Connect Sally AI with Bitrix24 to turn meeting insights into real work – directly on the right Lead, Deal, Contact, or Company. With the Sally Bitrix24 integration you can create tasks, add comments to existing tasks, and attach notes to CRM records with one click, avoid double entry, and keep your CRM up to date.
Quick Navigation
1. How to connect Bitrix24 with Sally AI
To enable the Sally Bitrix24 integration, first install the Sally app in your Bitrix24 portal, then finalize the connection in your Sally account.
-
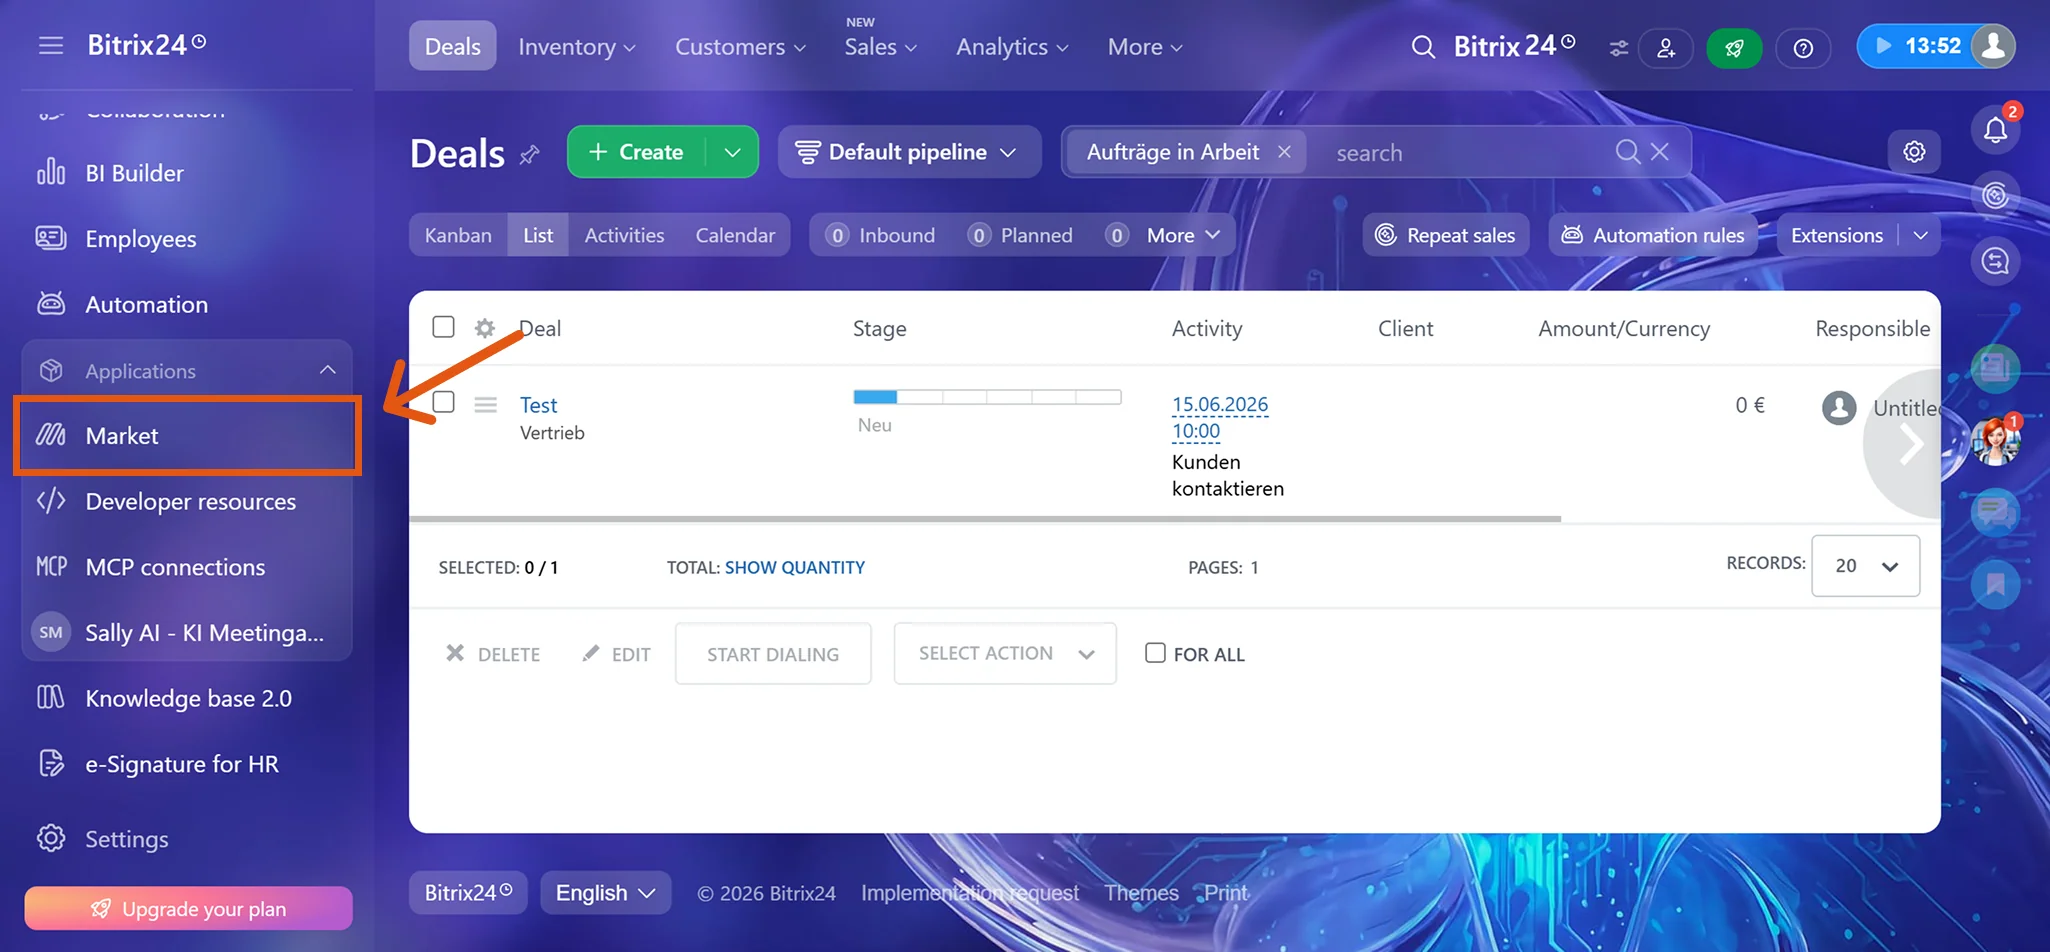
Open your Bitrix24 portal and go to Applications → Market in the left sidebar.
Figure 1: Open the Bitrix24 Market -
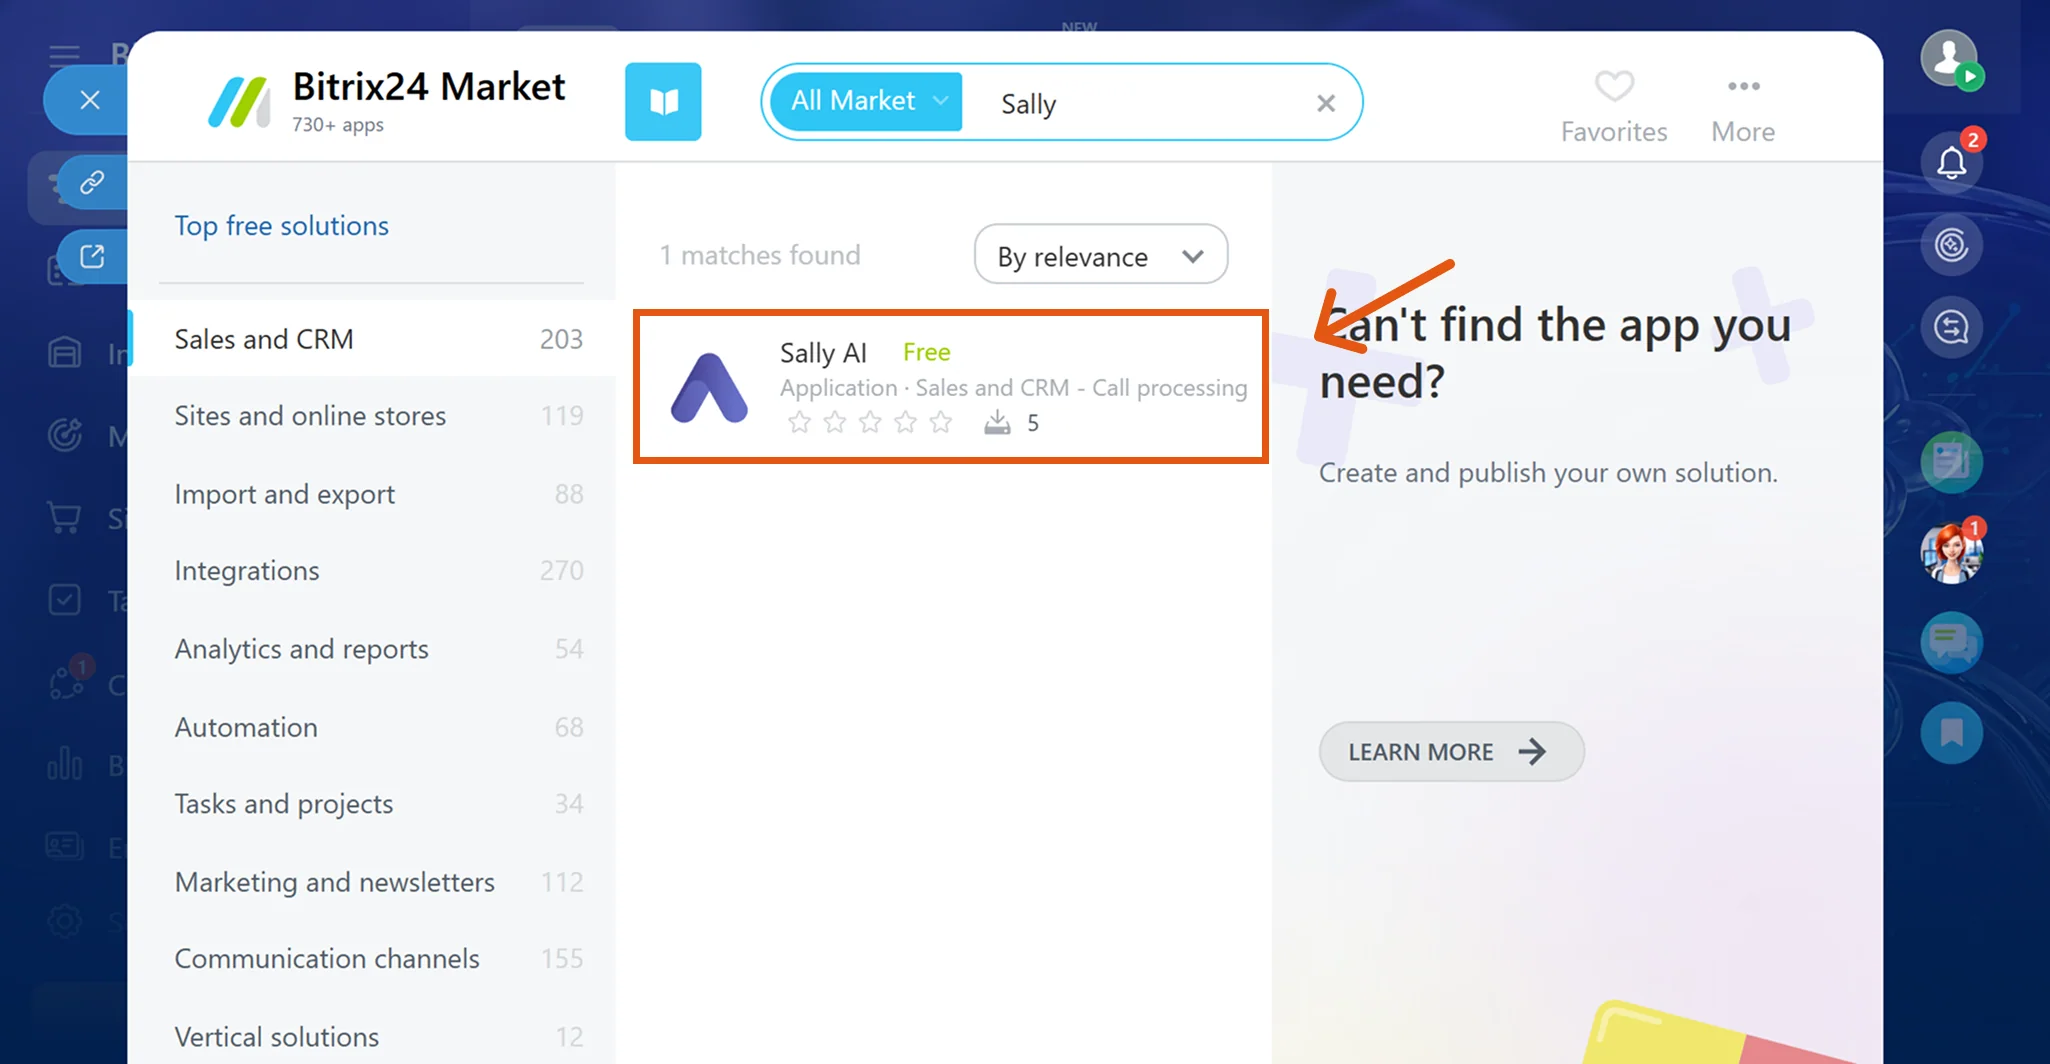
Search for Sally and open the Sally AI app from the results.
Figure 2: Find Sally AI in the Bitrix24 Market -
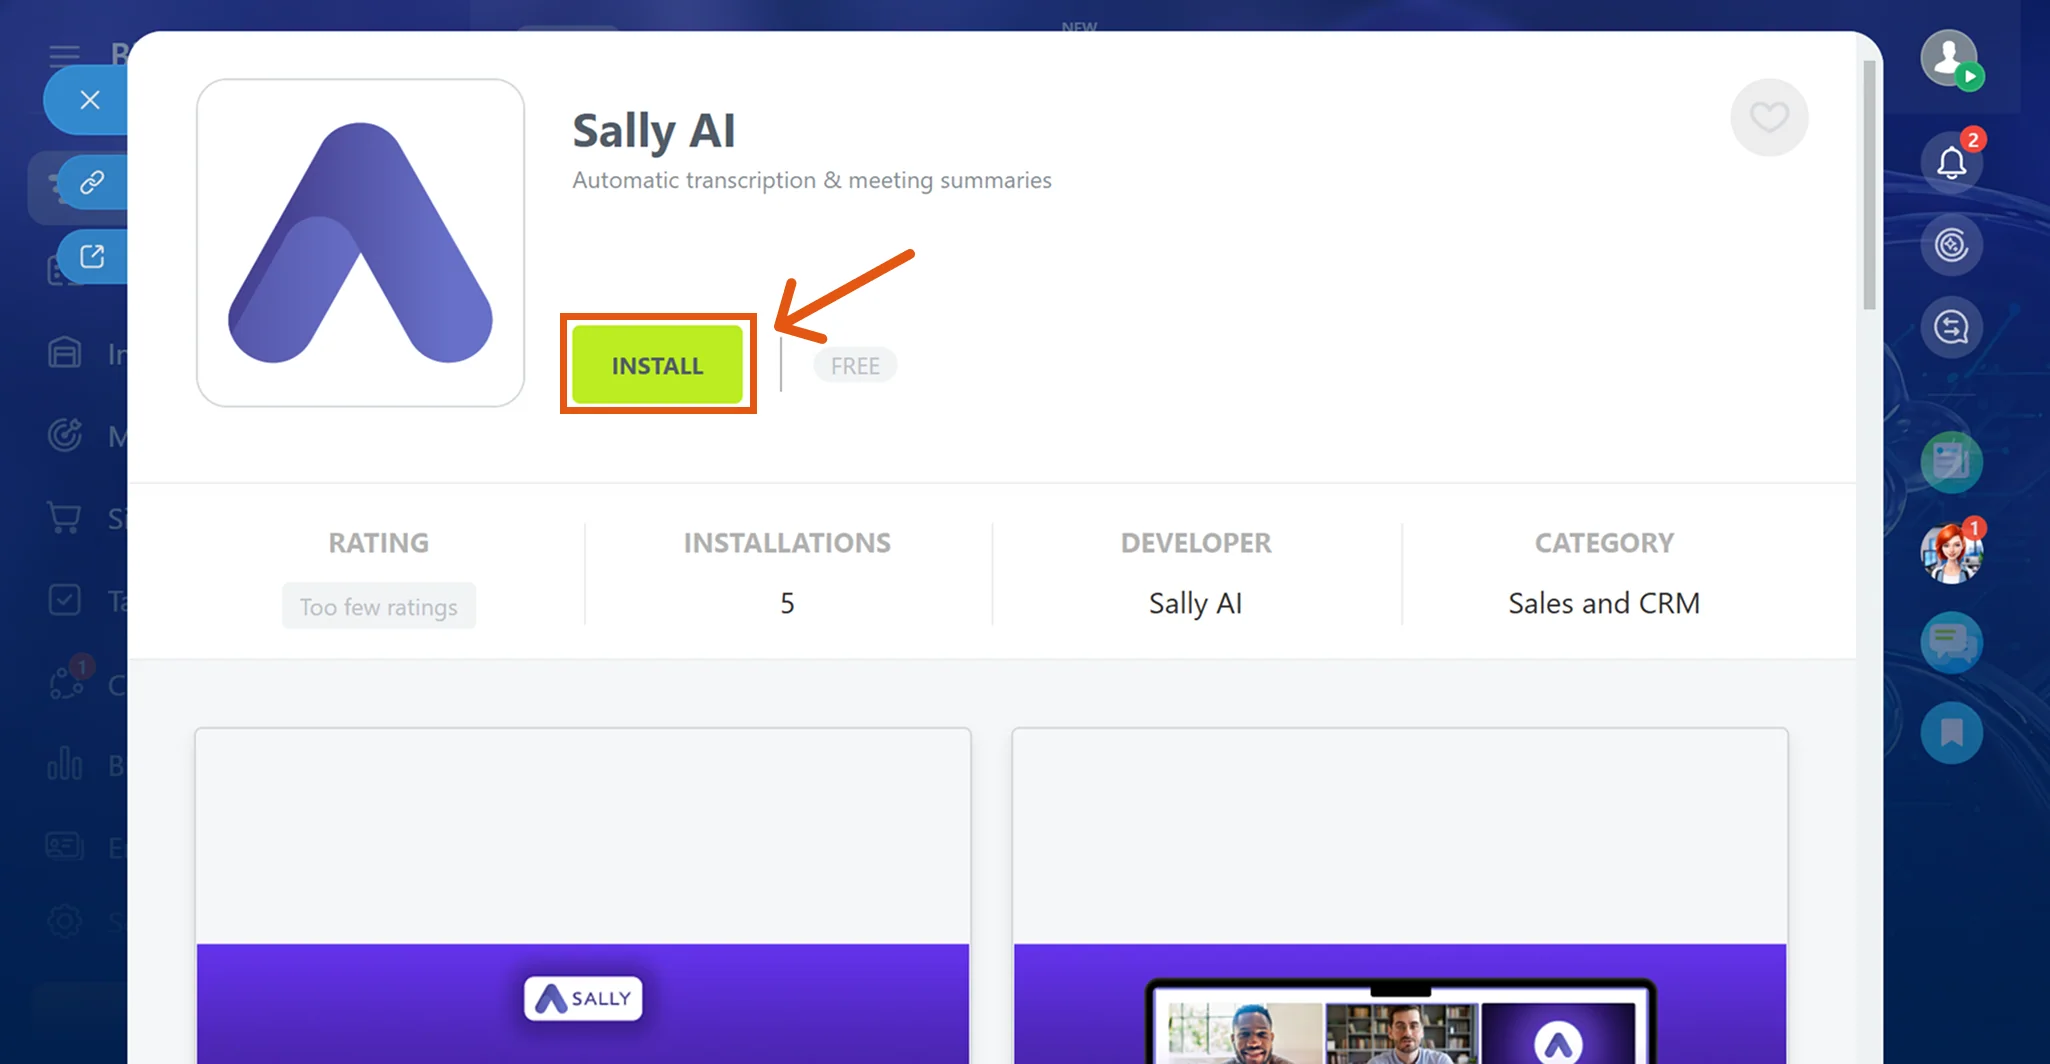
Click Install.
Figure 3: Install the Sally AI app -
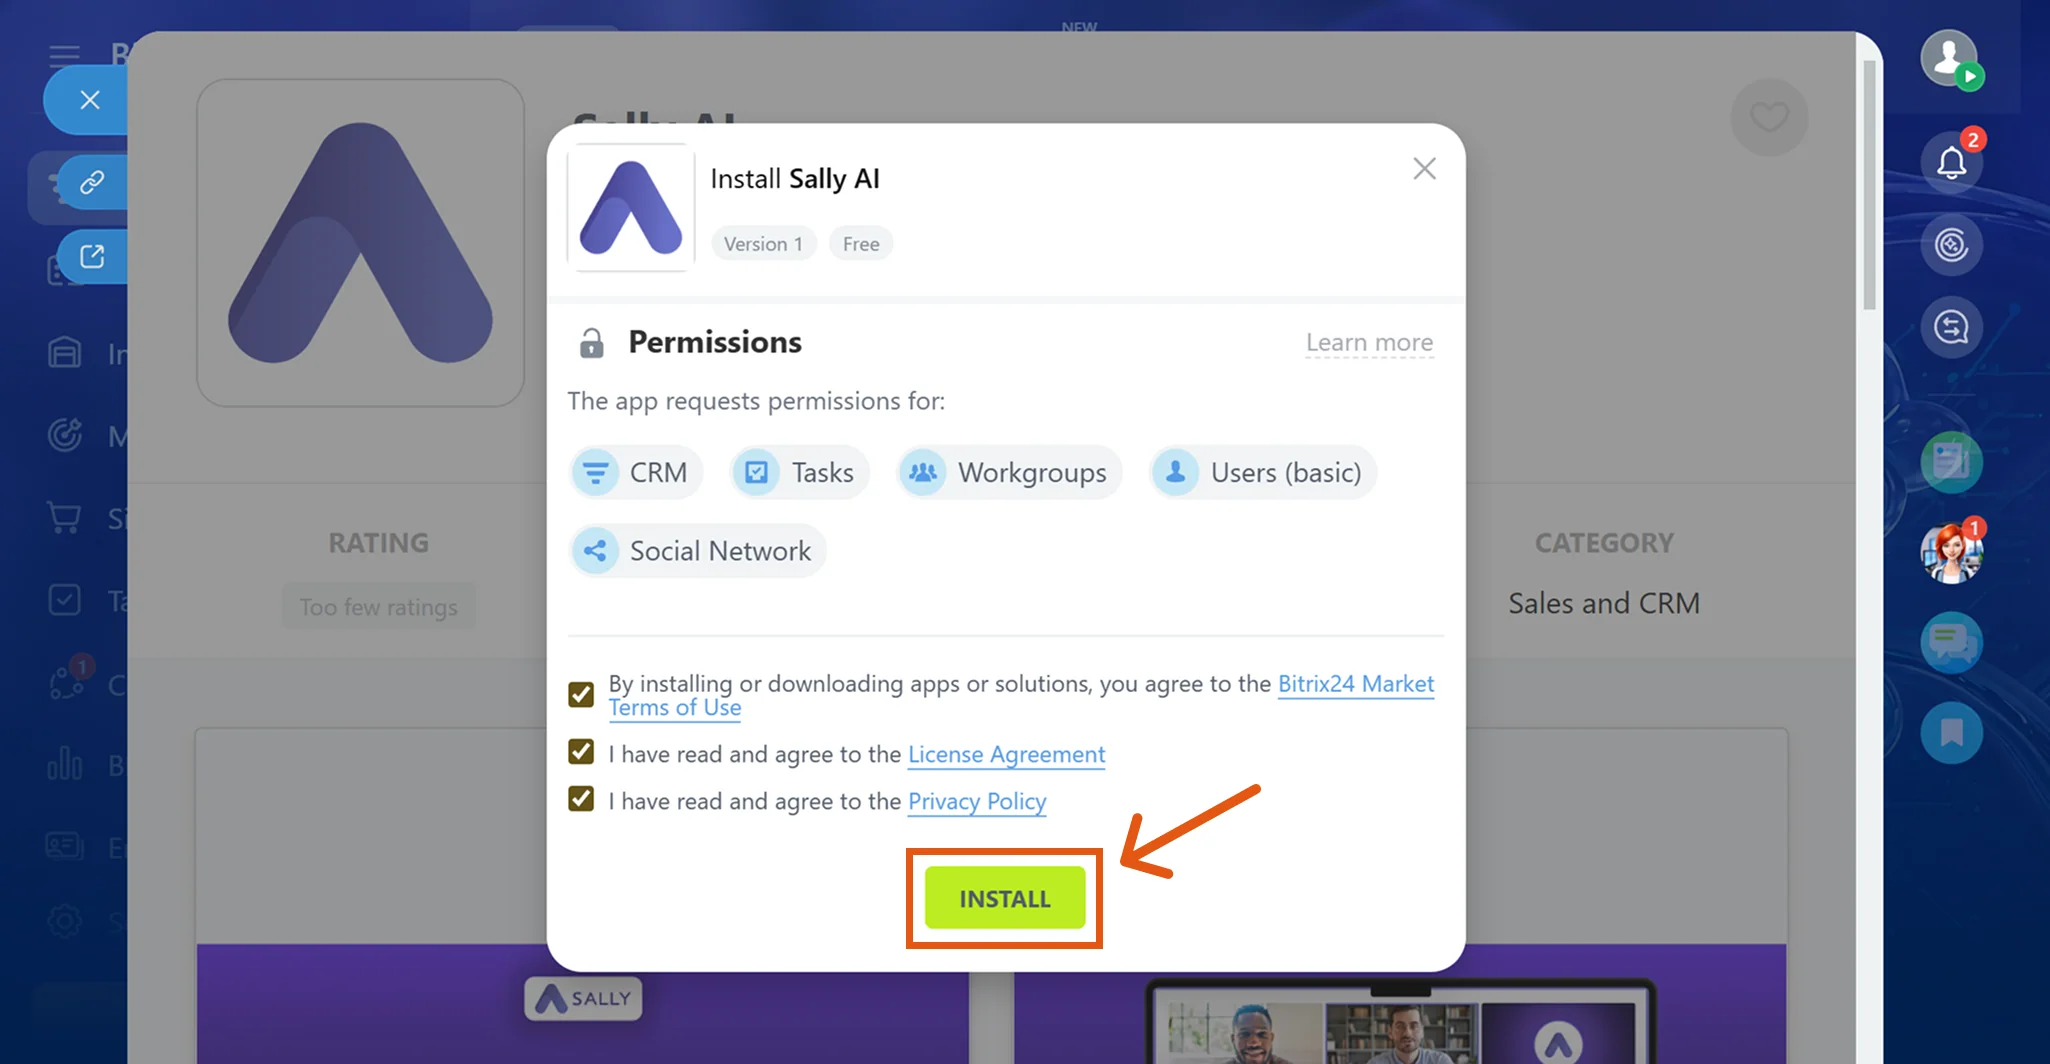
Review the requested permissions, accept the License Agreement and Privacy Policy, and click Install.
Figure 4: Confirm permissions and install -
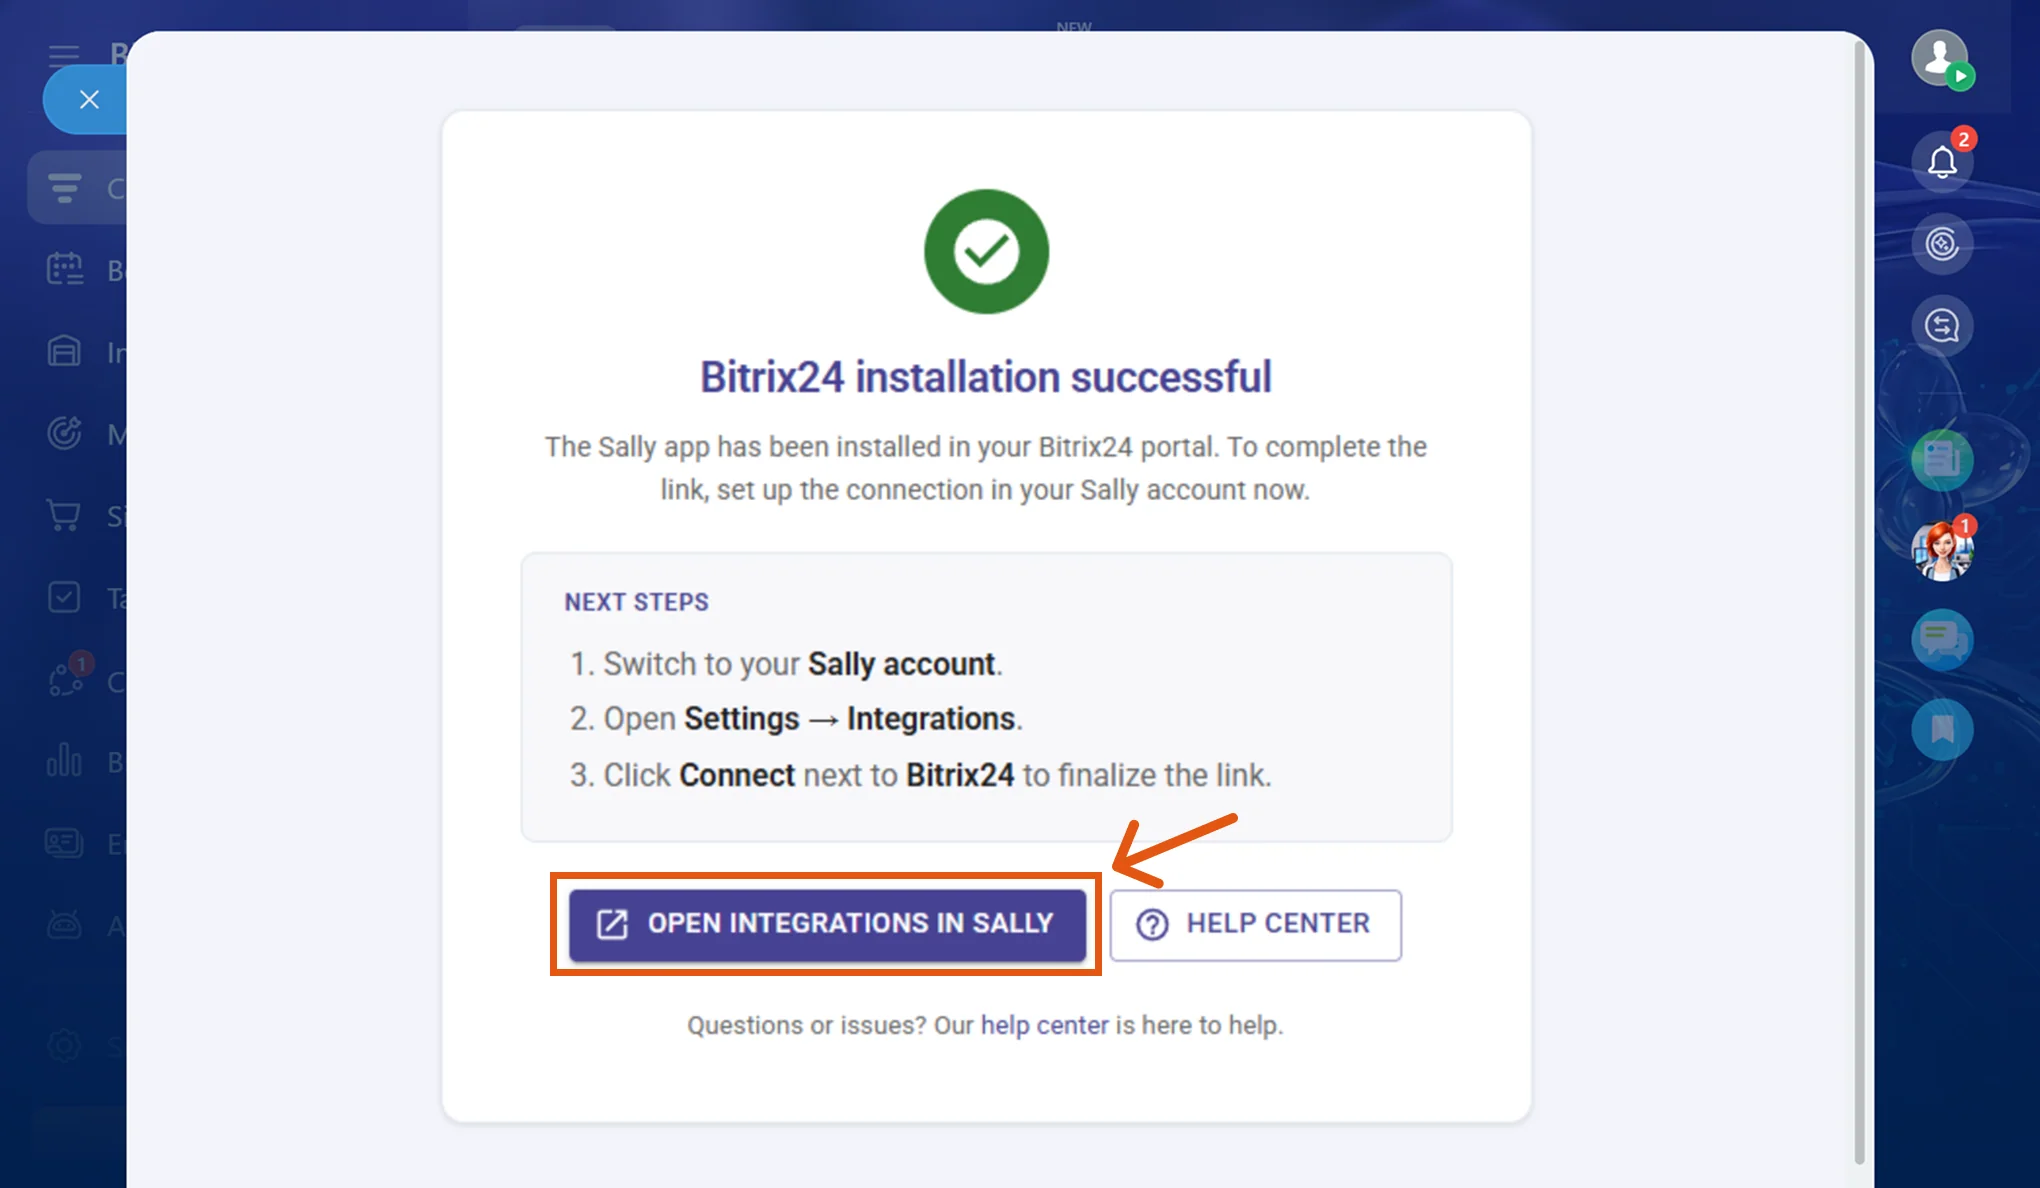
After a successful installation, click Open integrations in Sally.
Figure 5: Switch to Sally to finalize the connection -
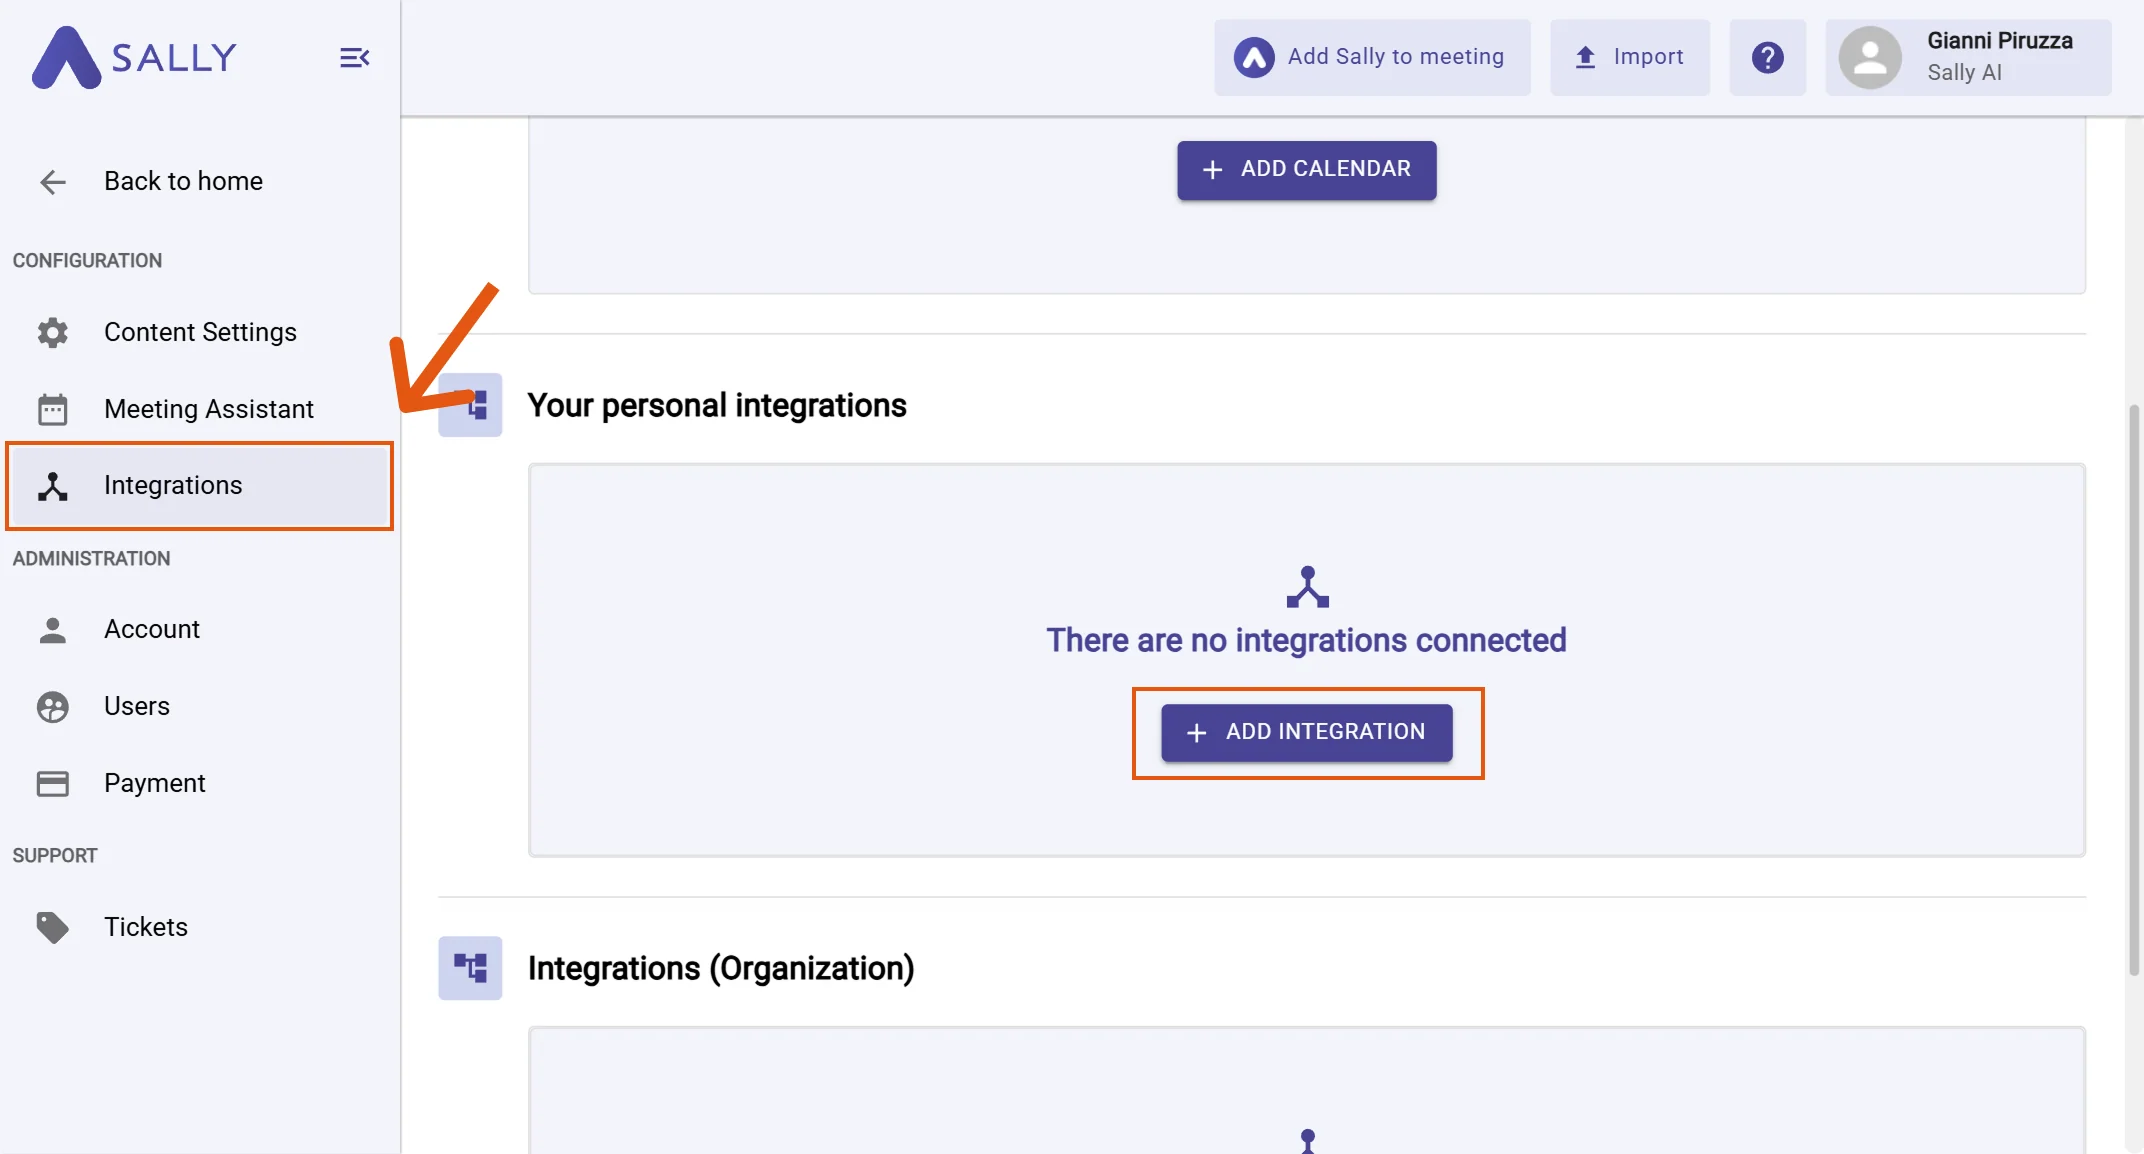
You are now automatically redirected to the Sally platform and land on the Integrations overview page. Under "Your personal integrations", click "+ Add integration".
infoPersonal integrations apply to your user account. Admins can also set up org-wide integrations under "Integrations (Organization)" if needed.
Figure 6: Add integration -
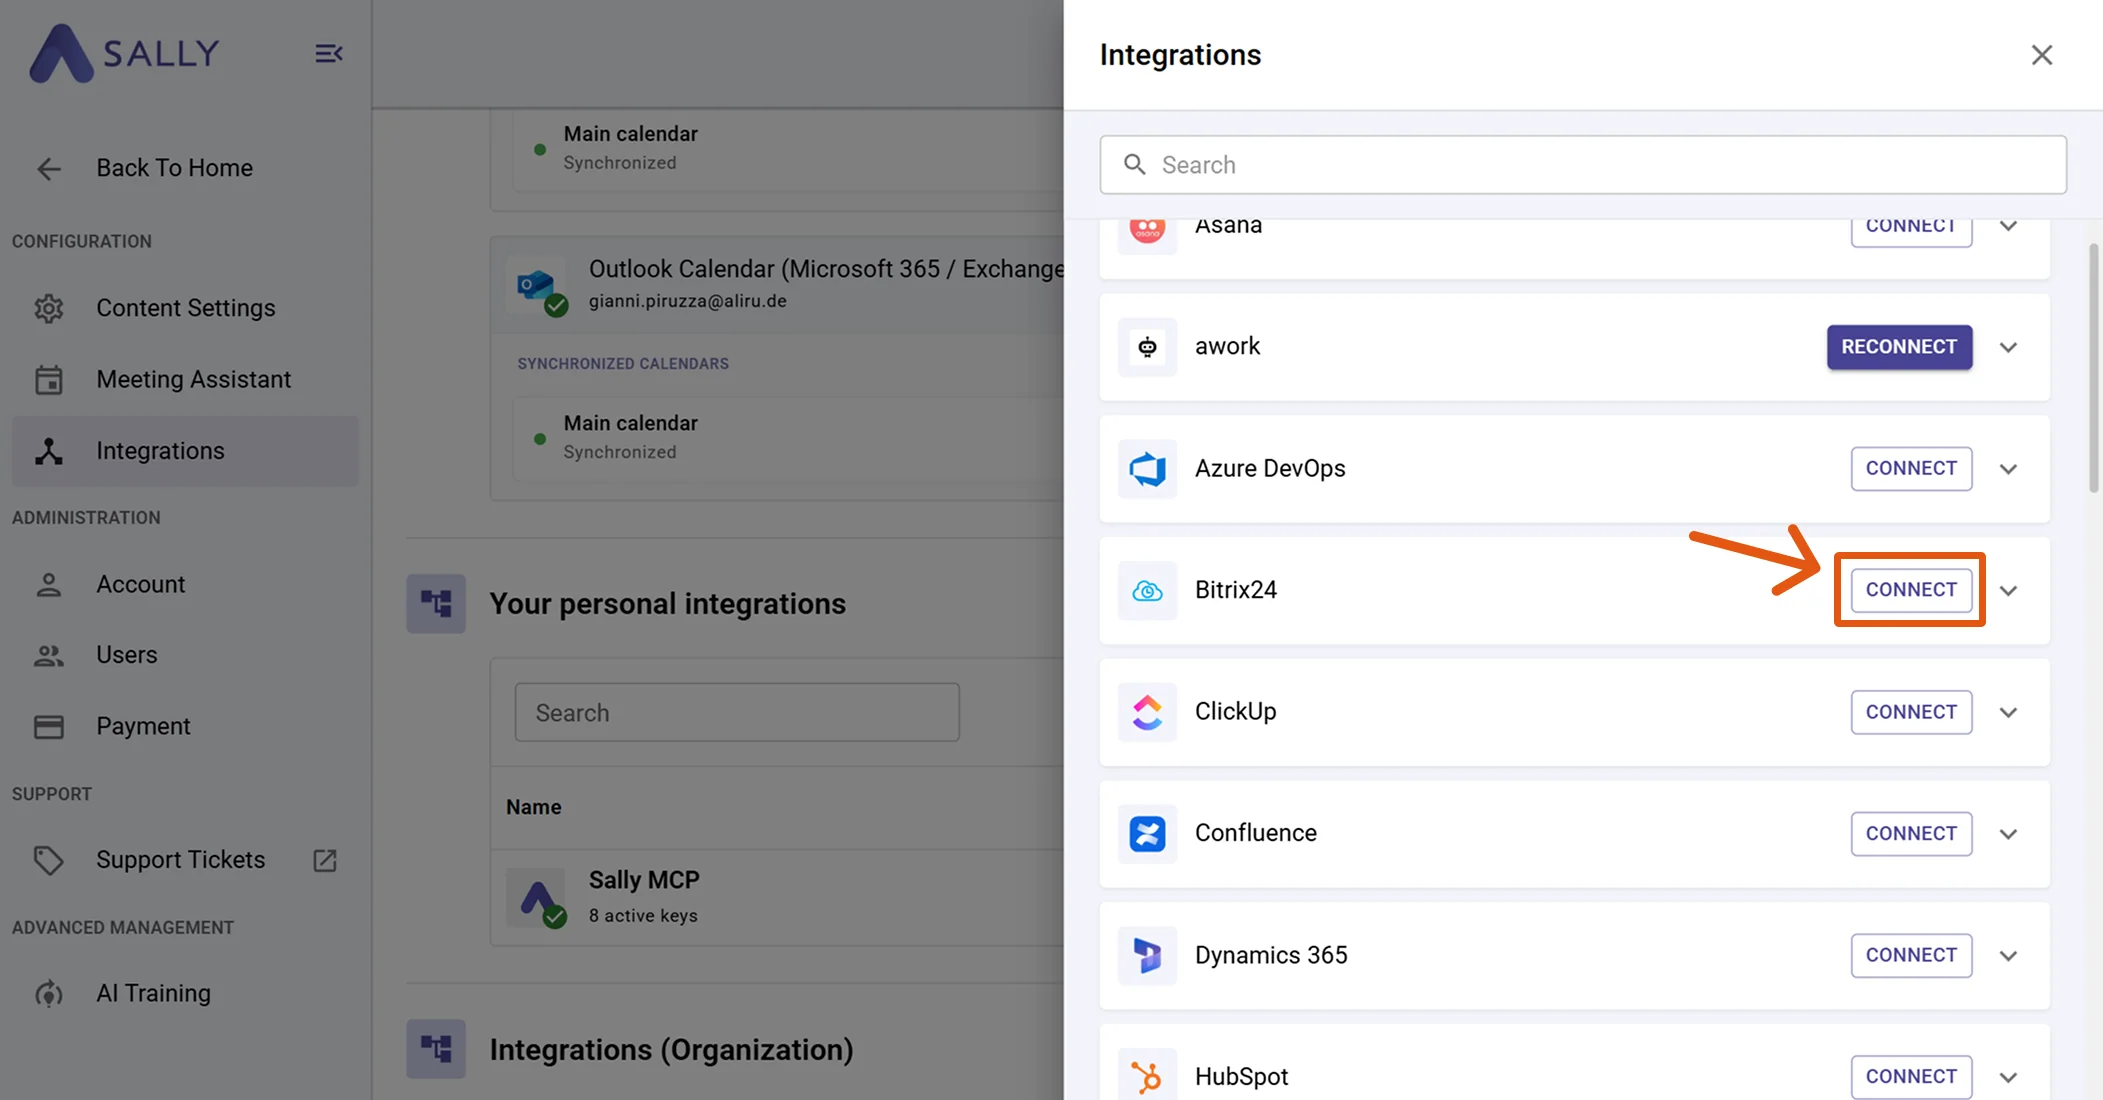
Find Bitrix24 in the integration list and click Connect.
Figure 7: Choose Bitrix24 → Connect -
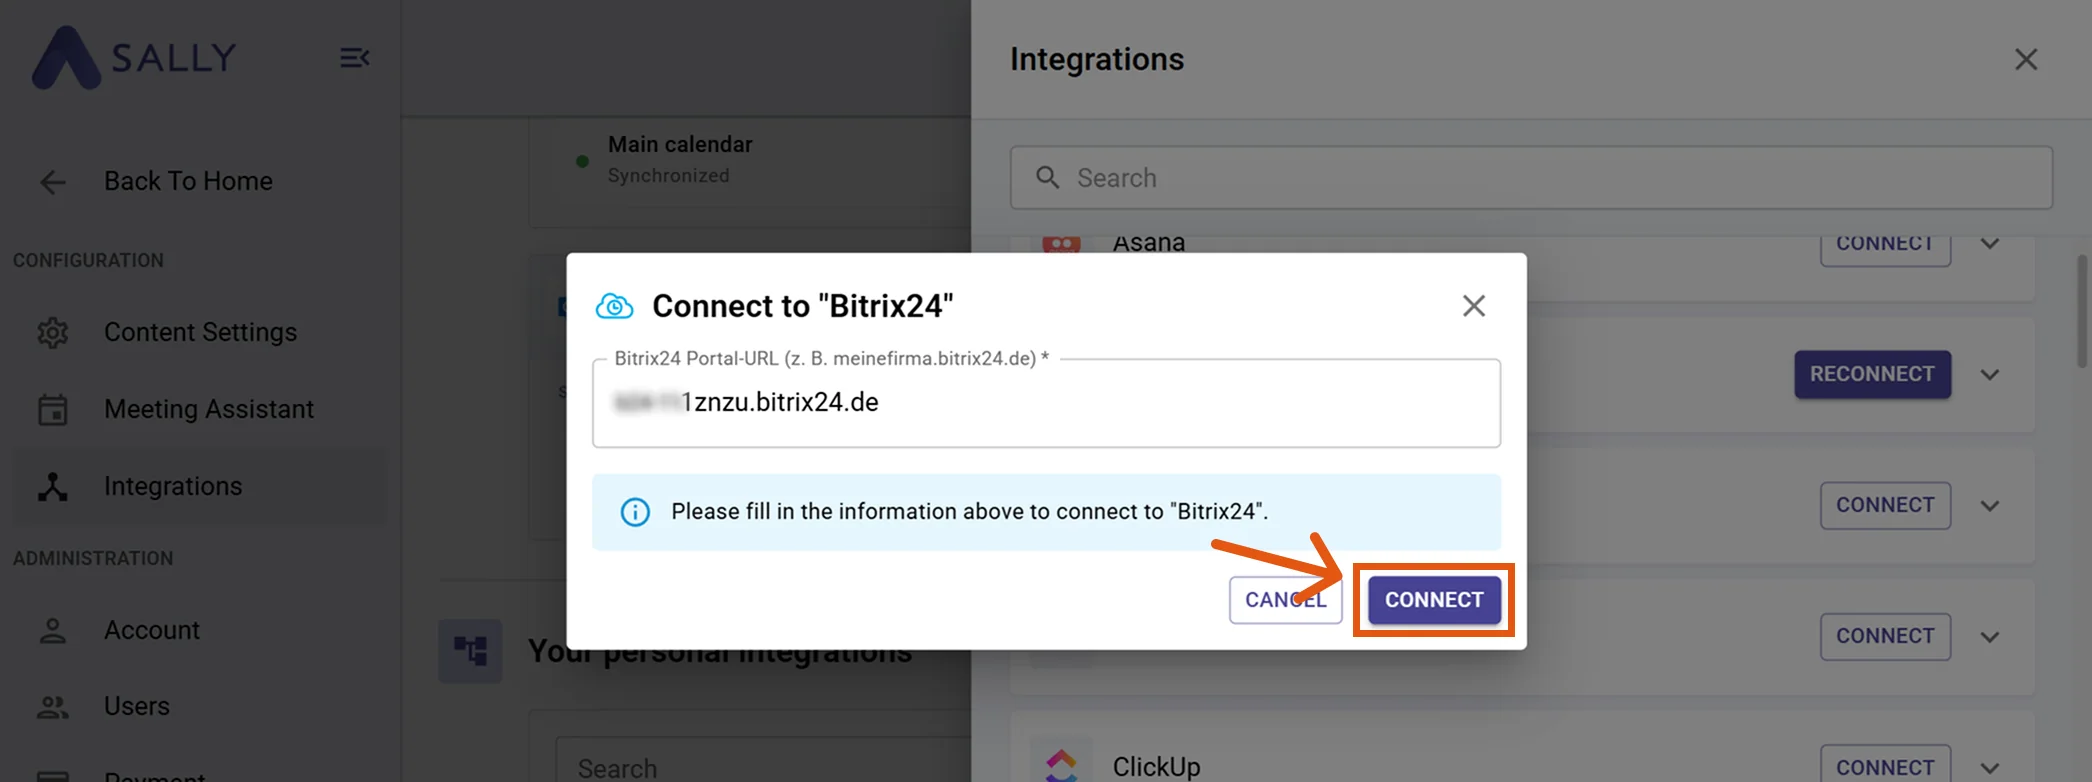
Enter your Bitrix24 portal URL (e.g.
yourcompany.bitrix24.com) and click Connect.Enter the bare domain onlyUse only the domain of your Bitrix24 portal – without
https://, withoutwww., and without any trailing path or slug. Otherwise the connection will fail.- ✅ Correct:
yourcompany.bitrix24.com - ✅ Correct:
yourcompany.bitrix24.de - ❌ Wrong:
https://yourcompany.bitrix24.com - ❌ Wrong:
www.yourcompany.bitrix24.com - ❌ Wrong:
yourcompany.bitrix24.com/ - ❌ Wrong:
yourcompany.bitrix24.com/crm/deal/list/
Figure 8: Enter your Bitrix24 portal URL - ✅ Correct:
-
After a successful connection, Bitrix24 appears under "Your personal integrations".
Figure 9: Bitrix24 is connected

2. How to send insights to Bitrix24
Once Bitrix24 is connected, you can send meeting insights from Sally to Bitrix24 with a single click - so they land on the right CRM record or task.
You can:
2.1. Create a task in Bitrix24
Turn a Sally insight into a Bitrix24 task and optionally link it to one or more CRM records.
-
Open the desired meeting or recording in Sally.
-
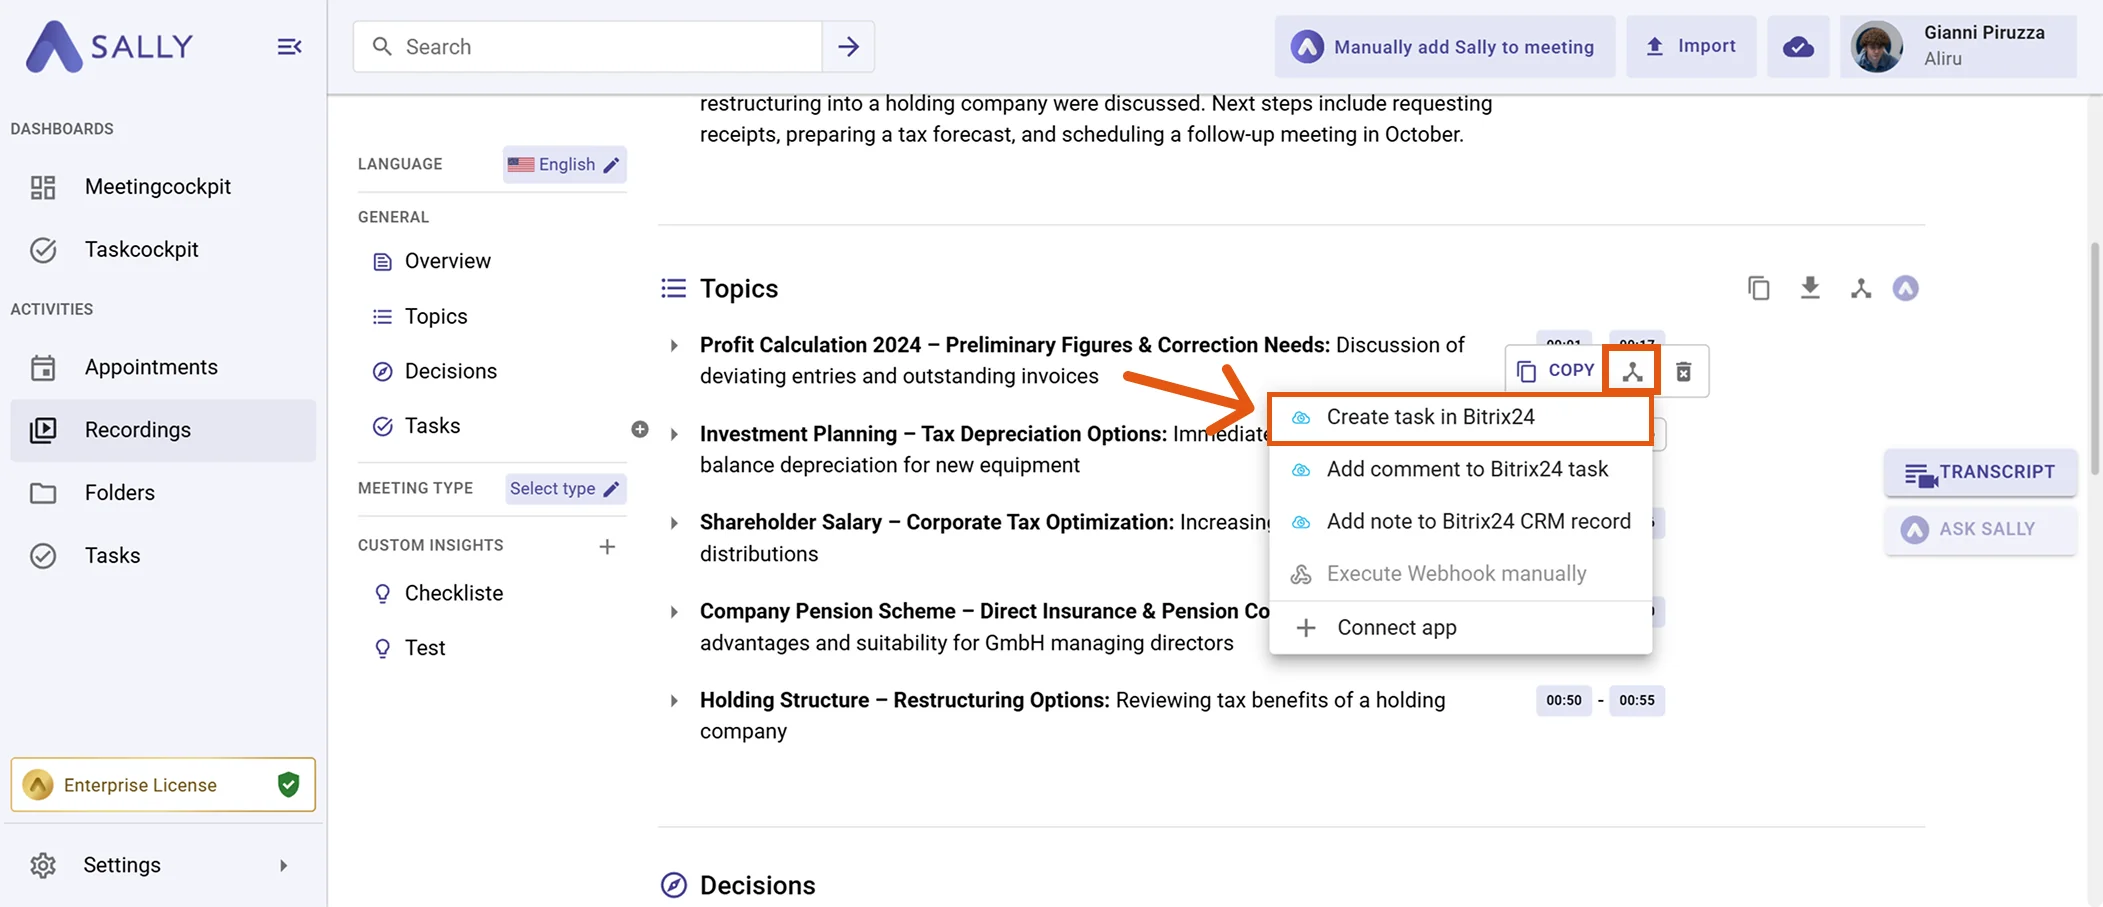
Click the integration button next to the insight you want to send to Bitrix24.
-
Choose "Create task in Bitrix24" from the menu.
Figure 10: Choose Create task in Bitrix24 -
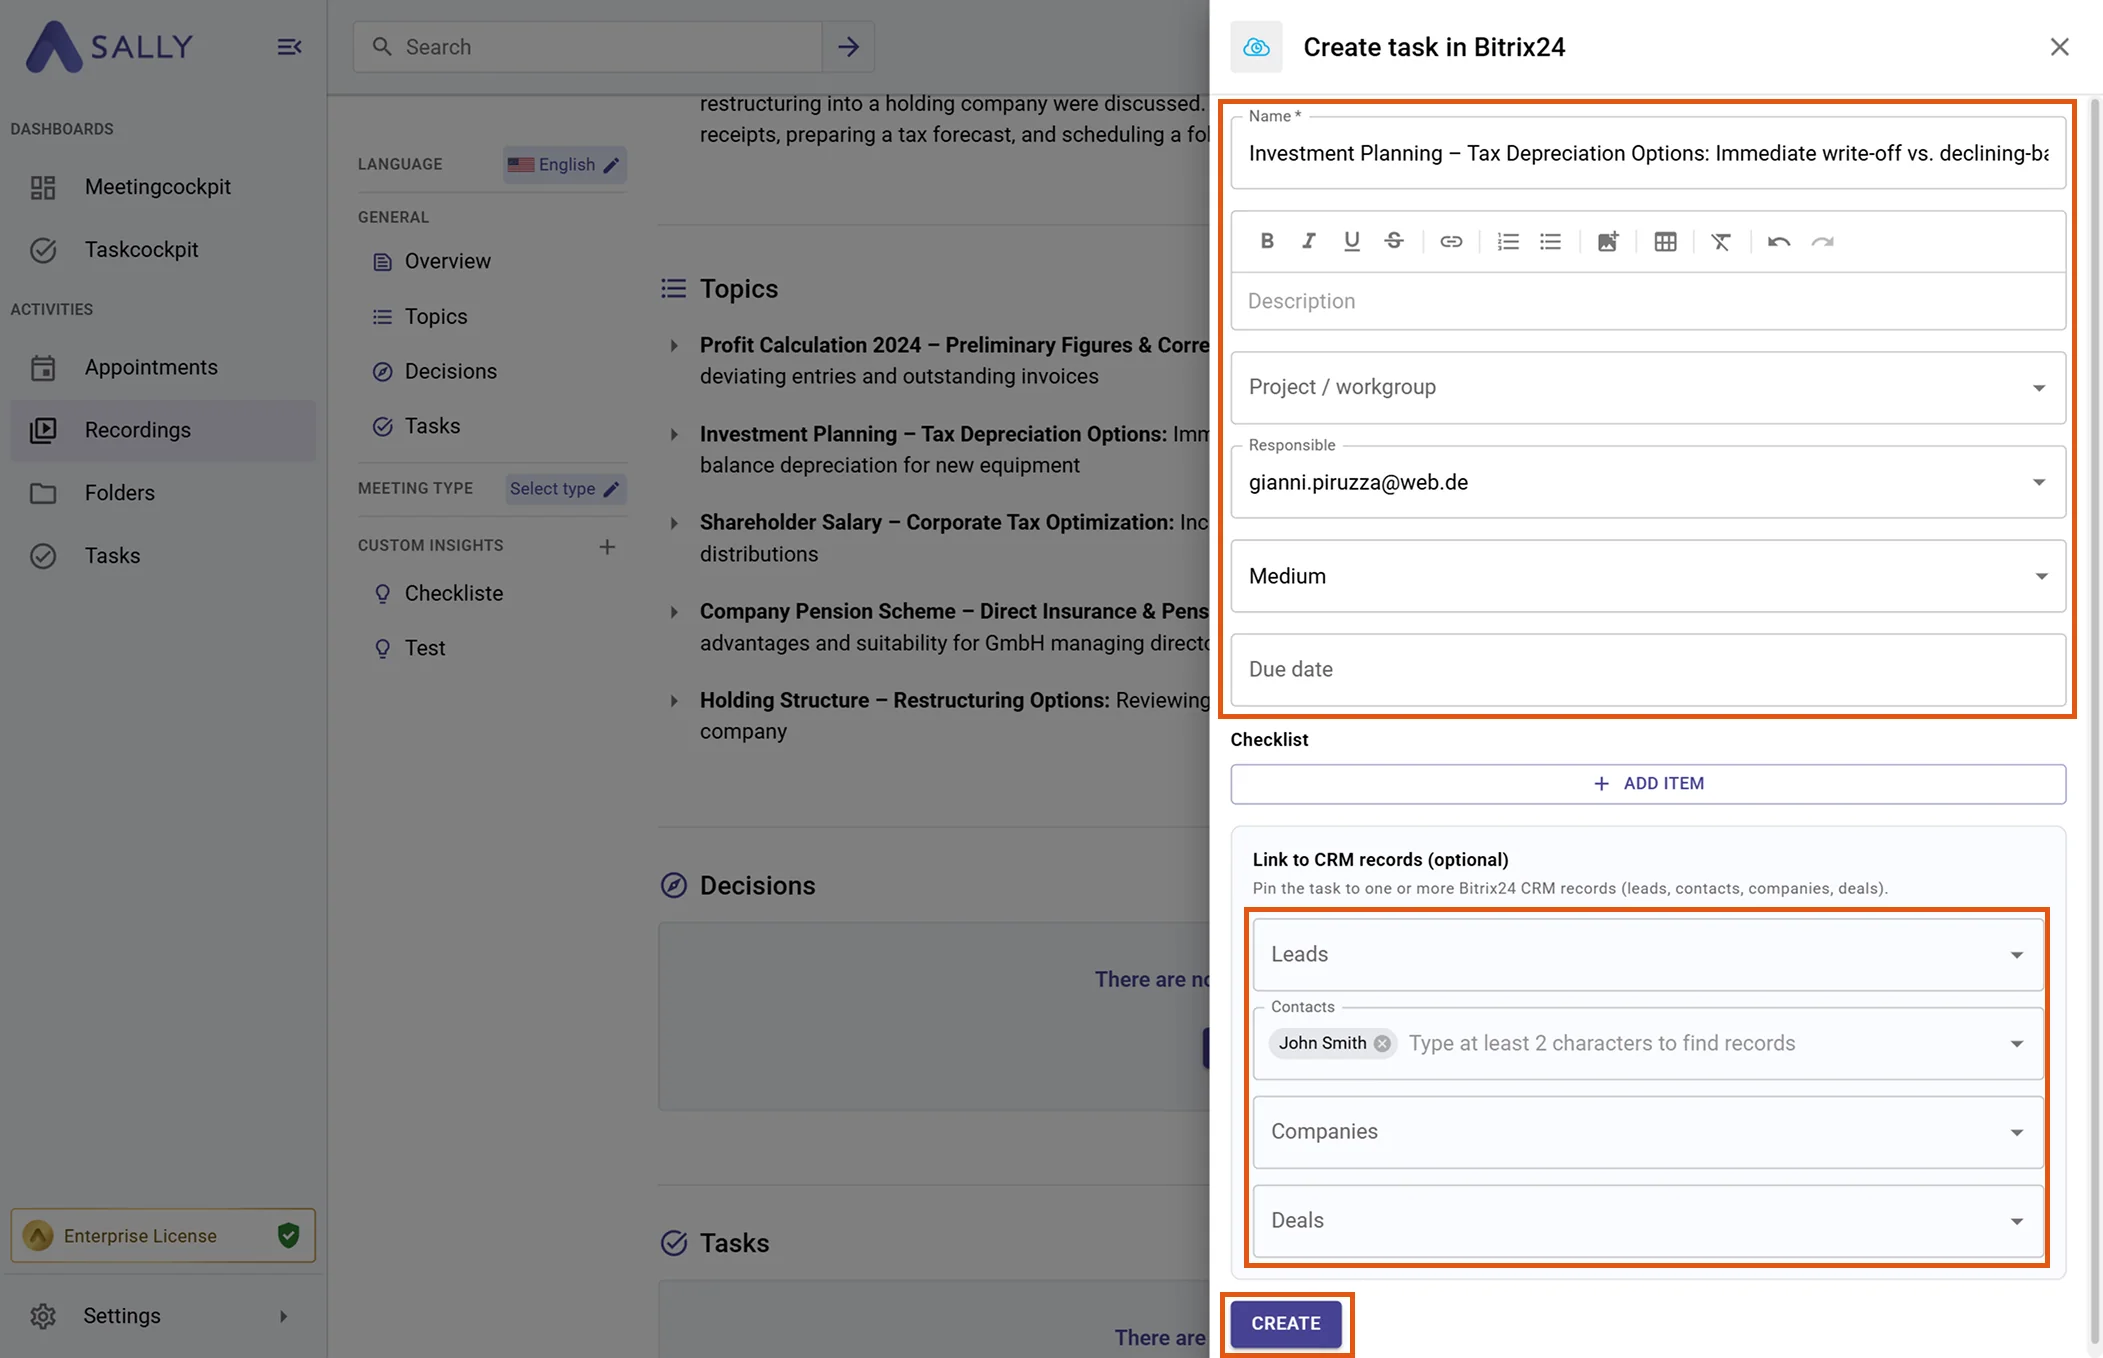
Fill in the creation form (required fields are marked with
*). For a Bitrix24 task this typically includes:- Name*
- Description
- Project / Workgroup
- Responsible user
- Priority
- Due date
- Checklist entries
- Linked CRM records (Leads, Contacts, Companies, Deals)
The task name and description are prefilled from Sally and can be edited.
-
Click Create to send the task to Bitrix24.
Figure 11: Fill the Bitrix24 task fields and Create -
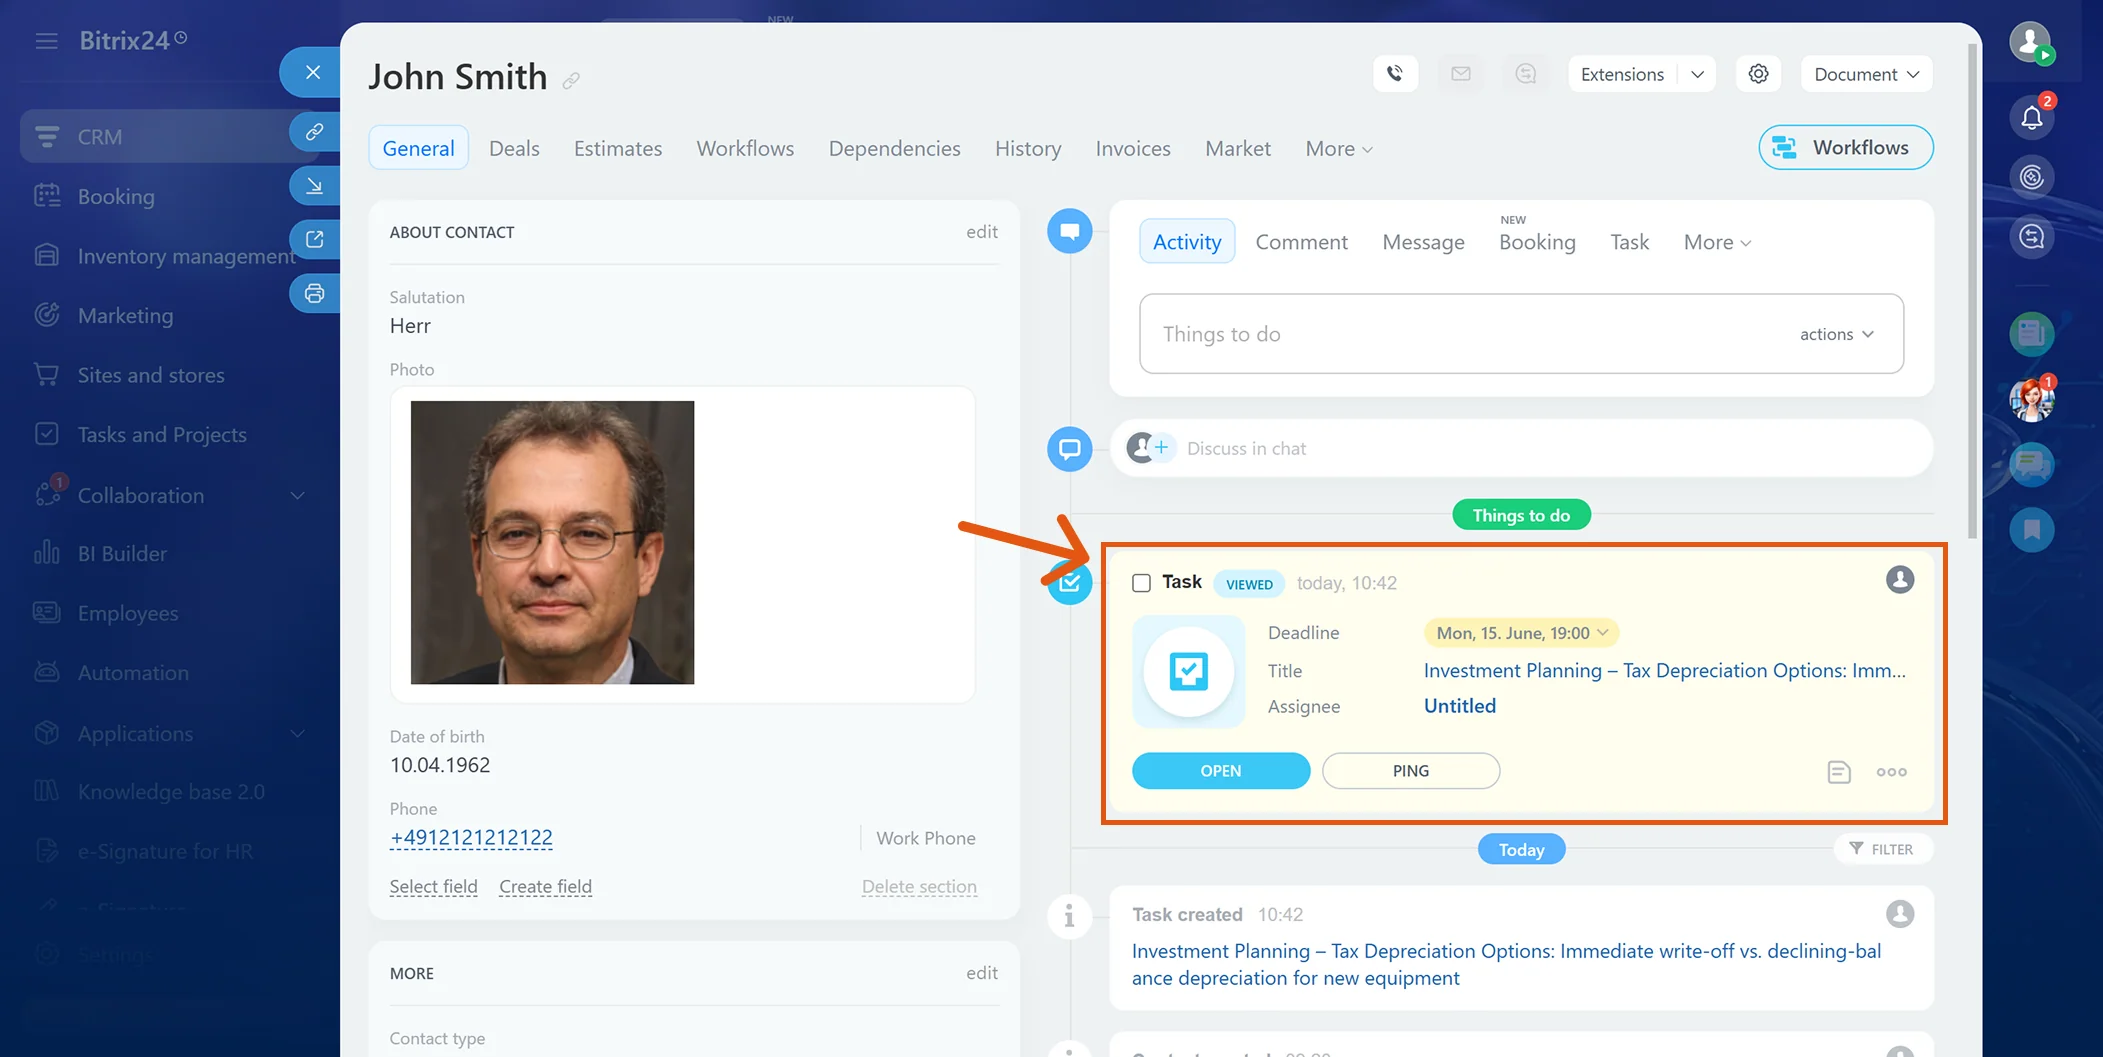
The task appears on the linked CRM record's timeline in Bitrix24.
Figure 12: The Sally task in Bitrix24
2.2. Add a comment to a Bitrix24 task
Push a meeting insight as a comment into an existing Bitrix24 task chat – ideal for status updates or quick follow-ups on work already in progress.
-
Open the desired meeting or recording in Sally.
-
Click the integration button next to the insight you want to send to Bitrix24.
-
Choose "Add comment to Bitrix24 task" from the menu.
Figure 13: Choose Add comment to Bitrix24 task -
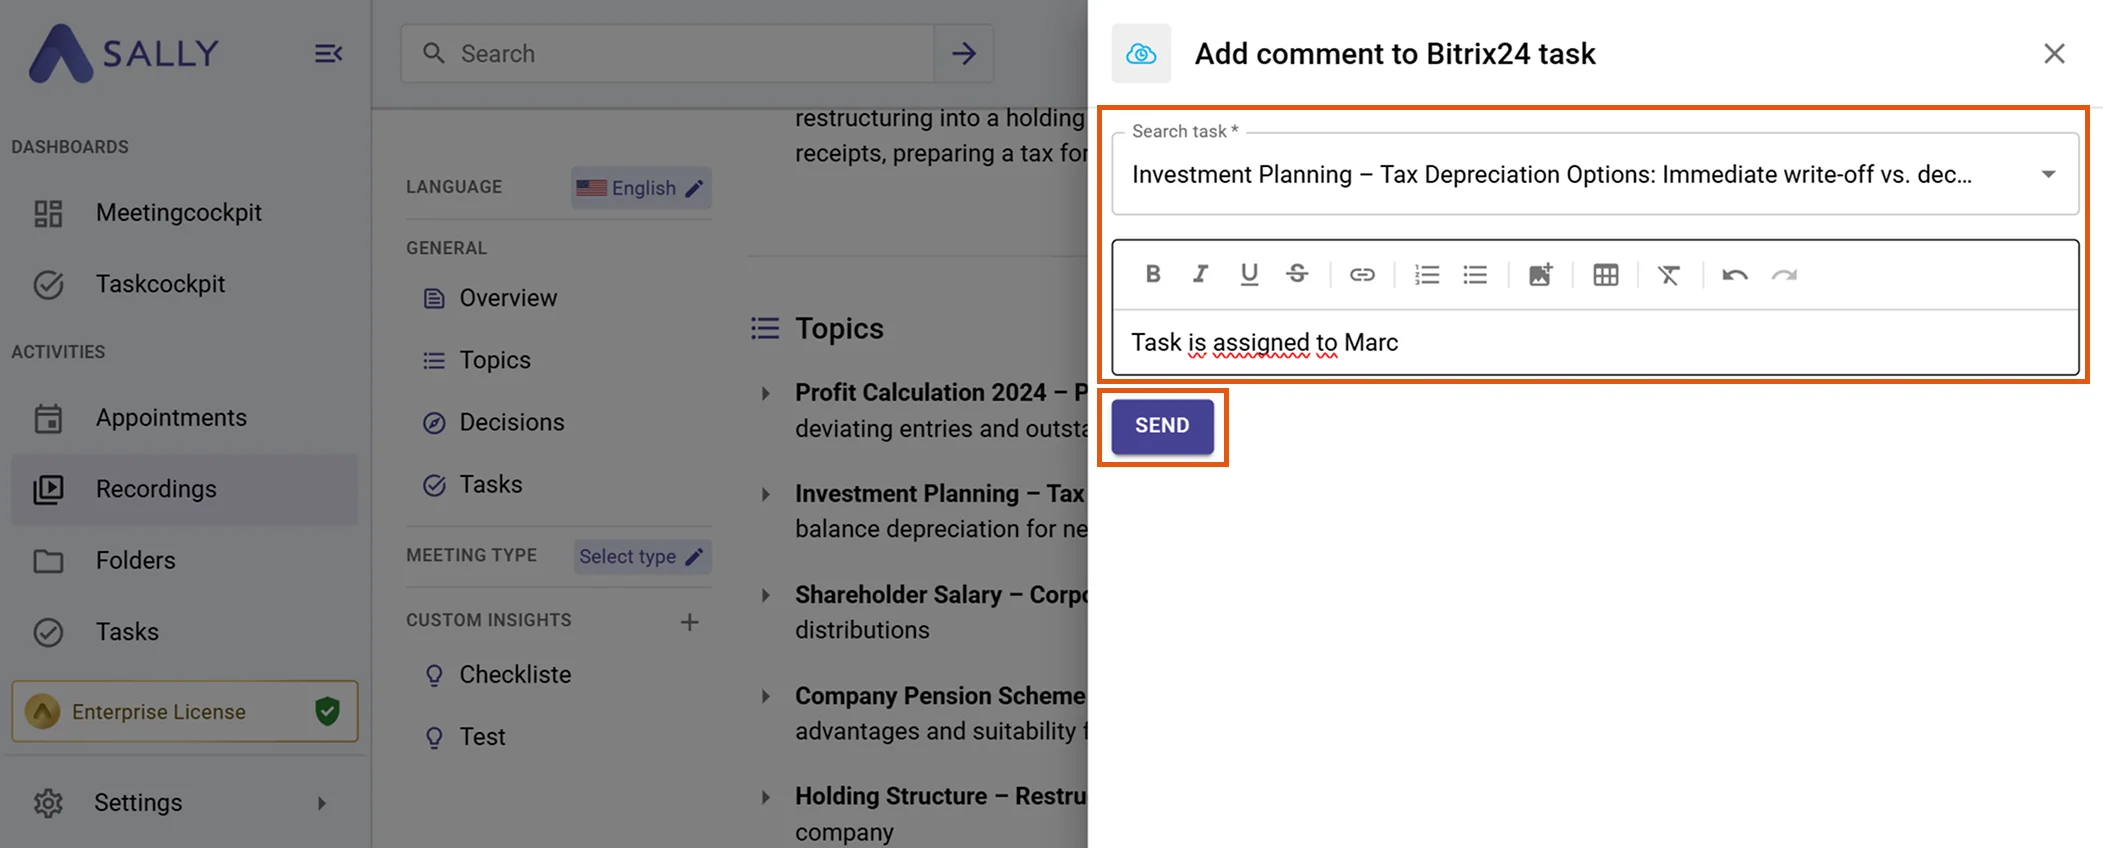
Search for and select the target task, then edit the prefilled comment if needed.
-
Click Send to post the comment.
Figure 14: Pick the task and send the comment -
The comment appears in the task's chat in Bitrix24.
Figure 15: The Sally comment in the Bitrix24 task


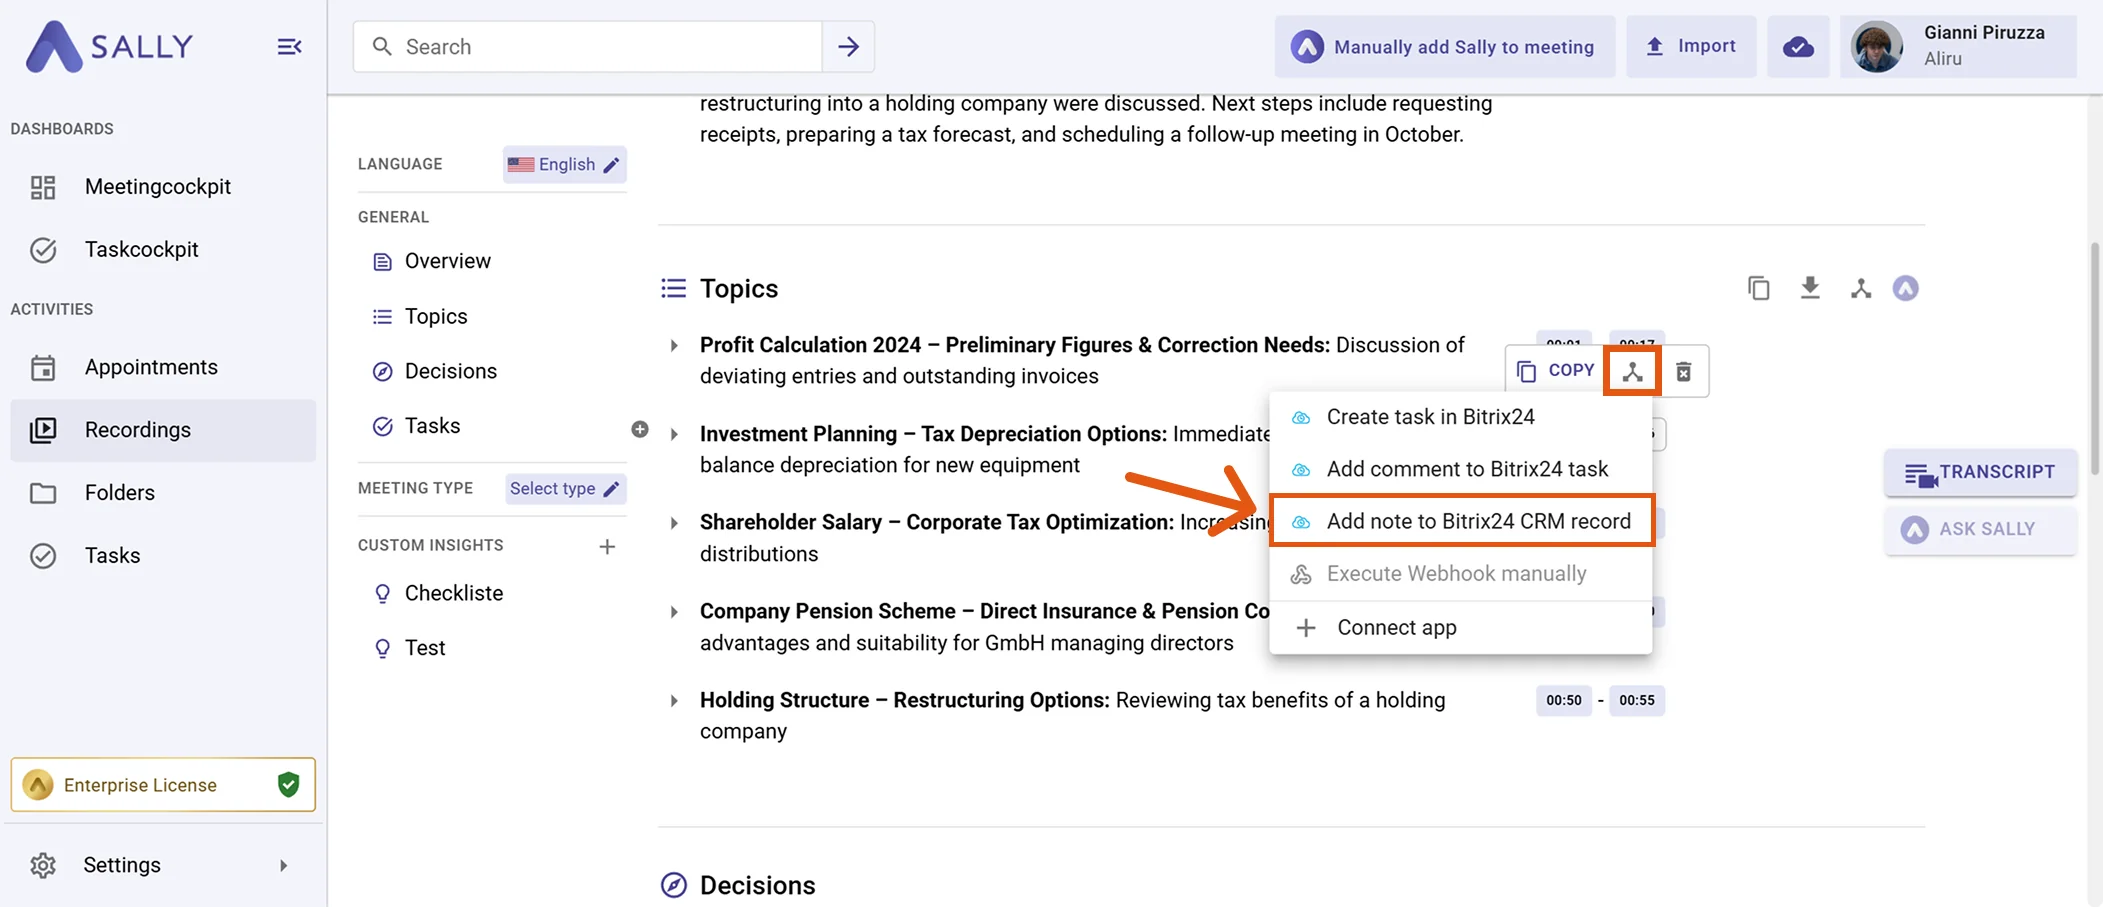
2.3. Attach a note to a Bitrix24 CRM record
Attach meeting context as a comment-style note on a Bitrix24 CRM record (Lead, Contact, Company, or Deal).
-
Open the desired meeting or recording in Sally.
-
Click the integration button next to the insight you want to send to Bitrix24.
-
Choose "Attach note to Bitrix24 CRM record" from the menu.
Figure 16: Choose Attach note to Bitrix24 CRM record -
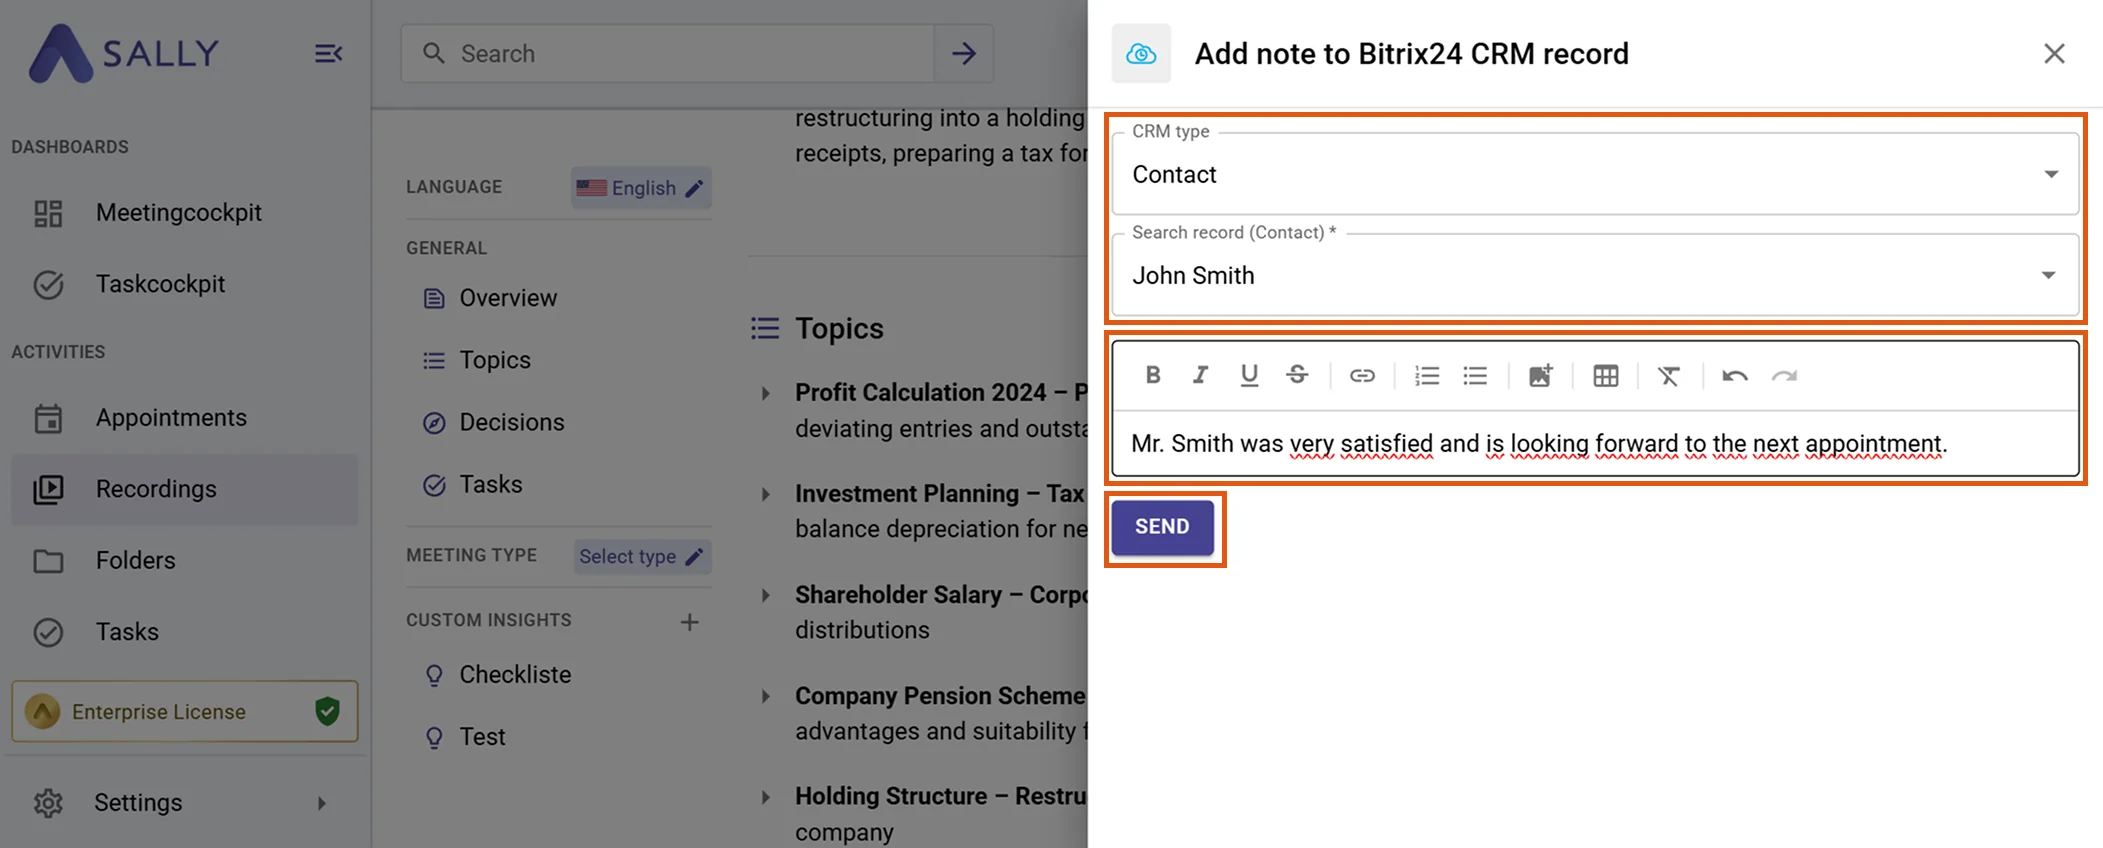
Pick the CRM type (Lead, Contact, Company, or Deal), search for and select the target record, then edit the prefilled note if needed.
-
Click Send to attach the note.
Figure 17: Pick the CRM record and send the note -
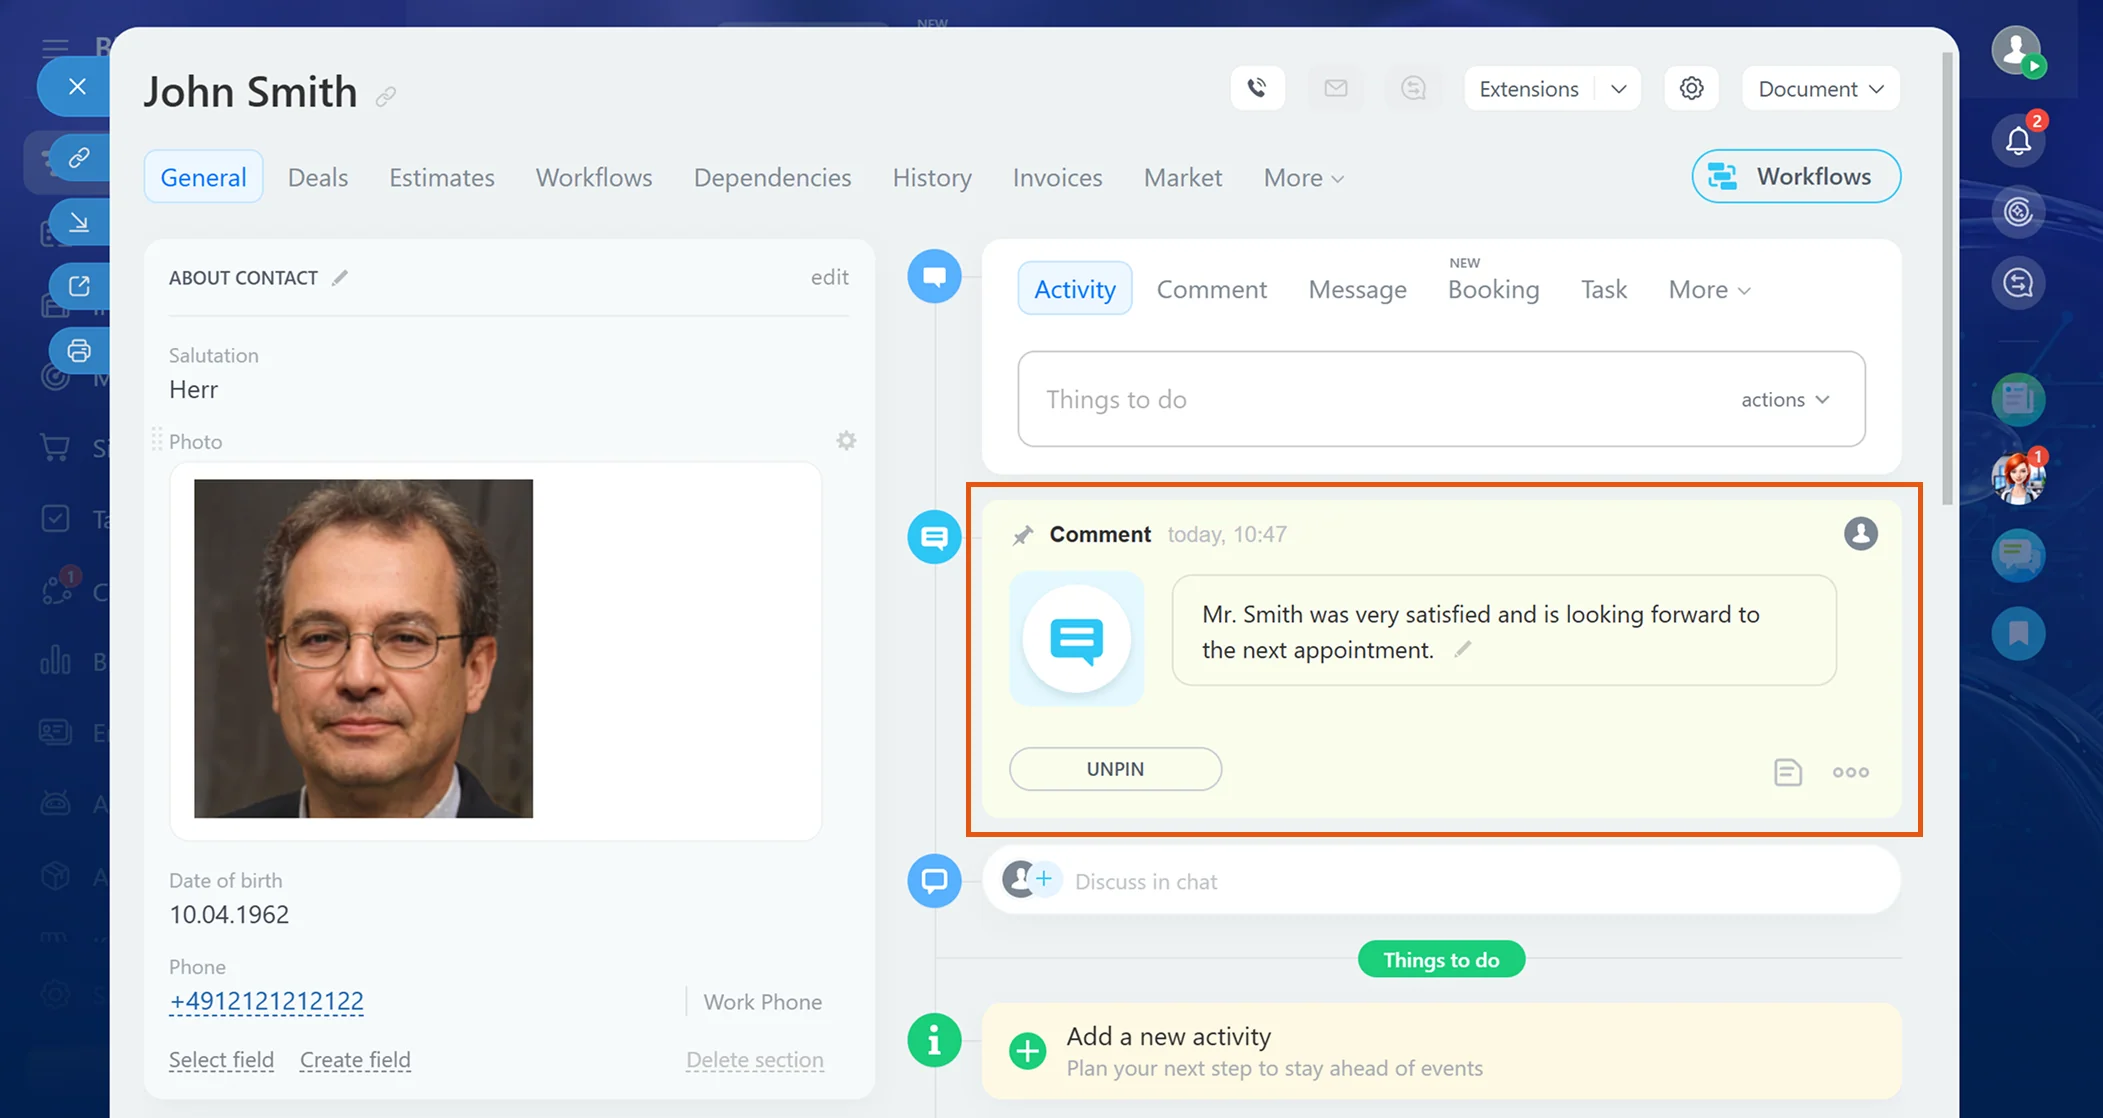
The note appears in the record's activity stream in Bitrix24.
Figure 18: The Sally note in Bitrix24
3. Required Permissions
For the integration with Bitrix24, Sally uses OAuth 2.0 for authorization. The following permissions define which areas Sally can access on behalf of the authenticated user.
-
Sally accesses this information solely to technically establish and maintain the connection to the user account.
-
Sally does not make any autonomous changes. Actions are performed exclusively upon the explicit initiative of the user.
-
API endpoints are only called within the scope of an active action initiated by the user within the platform.
Technical Overview of Required Permissions
| Permission | What Bitrix24 technically allows with this scope | How Sally uses this scope |
|---|---|---|
crm | Read and write access to CRM entities (Leads, Contacts, Companies, Deals), including activities and timeline entries | Sally reads CRM records so you can pick the right Lead, Contact, Company, or Deal as a link target, and attaches notes or links tasks to them when explicitly triggered by the user. |
task | Read and write access to tasks and task comments | Sally creates new tasks and posts comments into existing task chats when explicitly triggered by the user. |
user_basic | Read access to basic user data | Sally reads basic profile data to identify the connected Bitrix24 portal and to display responsible users correctly in the task and comment forms. |
sonet_group | Read access to project groups / workgroups | Sally reads workgroups so you can assign new tasks to the correct project / workgroup. |
socialnetwork | Access to the social network (task chats, activity stream) | Required so Sally can post comments into a task chat and write notes into the activity stream of a CRM record on explicit user action. |