Privacy notice via email before meetings
Sally can automatically inform meeting participants by email before a meeting starts if a recording is planned. This setting defines whether an email is sent and how consent is handled.
You find it in the privacy settings under Duty To Inform.
This setting applies organization-wide, it is defined the same way for everyone in the company.
Only owners and admins can change it, members cannot.
Quick navigation
1. Configure the email privacy notice
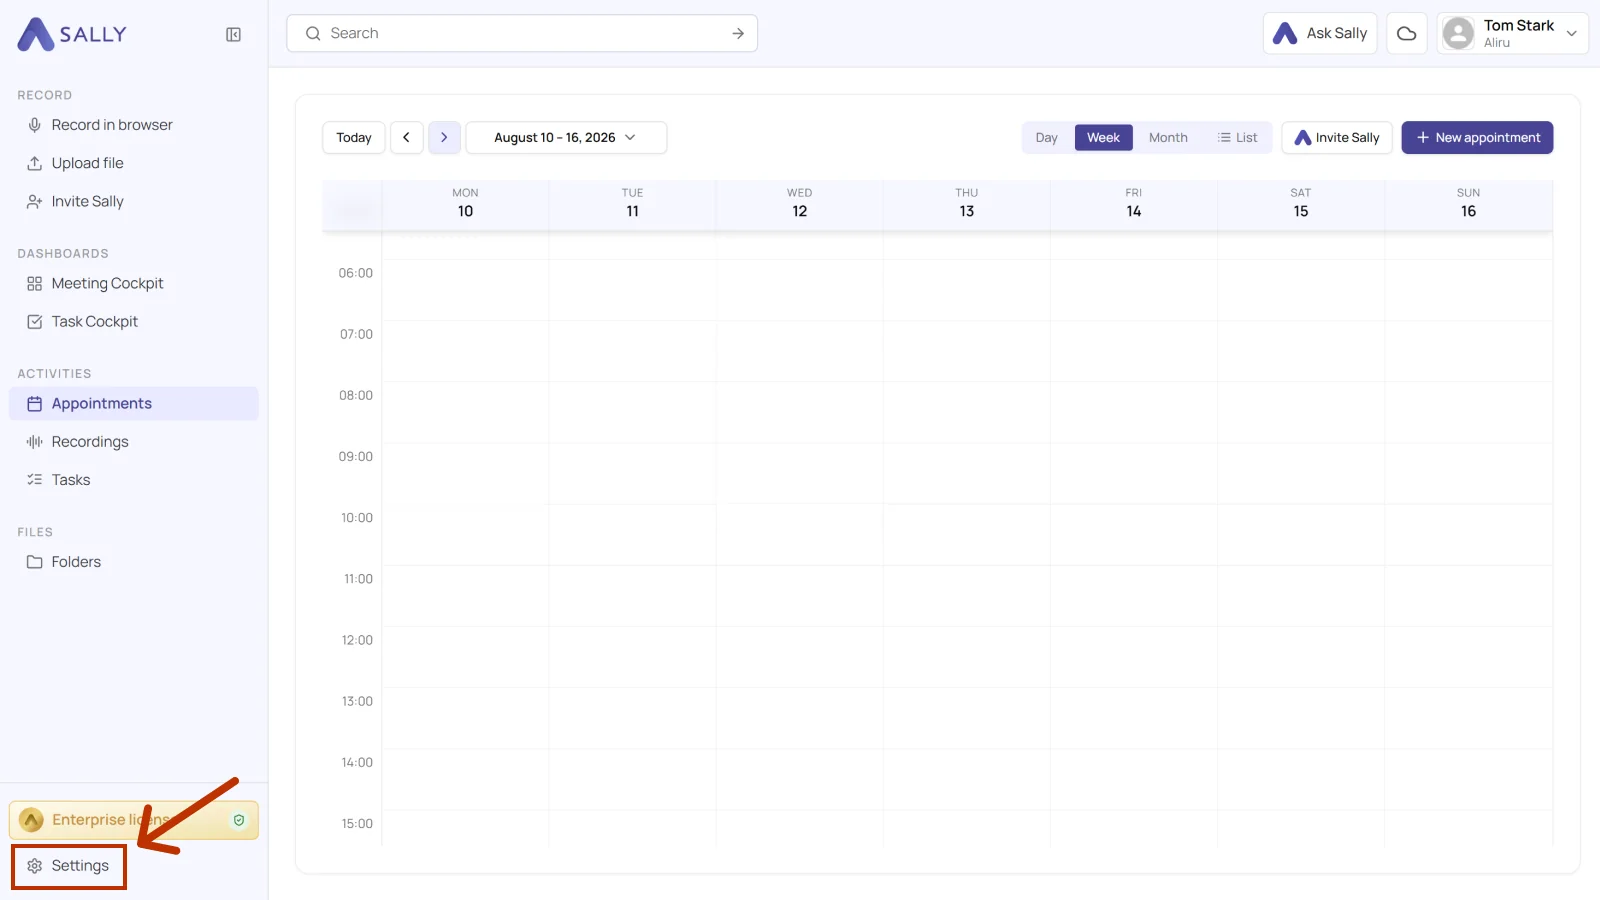
- Open Settings at the bottom of the left sidebar.
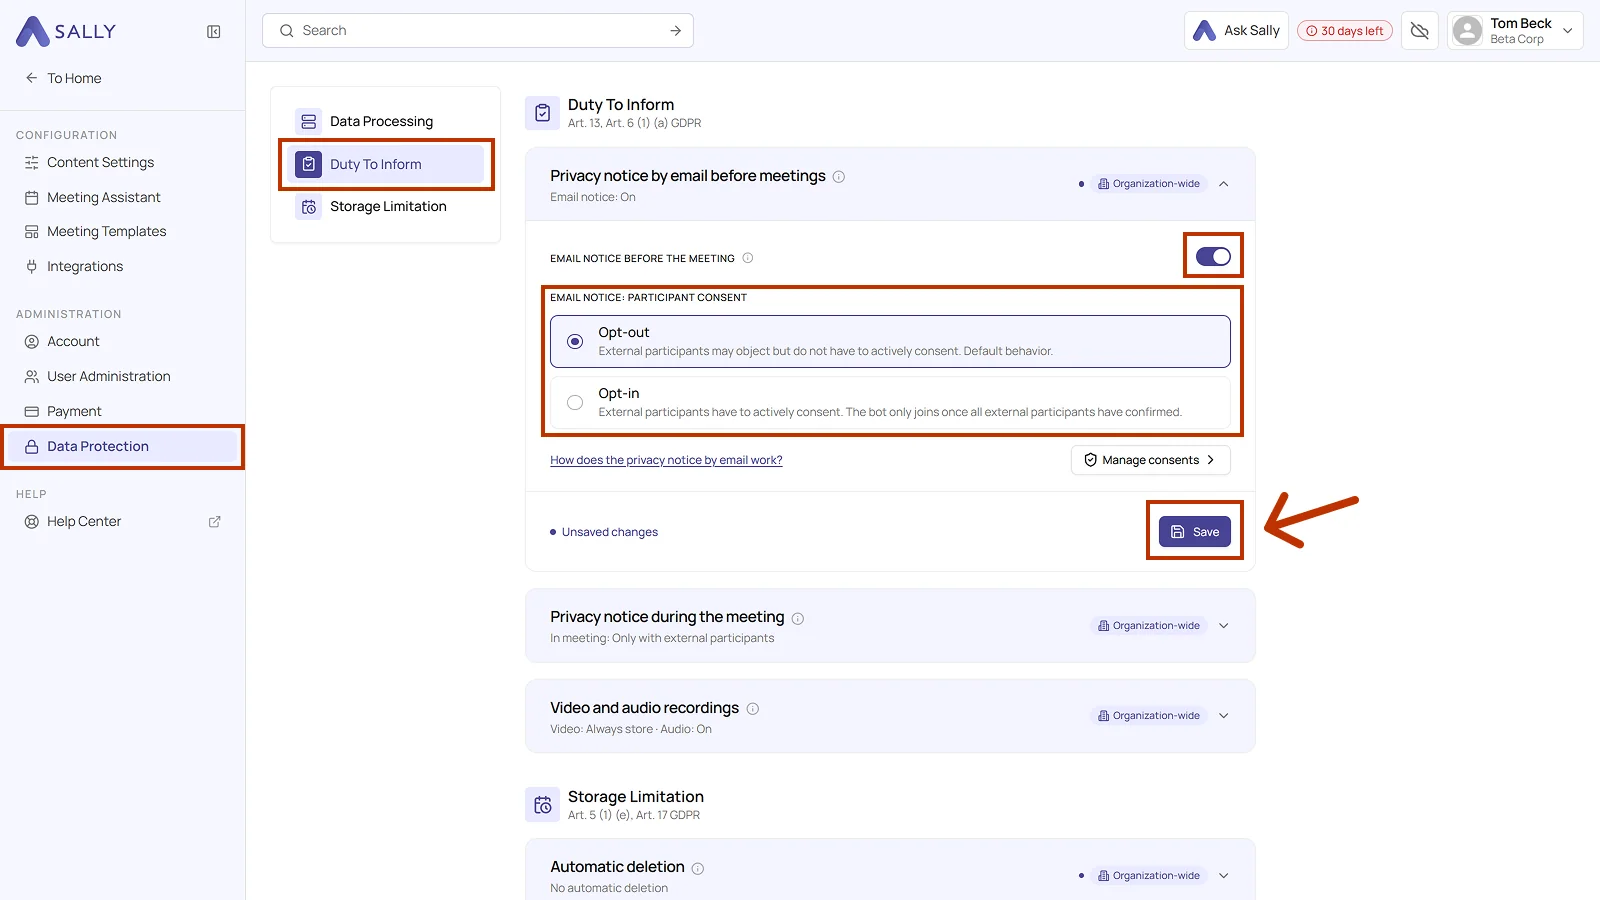
- Under Administration, open Data Protection and pick Duty To Inform on the left.
- Open the Privacy notice by email before meetings section. The line below shows whether the notice is currently active: Email notice: On.
- Turn on Email notice before the meeting if participants should be told about the planned recording by email.
- Under Email notice: participant consent, choose between Opt-out and Opt-in.
- Click Save. Until you do, an Unsaved changes note sits next to the button.
The email goes to every participant. It is not sent to anyone who switched on the Sally recording for this meeting themselves, who has already given permanent consent, or who declined the meeting invitation. Someone who declined and joins anyway can still object by typing "opt out" in the chat.
The difference between opt-out and opt-in
Sally sends the same kind of email either way. The difference is only what happens when nobody replies.
| Situation | Opt-out | Opt-in |
|---|---|---|
| Nobody replies | Sally joins | Sally does not join |
| Participants have to | do nothing, but they may object | actively consent |
| Useful when | a heads-up beforehand is enough | you need documented consent, in strictly regulated fields for example |
1.1 Opt-out
Sally joins the meeting unless someone objects. This is the default.
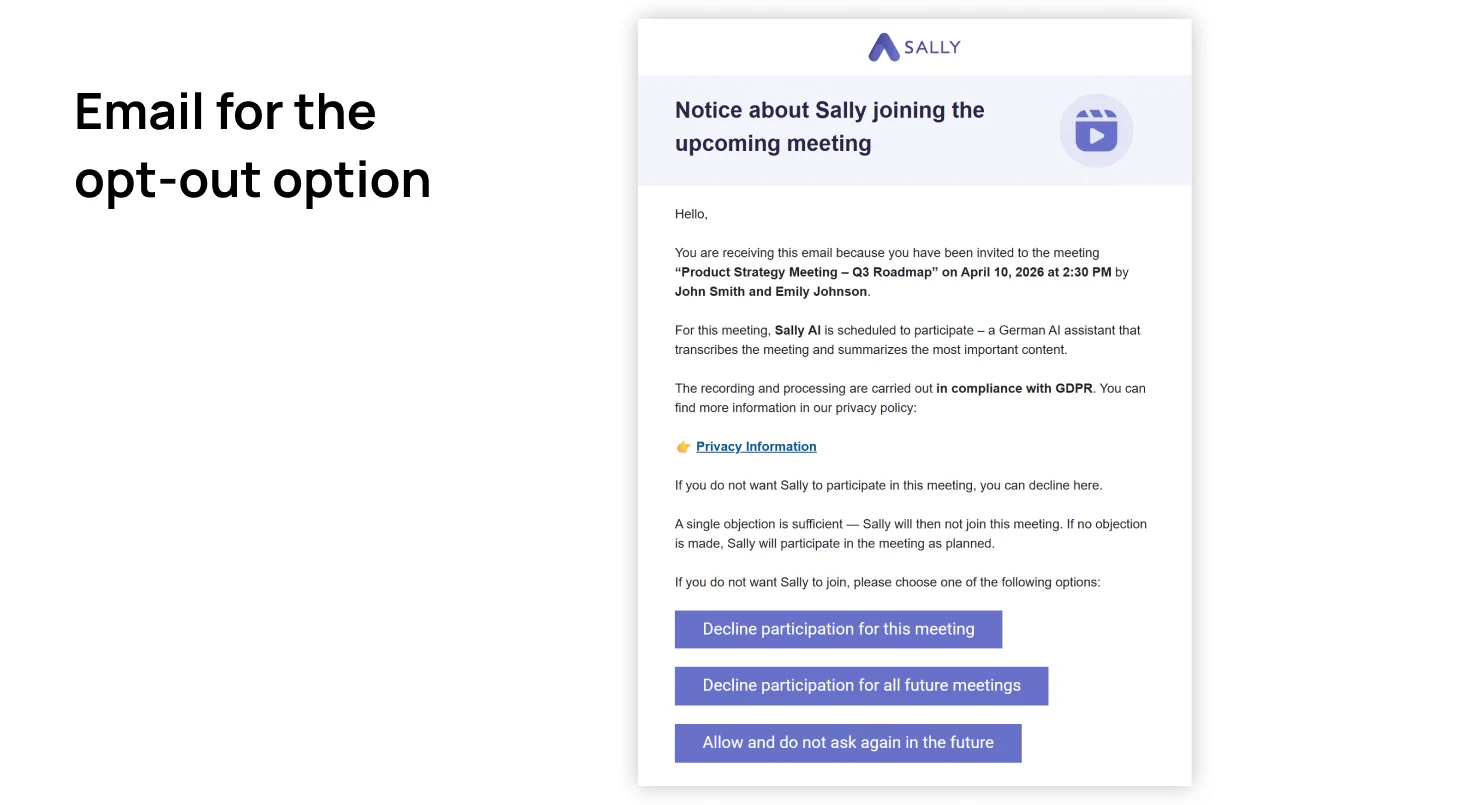
The email names the meeting, the time, and who invited them, briefly explains what Sally does in the meeting, and links to the privacy information. Below that are two buttons and two links:
- Decline for this meeting
- Decline for all future meetings
- Allow participation for this meeting only
- Allow and don't ask again
A single objection is enough to keep Sally out of that meeting.
If a participant has already declined for all future meetings, Sally sends no email at all for their meeting and does not join. This applies to both opt-out and opt-in. An admin can reset the entry under Manage consents.
1.2 Opt-in
Sally only joins once every participant has consented, including colleagues from your own company. The only exception is whoever switched on the recording for this meeting. If even one consent is missing, Sally stays out.
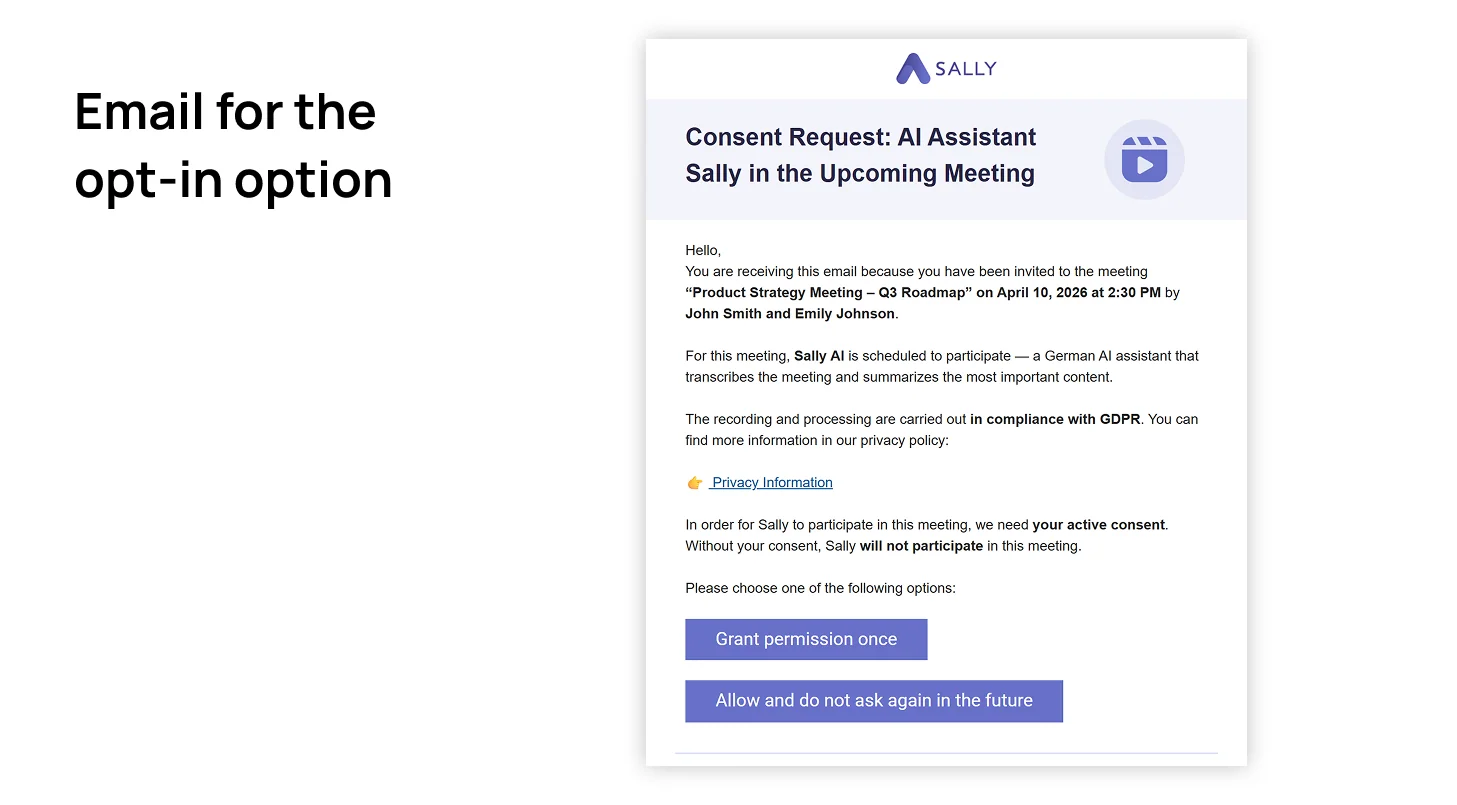
The email asks for consent explicitly and offers two buttons:
- Allow this once
- Allow and don't ask again
By default the email goes out one hour before the meeting. For short-notice meetings it is sent if the meeting was created at least 15 minutes before it starts. With even less lead time, no email is sent.
Sally checks 30 minutes before the start whether everyone has consented. If a consent only arrives after that but before the start, Sally still joins. The earlier everyone has consented, the more punctually Sally joins.
For recurring meetings with colleagues, Allow and don't ask again saves time, because each person only has to consent once. If consent is demonstrably on file already, an admin can store it under Manage consents with Add email.
Participants can object at any point during the meeting by typing "opt out" in the chat. Sally then leaves the meeting automatically.
1.3 How participants confirm their choice
A click on a button in the email does not save anything yet. It opens a page in the design and language of the email. The page shows the meeting, who invited the participant, and the same options as the email, with the clicked one already selected. The decision is only saved when the participant clicks Confirm choice.
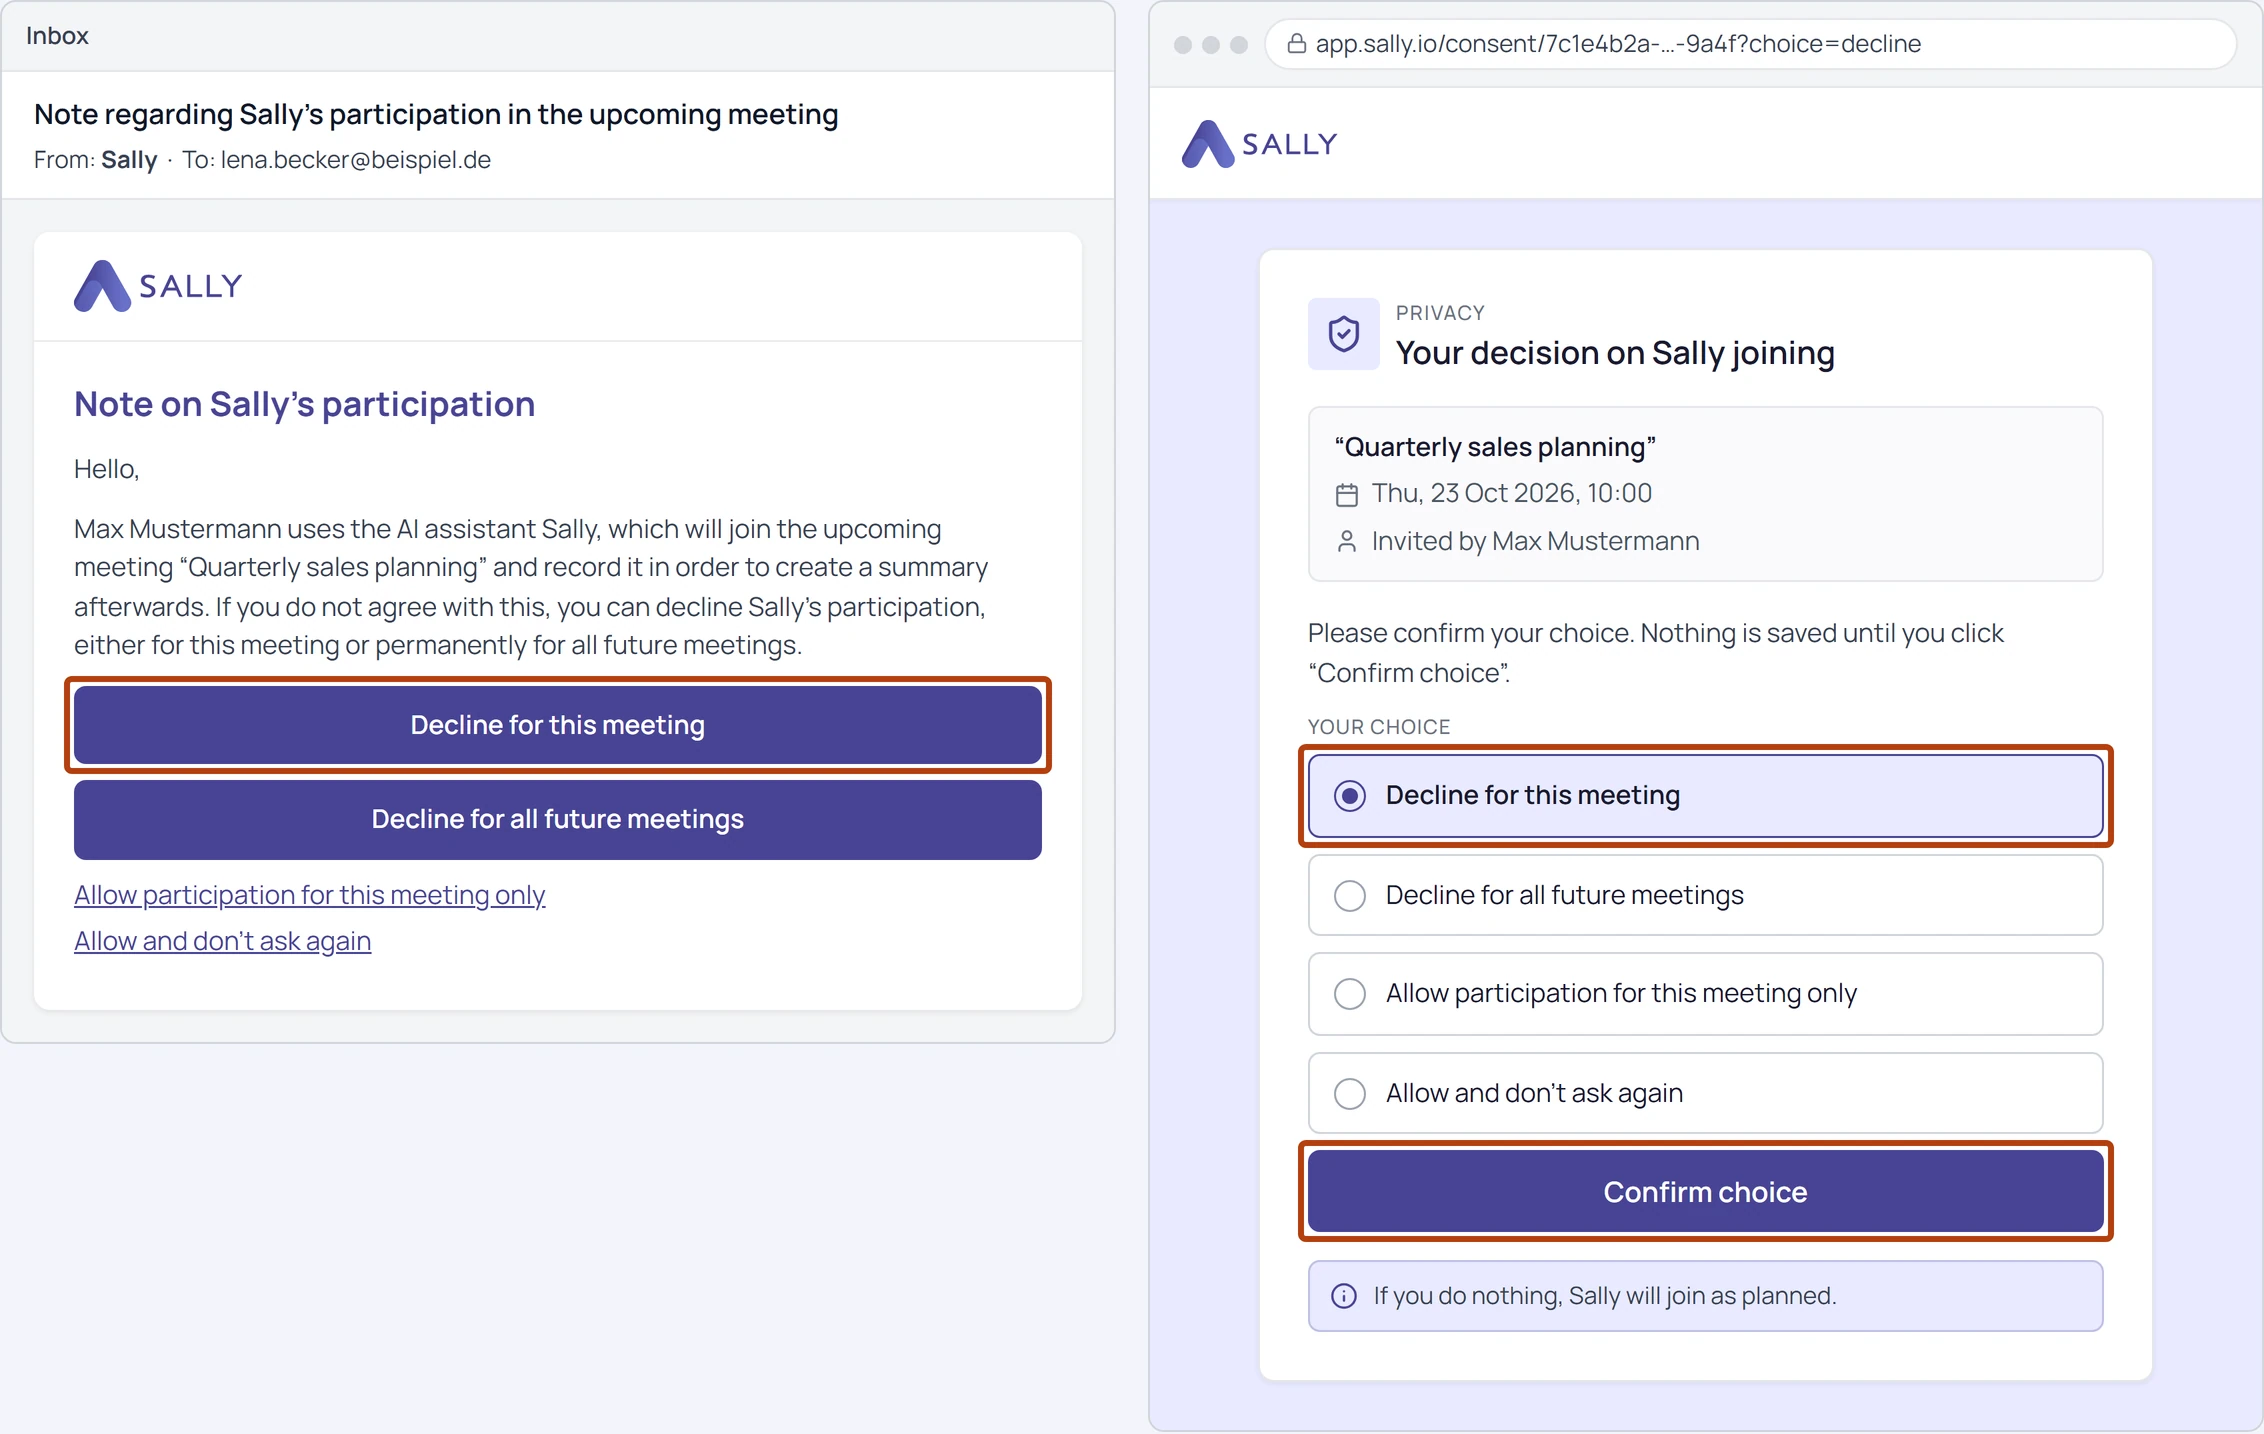
This keeps mail filters from deciding for your participants. Many companies have every link in an incoming email opened automatically to check it. Opening the page alone changes nothing, so the decision always comes from the participant.
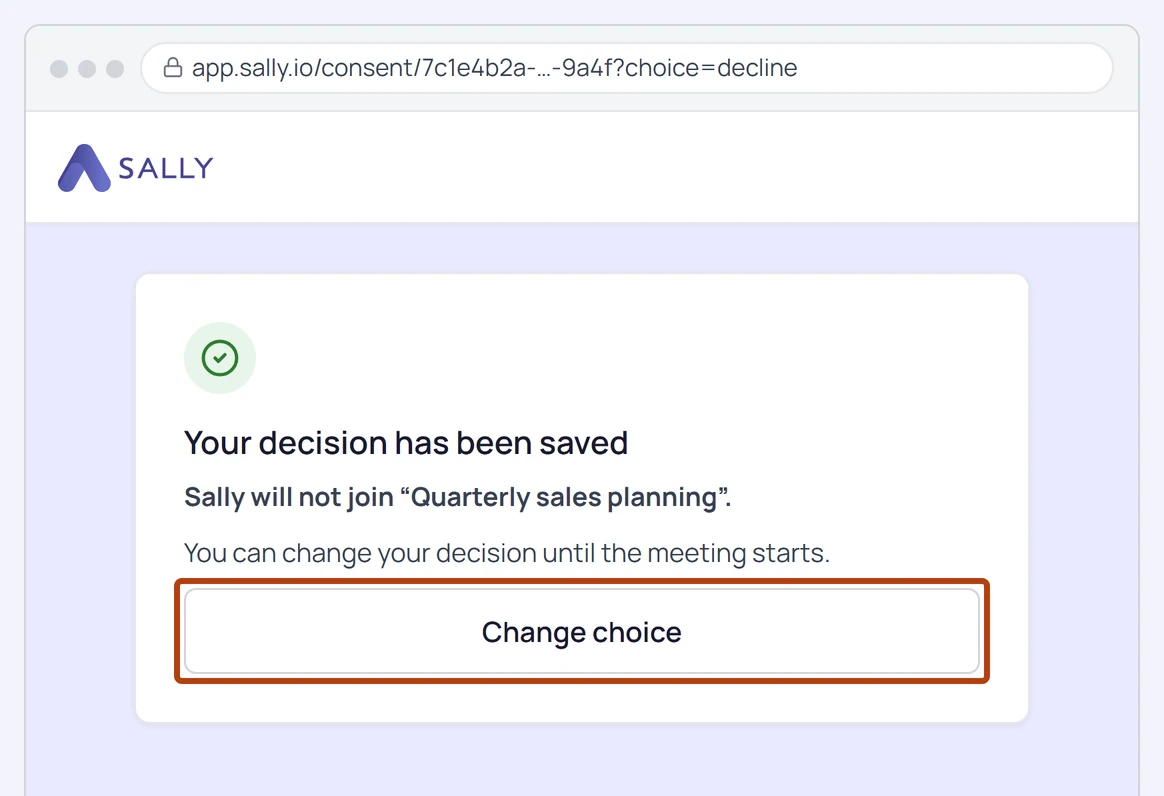
After confirming, the page states in one sentence what now applies, for example that Sally won't join the meeting. Participants can change their decision with Change choice until the meeting starts. If they open the link again later, the page shows what is currently saved. Once the meeting has started, the link has expired and the page only shows which decision was saved at the start.
If your company uses a consent email with wording created specifically for you instead of the standard email, a click still saves the decision straight away for now. The confirmation page will follow once your company has approved it.
If someone confirms more than once, the last confirmed choice counts. A choice always counts for the address the email was sent to, so confirming a forwarded email gives consent for the original recipient, not for yourself.
2. Manage and adjust consents
This area lets you review and selectively edit participant consents. It is particularly helpful when a participant chose the wrong option by mistake, or when you want to document consents properly after the fact.
Editing consents without the agreement of the people involved can breach the GDPR. Only make changes in coordination with the participants, and document them internally if in doubt.
2.1 View consents
- Open Settings and, under Administration, go to Data Protection and the Duty To Inform area.
- In the Privacy notice by email before meetings section, click Manage consents.
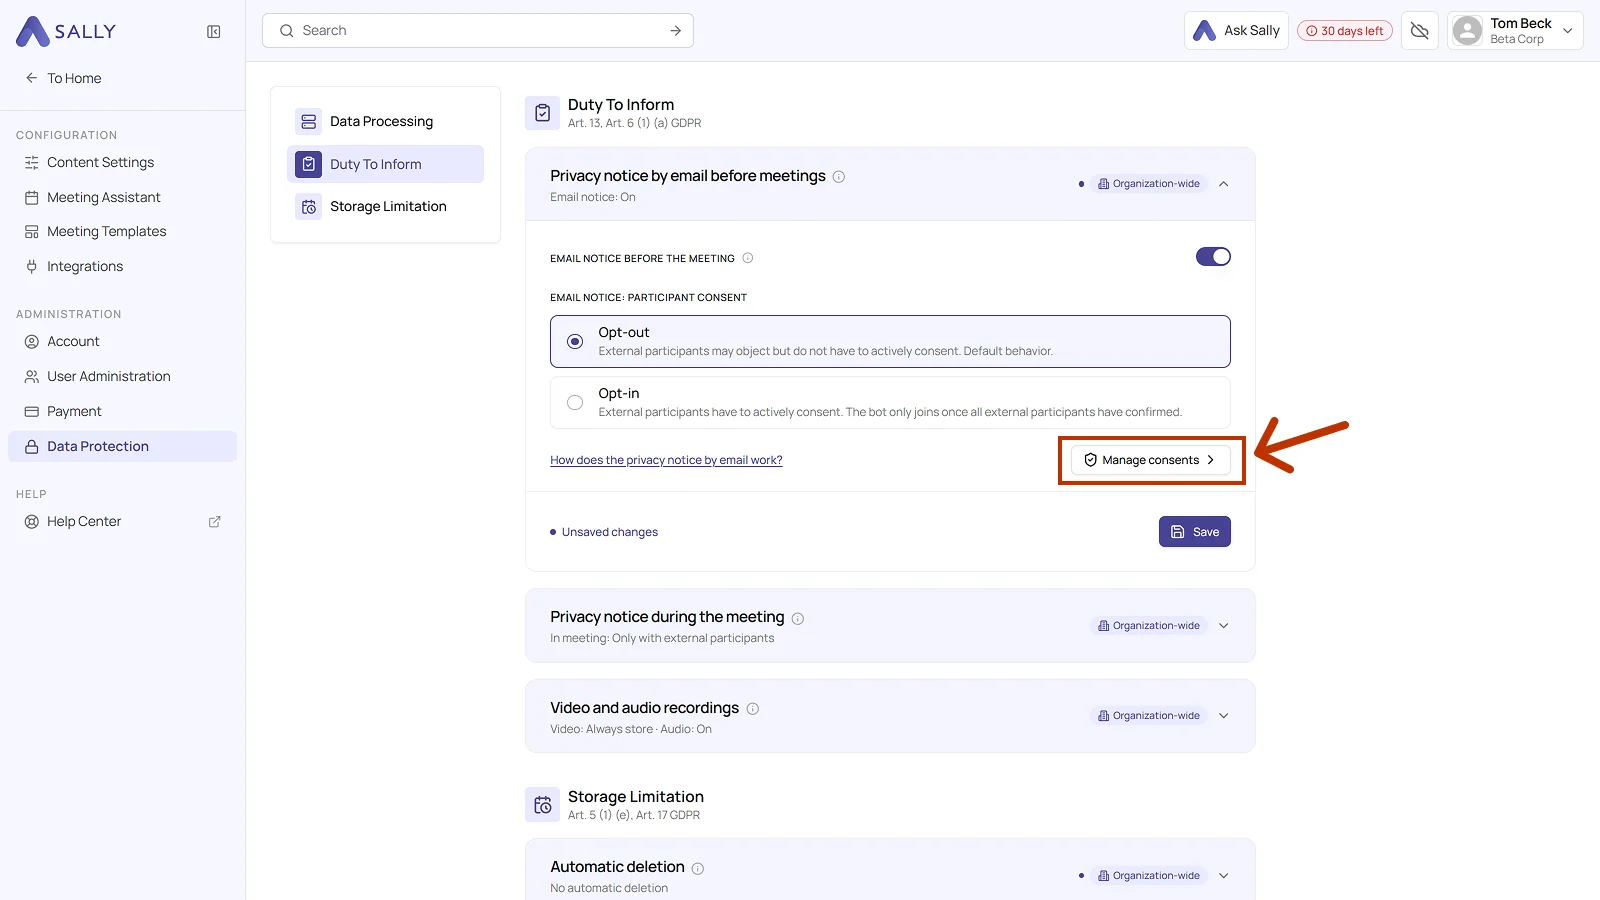
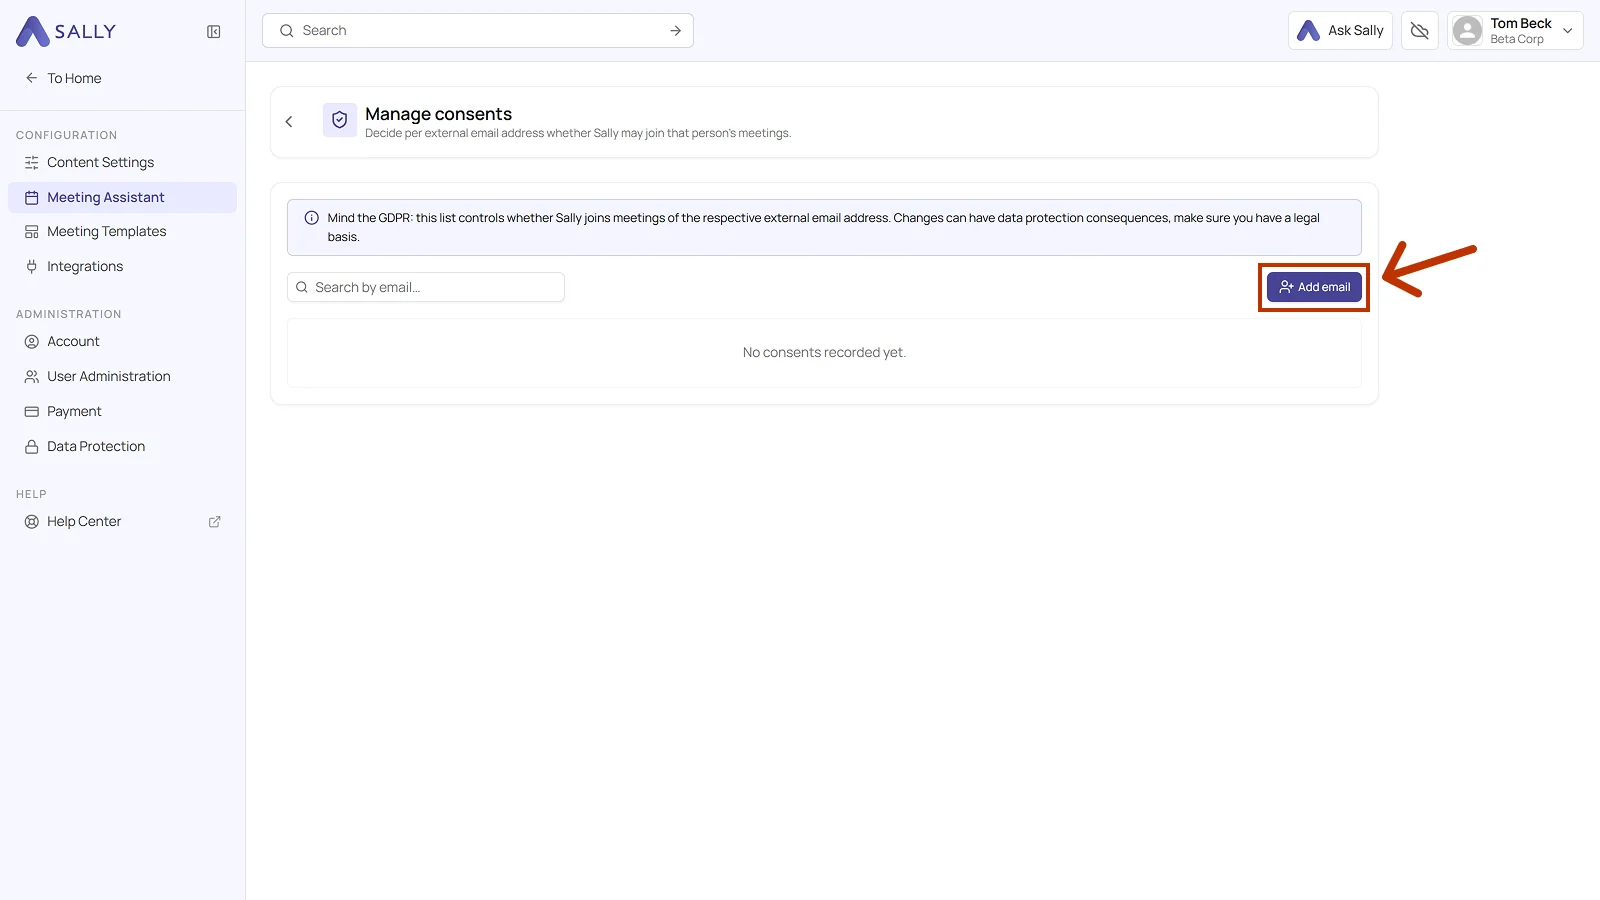
- You land in the Manage consents overview. There you decide per email address whether Sally may join that person's meetings. As long as nothing is on file, it reads No consents recorded yet.
Once entries exist, the table shows:
- the person's email
- the status, either Join all meetings or Join no meeting
- Granted on with the date of the decision
- Action with the Reset entry
The search field finds an address directly, even in long lists.
2.2 Edit consents
There are two ways to adjust consents:
- Reset a consent → the participant can decide again
- Add an email manually → define the consent up front (for known participants or long-standing partners)
Reset consent
If a participant declined by mistake, you can reset their status:
- Find the participant in the list.
- In the Action column, click Reset.
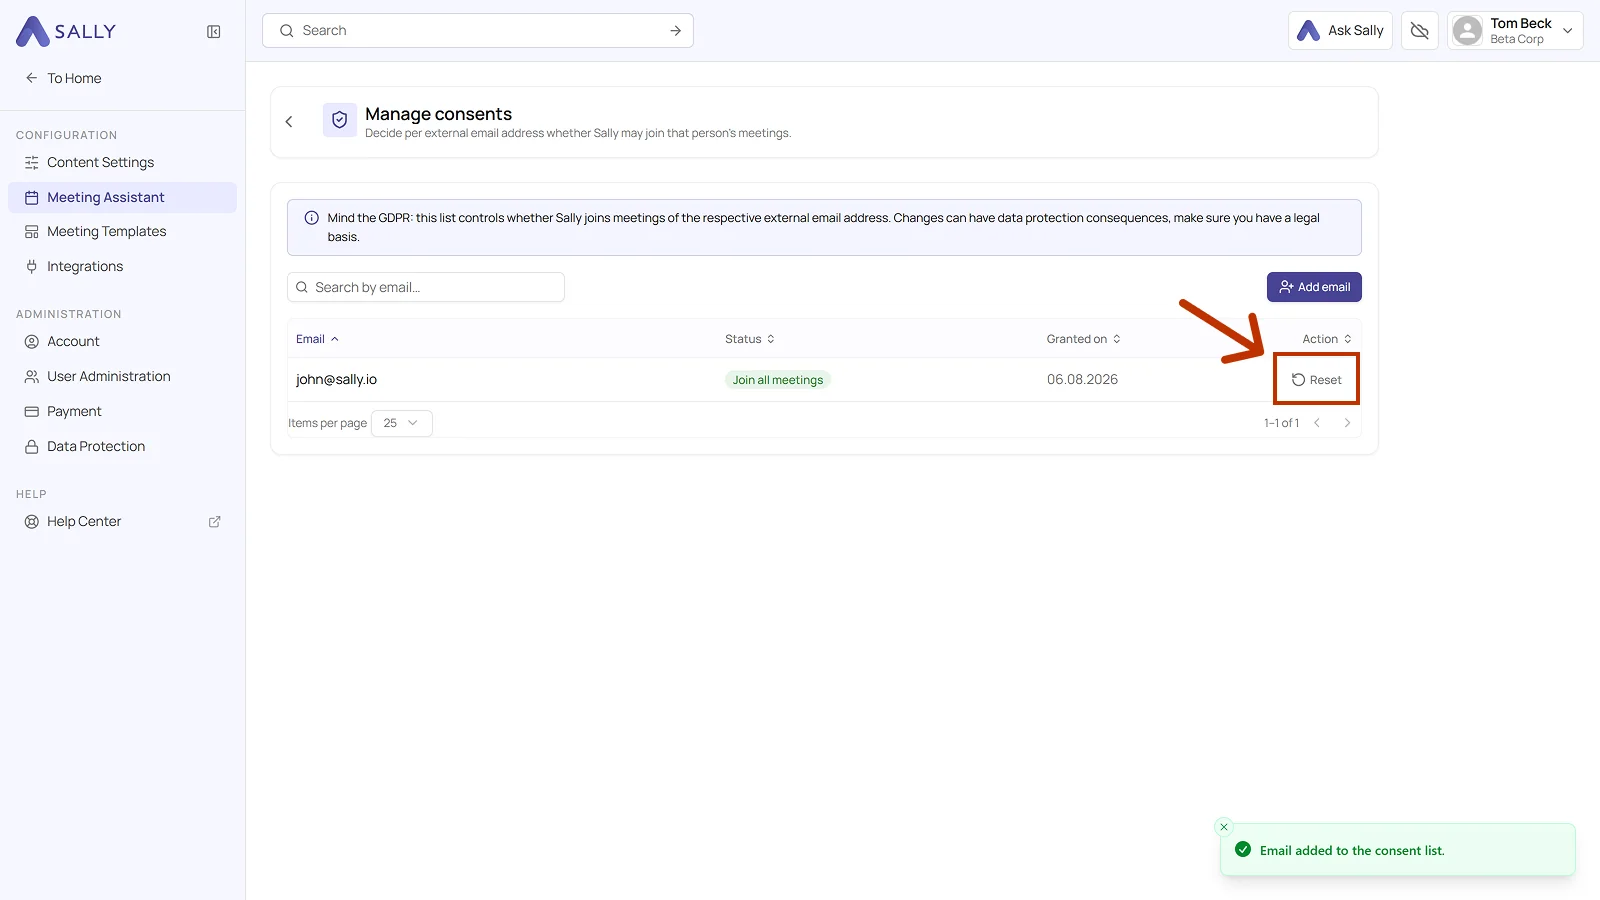
At the next meeting, that participant gets to make their choice again.
Resetting a consent does not send a new email right away.
The person is informed automatically again with the next newly created meeting and can then give their consent once more.
Manually add participant
You can also set consents proactively, for example when:
- you work with the same external partners regularly
- consent was already obtained outside of Sally (contractually, for instance)
- In the overview, click Add email.
- In the Add an email to the consent list panel, enter the email address and pick the consent status. The two choices are Join all meetings and Join no meeting.
- Click Add to store the entry, or Cancel to discard it.
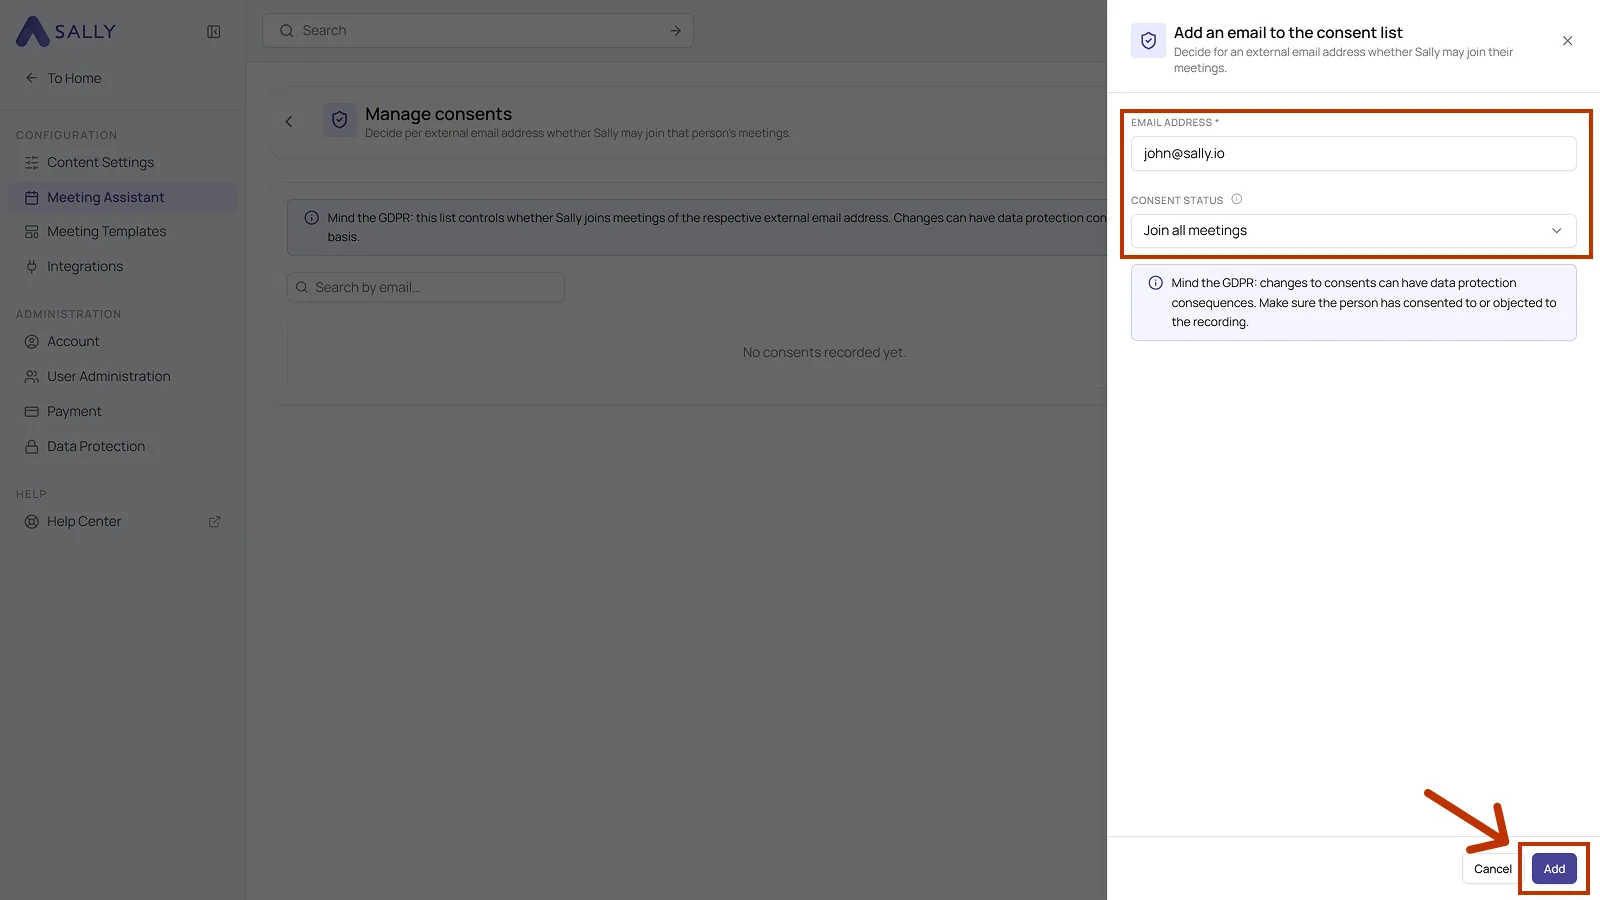
Use this sparingly and only when the consent is demonstrably on file (in writing or contractually agreed, for example).
3. See who objected to the recording
If a participant objects to the recording, Sally shows on the appointment who it was. This applies to both ways of objecting: declining in the email before the meeting, and typing "opt out" in the meeting chat.
You see the name or email address in these places:
- Attendee list of the appointment: the row of the person who objected is marked with Consent denied or Opt-out.
- Status of the appointment: instead of "a participant", Sally names the person, for example "Name did not consent to the recording." or "Name triggered the recording stop, Sally stopped the recording." If several people objected, it reads "Name and 2 more".
What the objection does stays the same: Sally stays out of the meeting or stops the recording.
3.1 Turn off the names
The names are shown by default. If you don't want that, an owner or admin can turn it off for the whole company:
- Open Settings, then Data Protection under Administration, and pick Duty To Inform on the left.
- Open the Objection to the recording section. The line below shows the current state, for example Names: visible.
- Turn off Show objecting participants by name.
- Click Save.
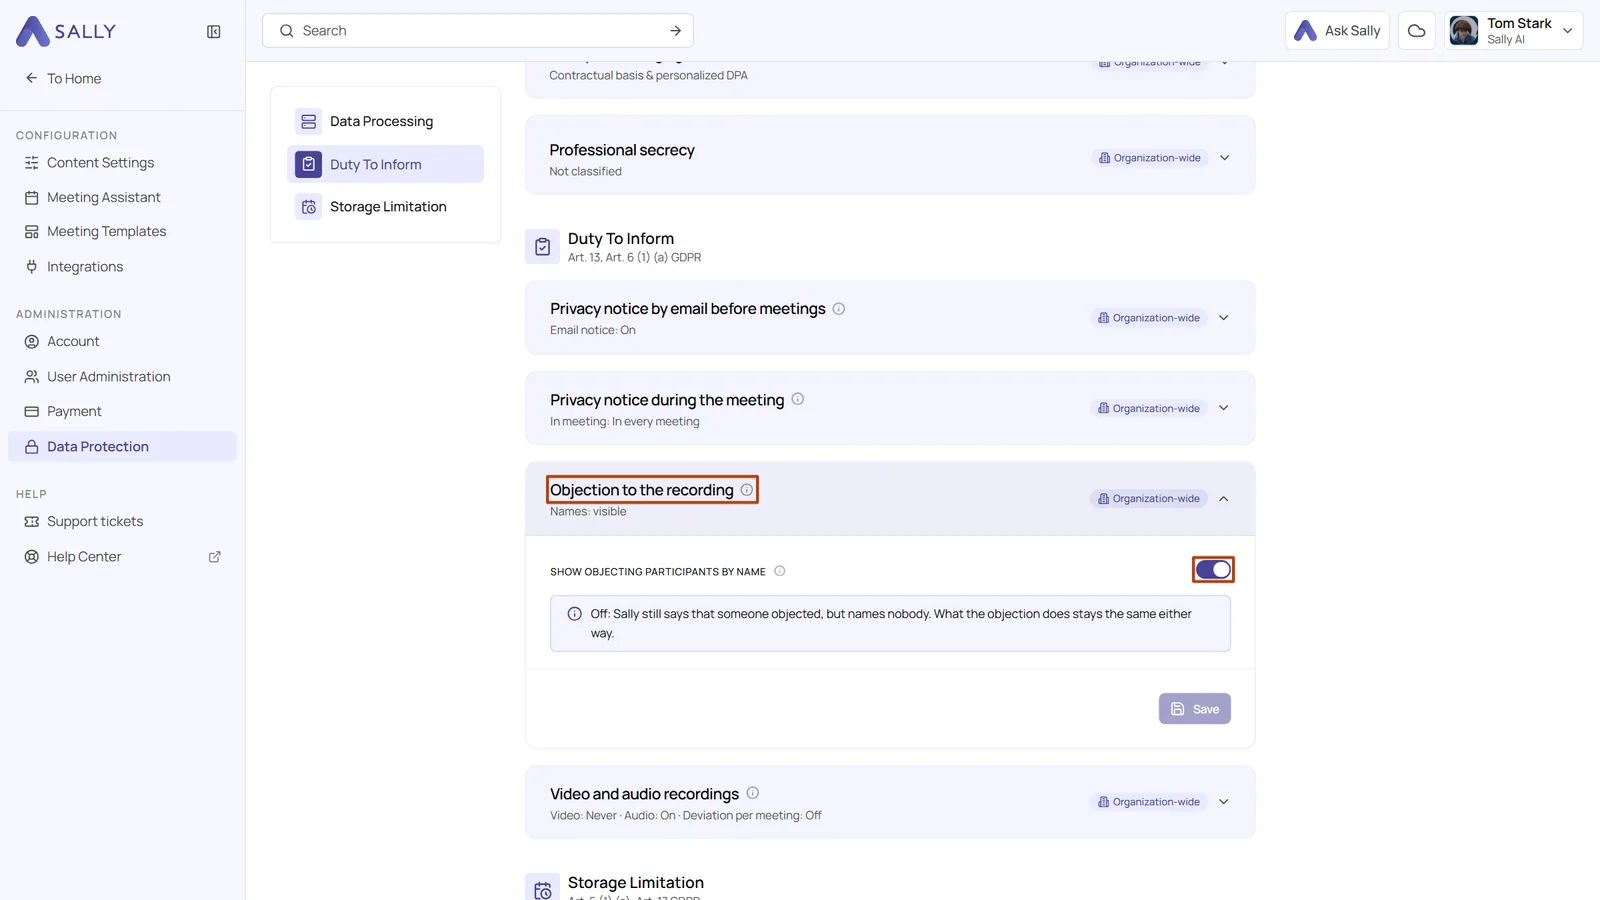
Sally then still shows that someone objected, but names nobody. The names are not passed to the app at all in that case, so they can't be read anywhere else either. The Manage consents list is not affected, it keeps showing the addresses of permanent decisions.