How to integrate Microsoft Apps with Sally AI
Connect Sally AI with your Microsoft apps, so Planner, Microsoft To Do and OneNote, and create tasks and notes straight from your meetings.
One click puts your follow-ups into your Microsoft workspace, and all your tools show the same state.
Quick navigation
- How to connect Microsoft Apps with Sally AI
- How to create tasks and notes in Microsoft Apps
- Permissions and admin consent
1. How do I connect Microsoft Apps with Sally AI?
Follow these steps to enable the Sally Microsoft Apps integration.
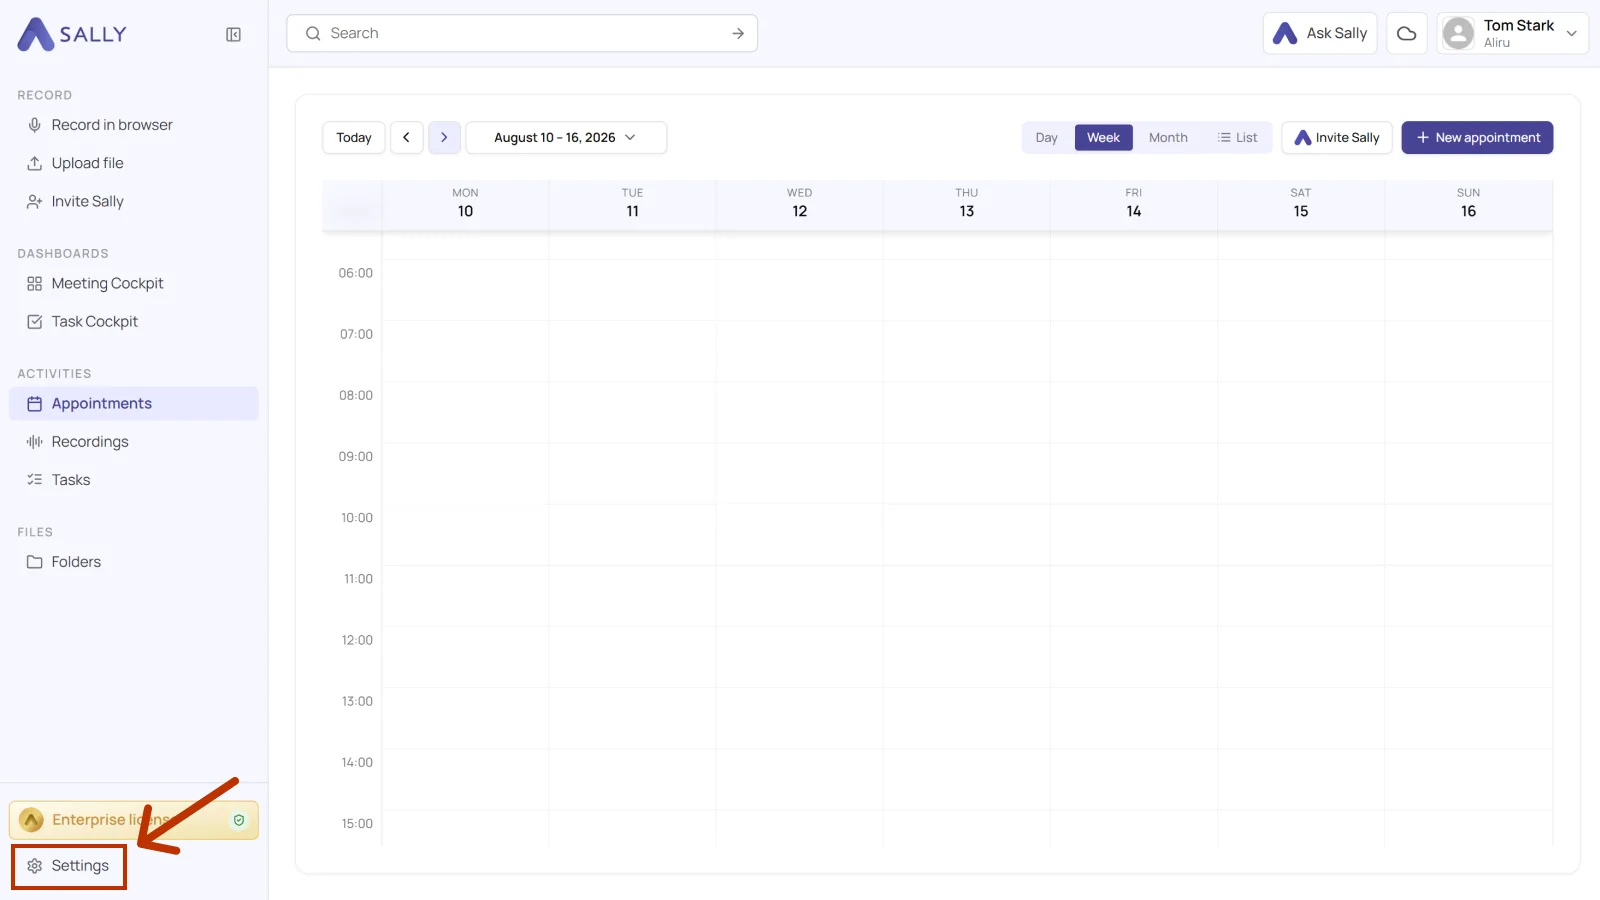
- Open Settings from the bottom-left corner of the sidebar.
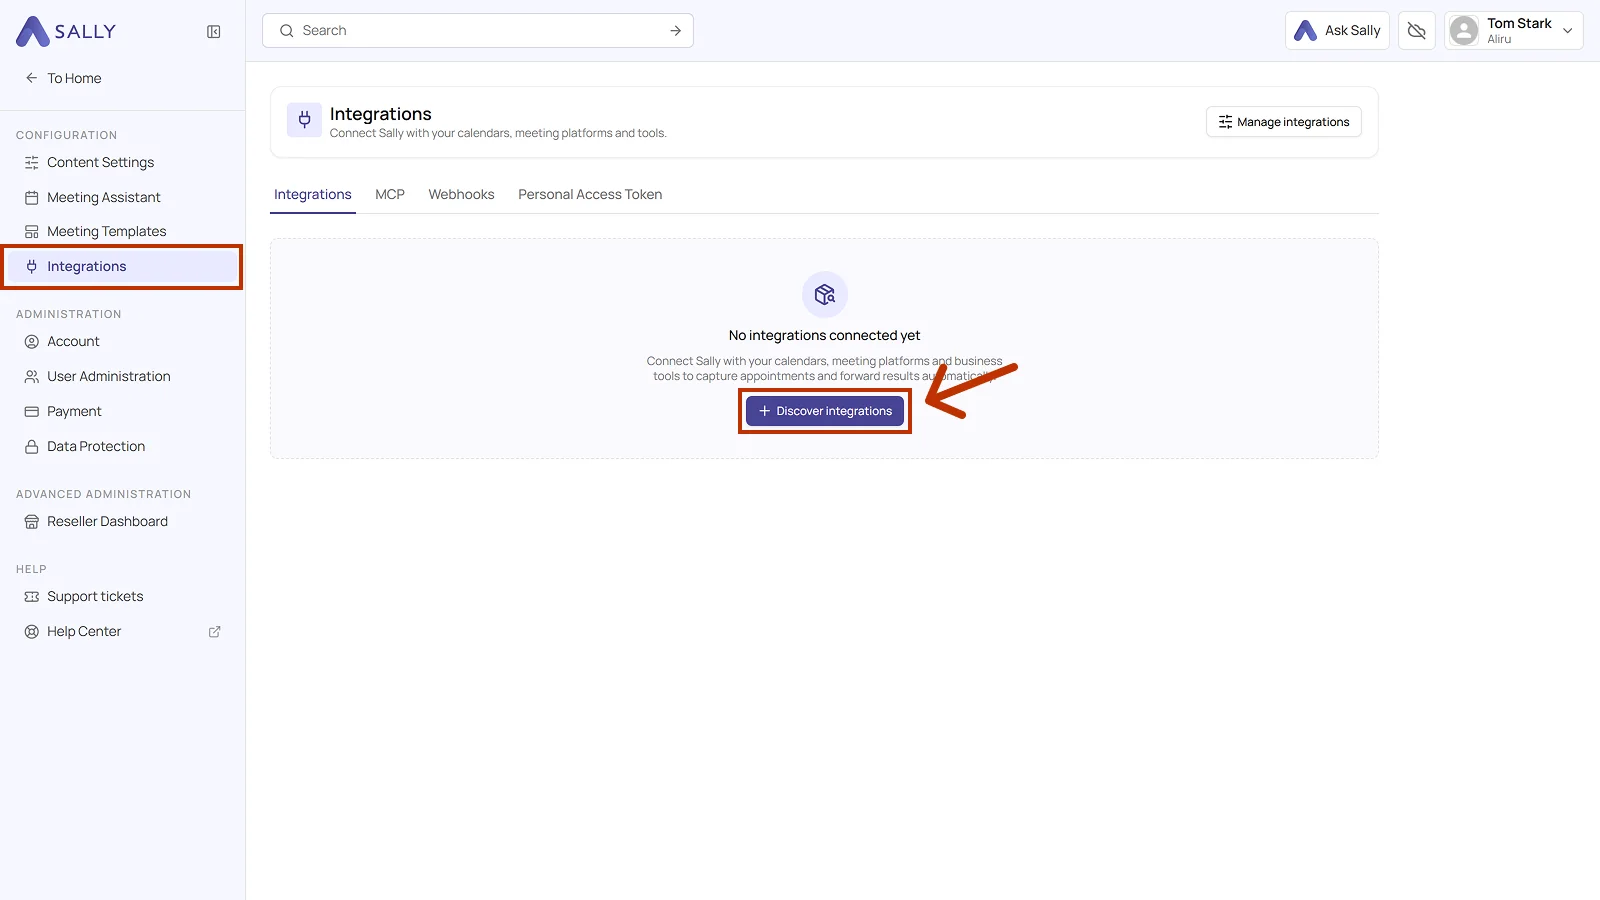
- Under Configuration, select Integrations. If no integration is connected yet, click Discover integrations, otherwise click Add integration in the top right corner.
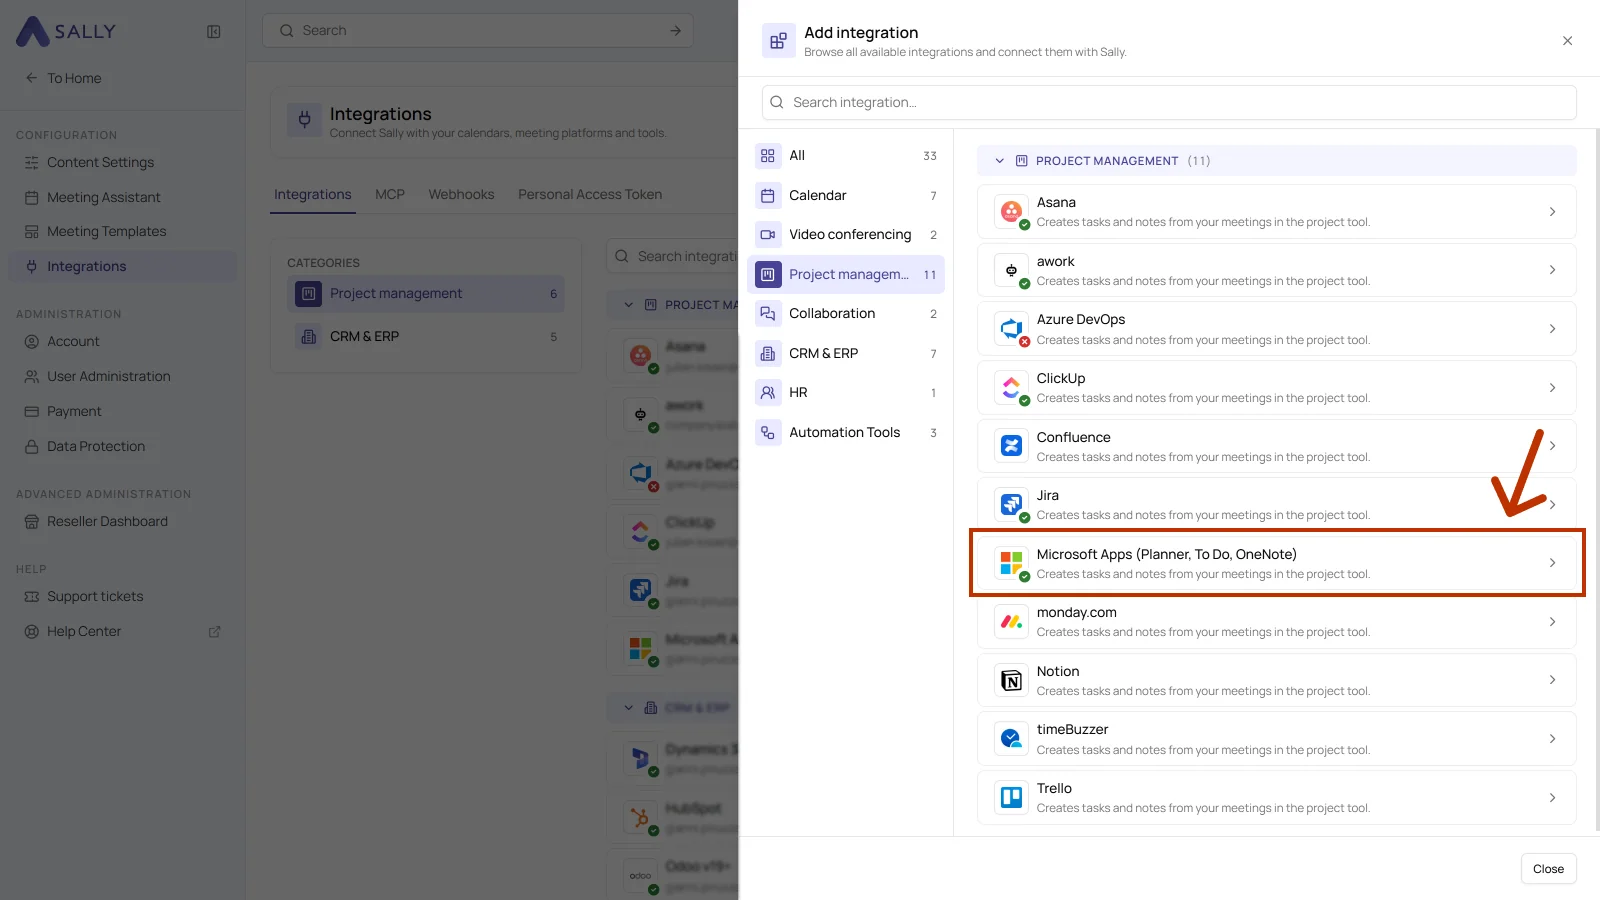
- In the Add integration panel, pick the Project management category on the left and then Microsoft Apps (Planner, To Do, OneNote). Complete the login on the Microsoft side.
As a Microsoft 365 administrator, you can also approve the permissions for everyone at once with admin consent for the whole organization. The consent prompt then no longer appears when people connect.
- After the login, the integration appears in the list under the Project management category. Disconnect in the top right corner ends the connection whenever you need to.
If your connected Microsoft account is a personal account, only the option to create a task in To Do
is available.
Other actions, such as creating tasks or comments in Planner or saving meeting notes in OneNote, require a work, school, or university account.
When a personal account is used, these buttons will appear grayed out or unavailable.
Microsoft distinguishes between two main account types:
-
Microsoft account (personal):
A personal account you use to access consumer services like Outlook.com, Xbox Live, or Microsoft Store.
These accounts are usually linked to an email ending with @outlook.com, @hotmail.com, or similar. -
Work, school, or university account:
An account provided by your organization (e.g. a company or educational institution) that gives access to Microsoft 365, Planner, To Do (work), Teams, OneNote, and other enterprise tools.
1.1. Which actions may Sally use?
A connected integration has two tabs, Overview and Actions. The Actions tab defines what Sally offers through this integration, in the Sally chat and after the meeting.
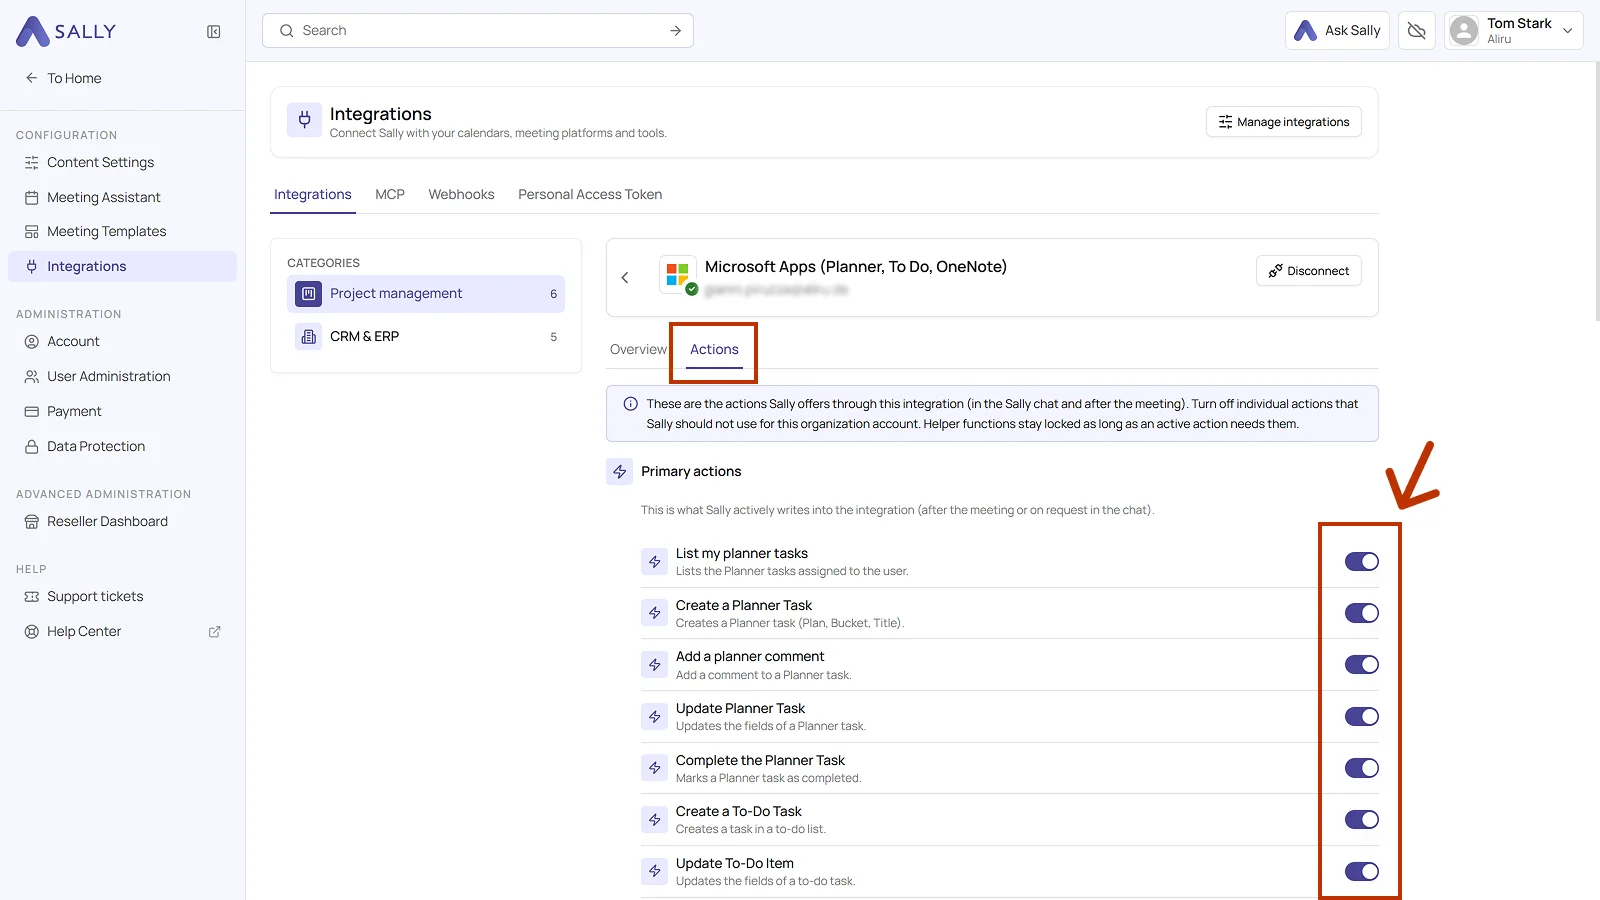
Primary actions are what Sally actively writes into Planner and To Do, meaning listing, creating, updating, commenting on, and completing tasks. Each action explains what it does in the line below it.
Use the toggle on the right to take out a single action that Sally should not use for this organization account.
Not every action shows up in the selection at the meeting. Sally uses some of them itself, in the chat or as part of another action. Leave them switched on so the integration works in full, and switch off only what Sally really should not do in this organization account.
Below that sit the helper functions, the read and search functions that support the primary actions, for example finding a plan or a list. They stay locked as long as an active action needs them.
2. How do I create tasks and notes in Microsoft Apps?
Once the integration is connected, you can send meeting insights from Sally to Planner, To Do, or OneNote with a single click.
You can:
- Transfer one task to Planner
- Transfer several tasks to Planner at once
- Add a comment to an existing Planner task
- Create a task in Microsoft To Do
- Create a page in OneNote
- Create task in Planner for a single task in the team plan, with a bucket, one or more assignees, and a due date.
- Create tasks in Planner on the Tasks section to turn every task Sally recognized into a Planner task of its own.
- Add comment to Planner task for extra context on an existing task.
- Create task in To Do for a personal task in your own list.
- Create page in OneNote for documentation that should stay around as text.
2.1. Transfer one task to Planner
Turn a single entry from Sally into a new task in Planner.
- Open the meeting in Sally.
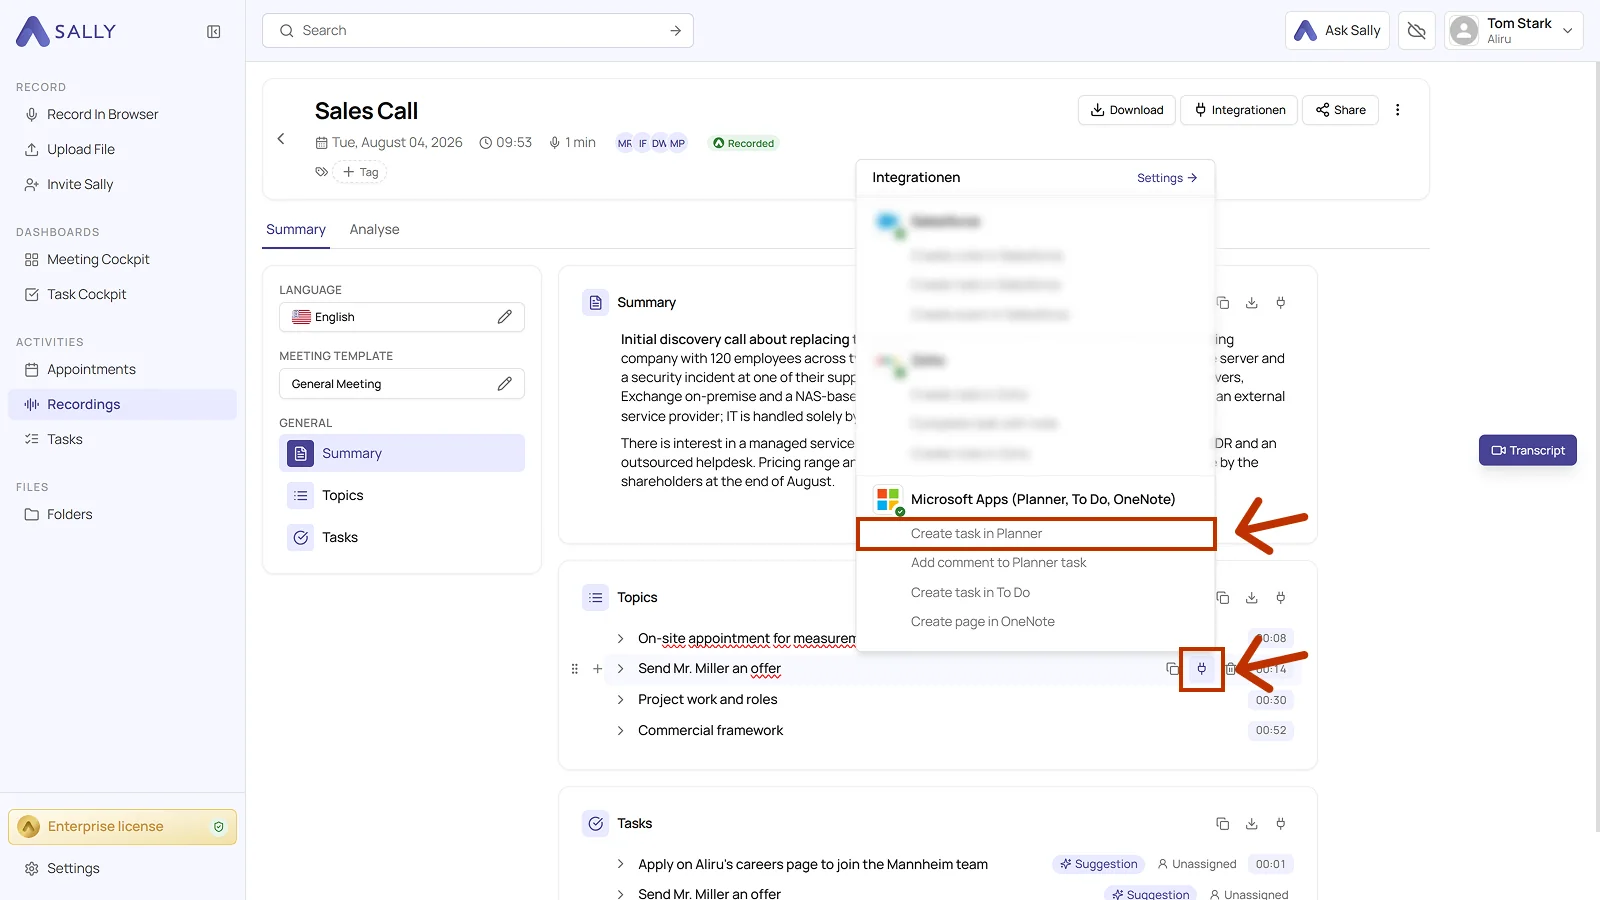
- In the summary, hover over a block or over a single entry and click the plug icon. In the list, choose Create task in Planner under Microsoft Apps (Planner, To Do, OneNote).
- Fill in the dialog. Plan, Bucket, and Title are required, and the title already comes prefilled from Sally. Assigned to, Priority, and Due date are optional. Under Assigned to you can pick several members of the plan, up to 20, just like in Planner itself. Everyone you pick appears as a chip in the field and can be removed there one by one.
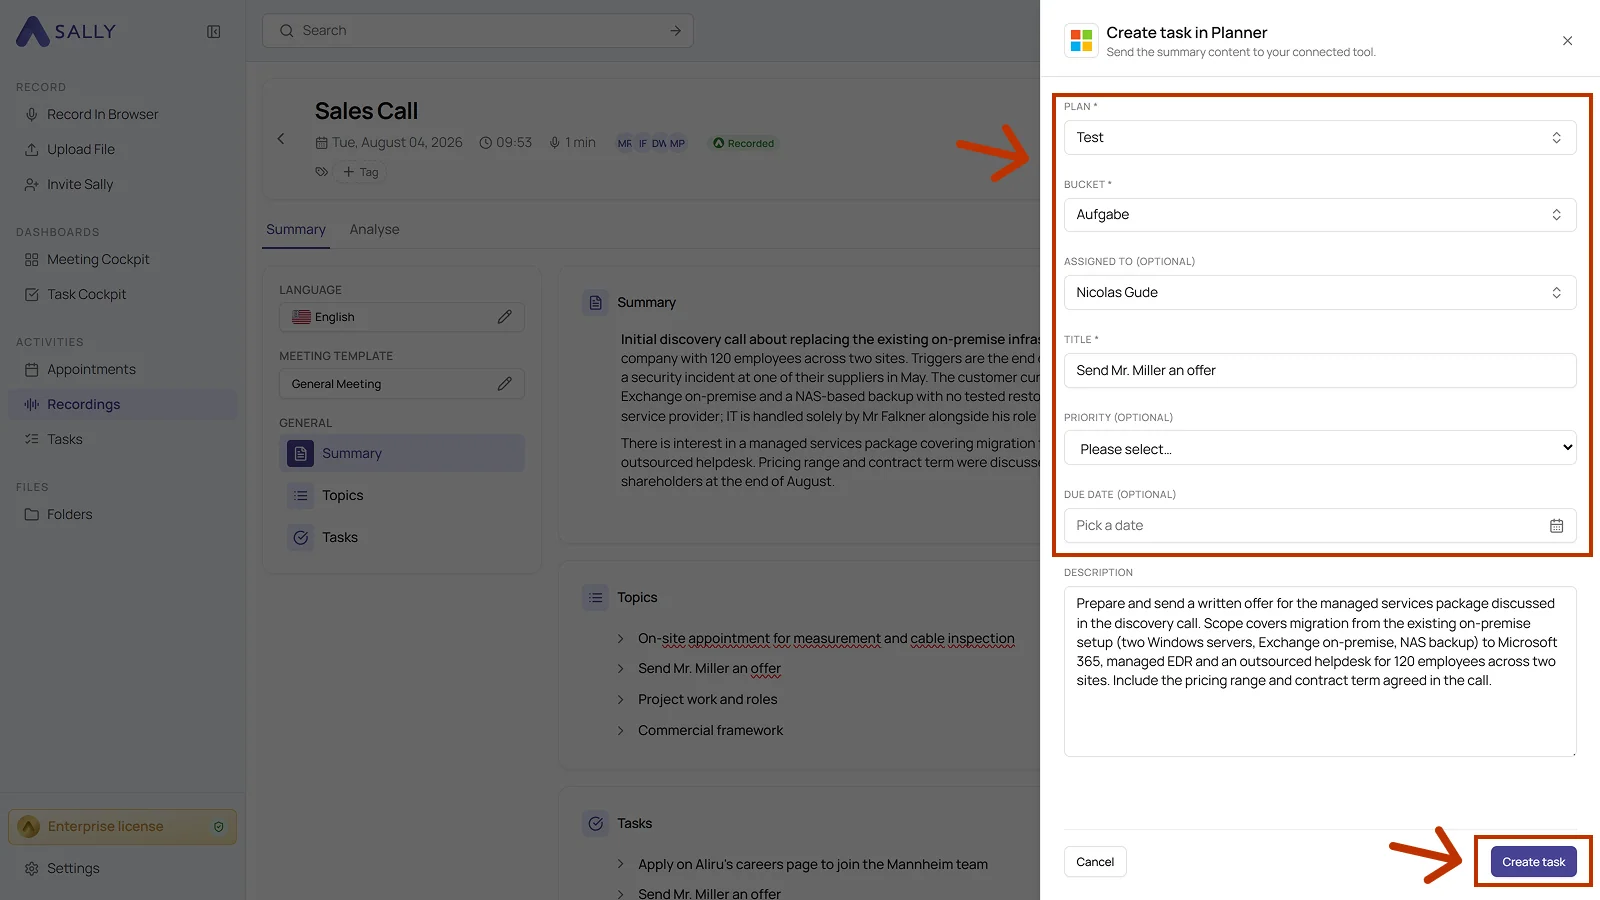
- The description holds the details from the summary where the selected entry has any. You can freely adjust them.
- Click Create task to send it to Planner.
Pick the bucket deliberately and set an owner and a due date right away. The more complete the task, the fewer follow-up questions come back later in the plan.
2.2. Transfer several tasks to Planner at once
If Sally recognized several tasks in a meeting, you do not have to send them one by one. From the Tasks section, Sally creates a separate Planner task for every task, with its own plan, bucket, assignees, due date, and priority.
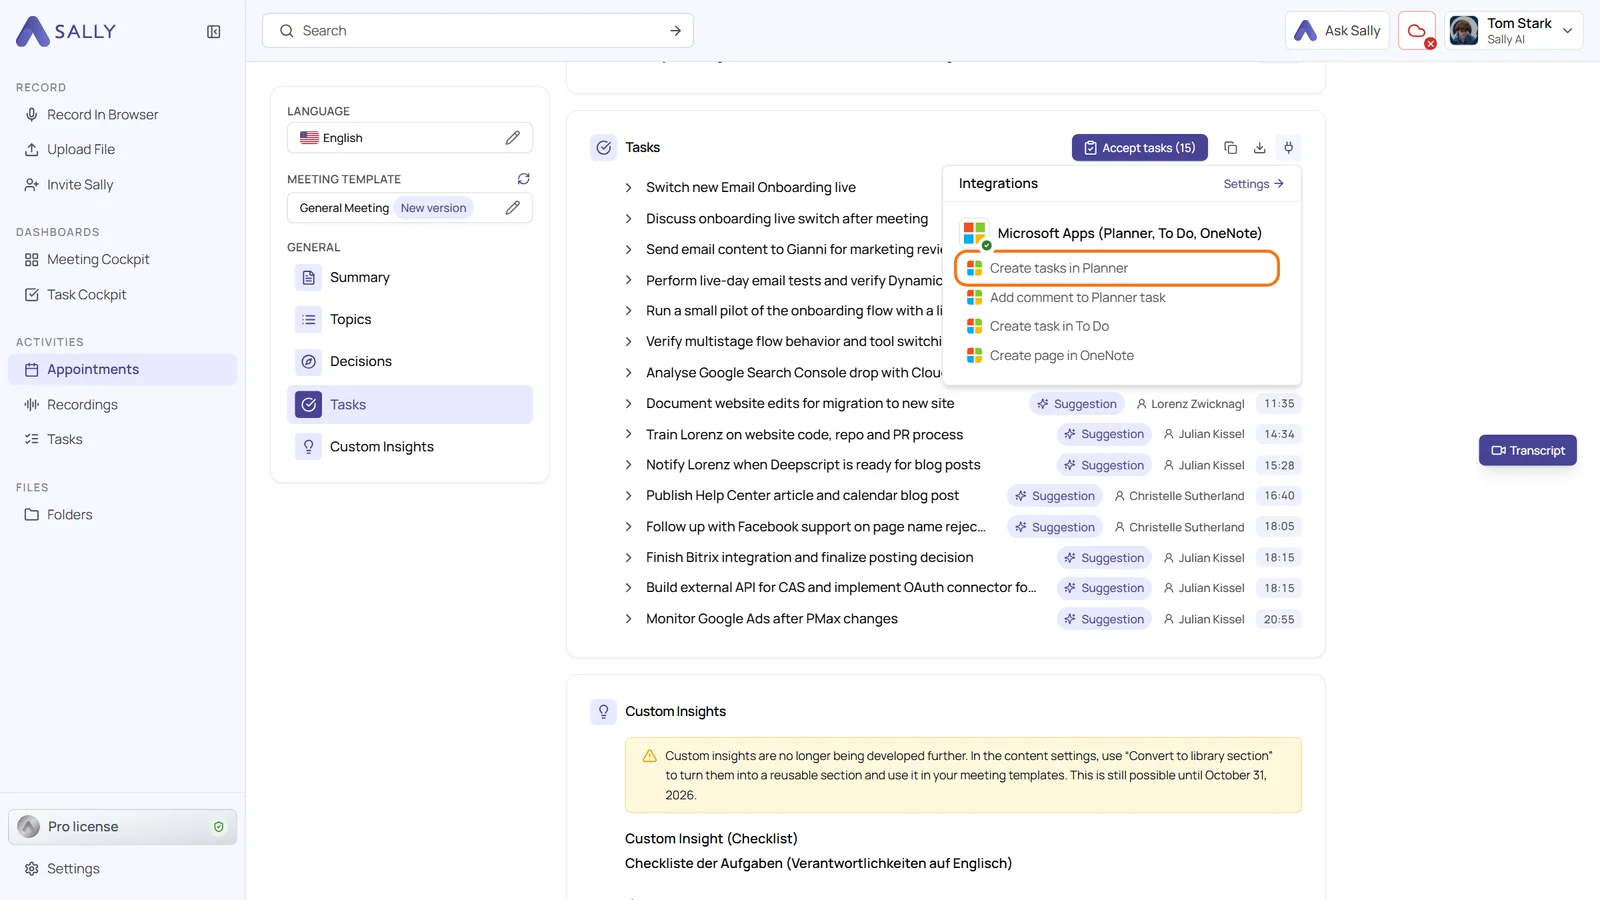
- In the summary, hover over the Tasks section, click the plug icon in its header and choose Create tasks in Planner.
- At the top, pick a plan under Plan for all. It sets the plan for every task at once. Sally then looks for the matching bucket for each task and fills it in. Where nothing clearly fits, the first bucket of the plan stays selected. Plan and bucket can still be changed for each row afterwards.
- Check the rows. Every row has its own title, description, assignees, due date, and priority. Under Assigned to, Sally fills in the person she recognized as responsible, provided they are a member of the plan.
- To assign more people, click the person chip of a row and tick further members. The menu stays open while you choose, a line at the bottom counts along, and Done closes it. The chip then reads like Anna Kunz +2. Up to 20 people per task are possible.
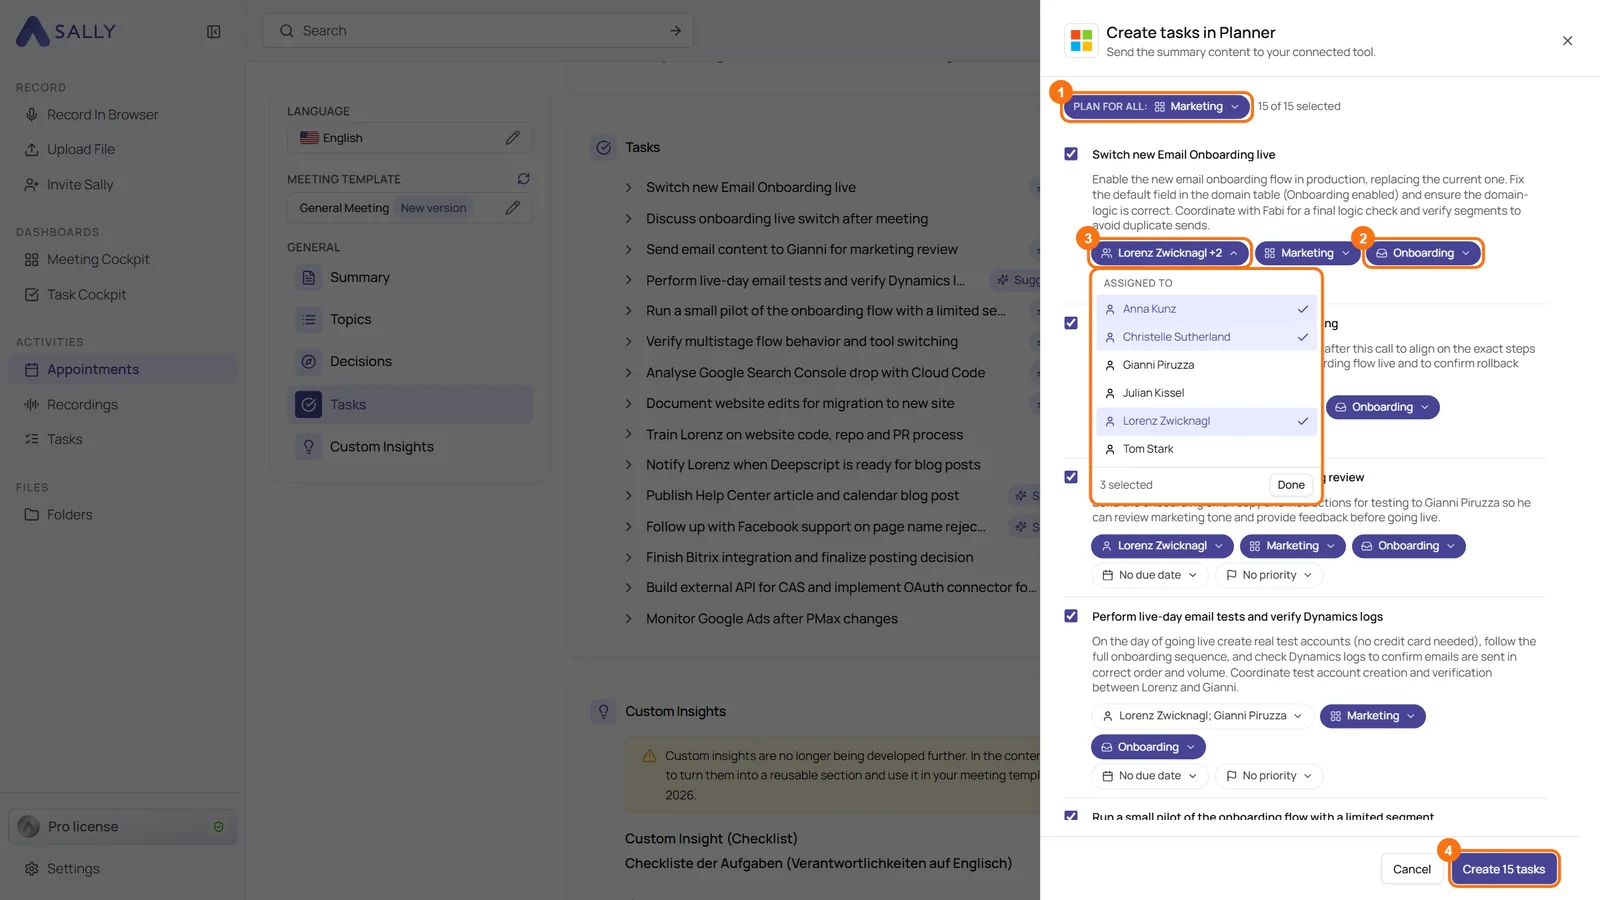
- Untick the tasks you do not want, then click the button at the bottom, for example Create 3 tasks. If something is still missing, such as a plan or a bucket, the button tells you what.
- Switching the plan of a row: only members of the new plan stay assigned. A note names everyone who was removed, so you can assign them again.
- The recognized person is not a member of the plan: the task is created without an assignee, and a note tells you so. Add the person to the plan in Planner, and Sally fills them in next time.
2.3. Add a comment to an existing Planner task
Add meeting context to an existing task, which suits updates, decisions, or extra notes.
- Open the meeting in Sally.
- Click the plug icon on the block or on the entry and choose Add comment to Planner task.
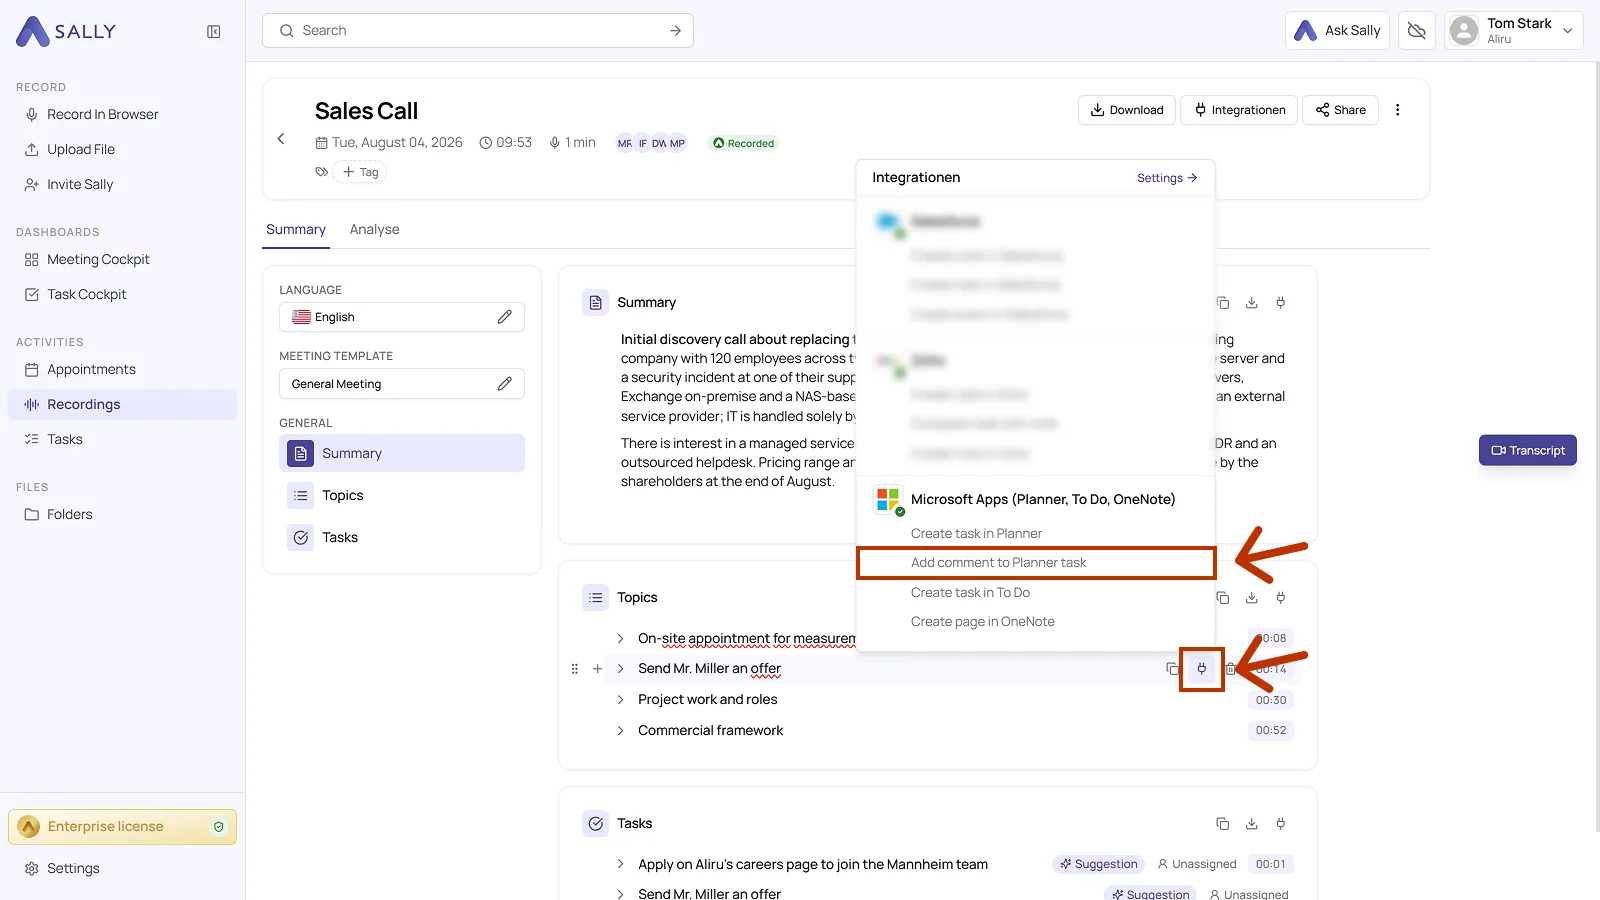
- In the dialog, pick the plan and the task the comment belongs to. The comment field holds the text from the summary. All three fields are required.
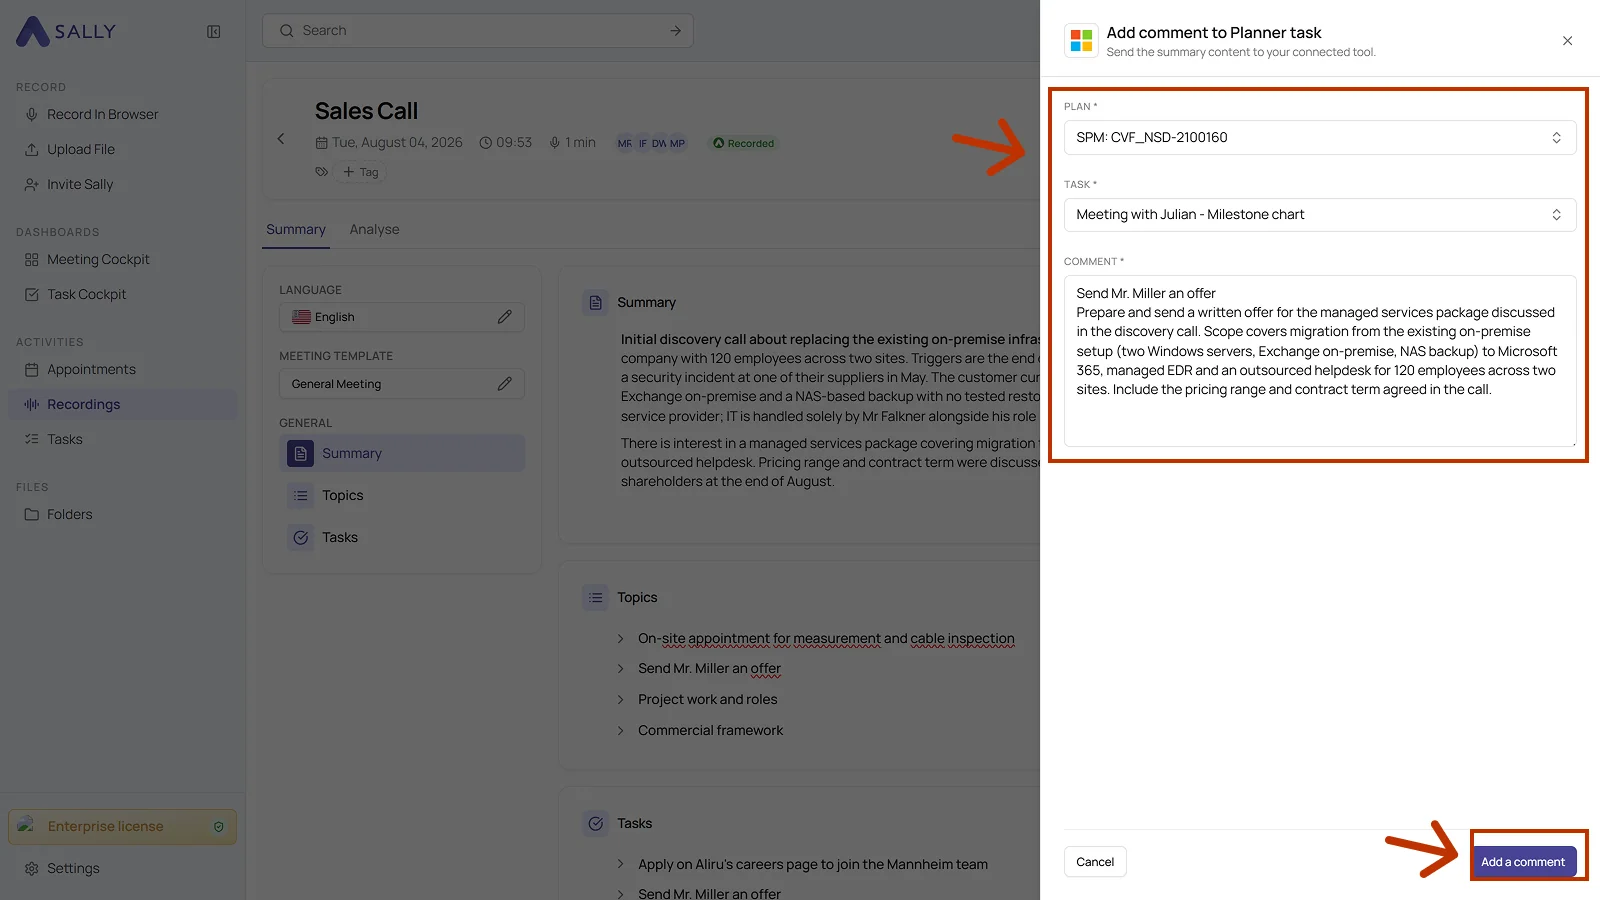
- Click Add a comment to send the comment to Planner.
2.4. Create a task in Microsoft To Do
Create a personal task in your own to-do list.
- Open the meeting in Sally.
- Click the plug icon on the block or on the entry and choose Create task in To Do.
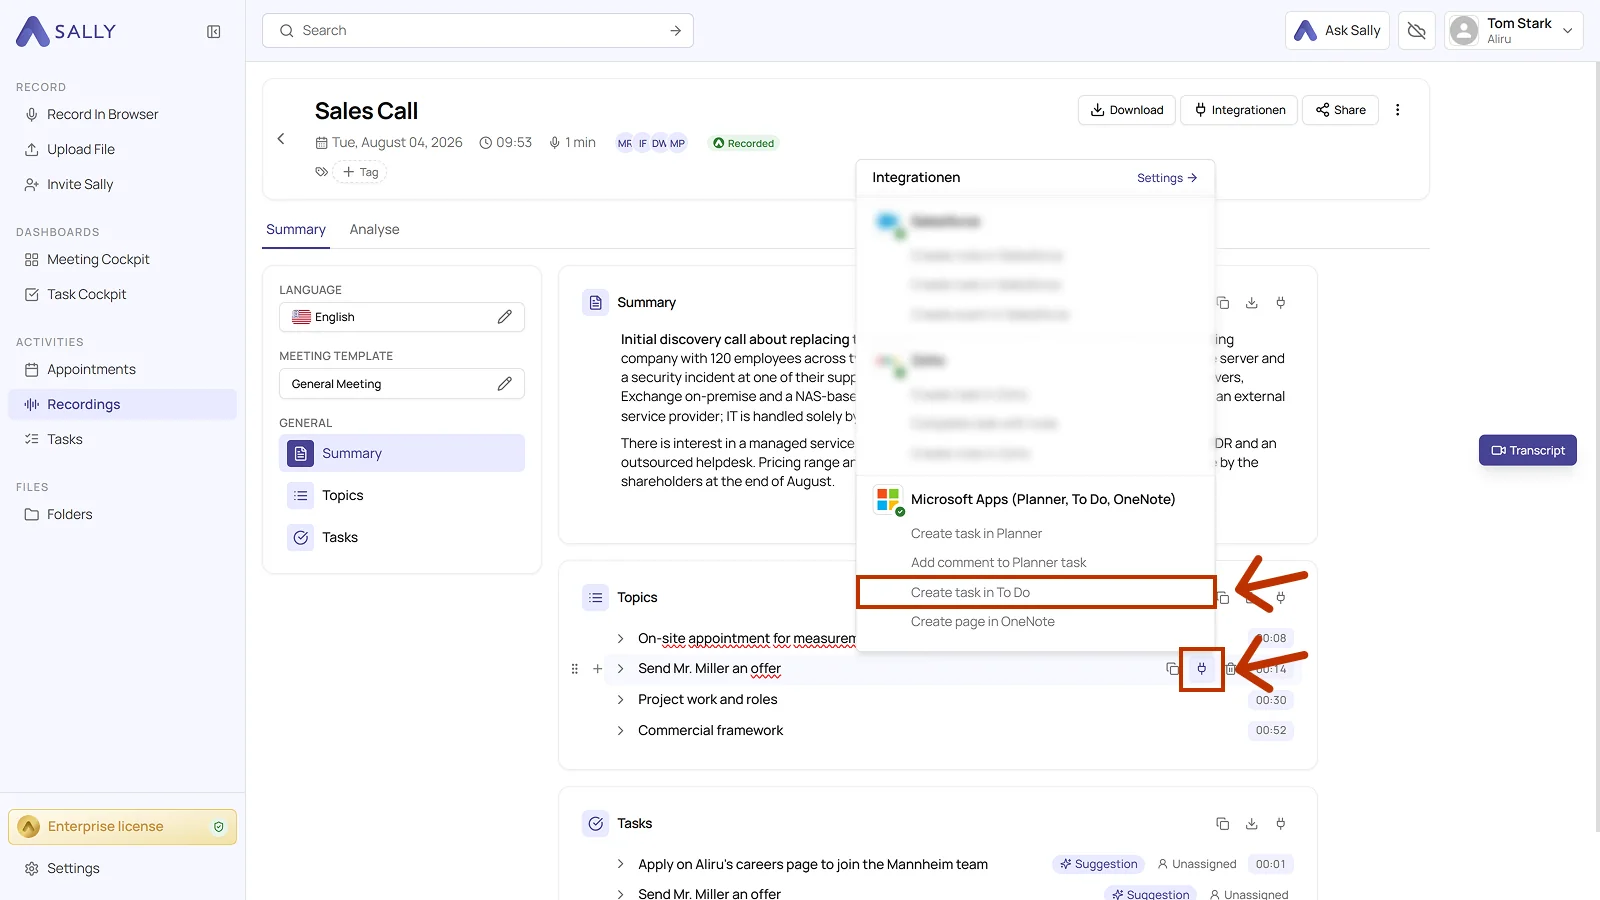
- Fill in the dialog. List and Title are required, Due date is optional. Use the description field to add details.
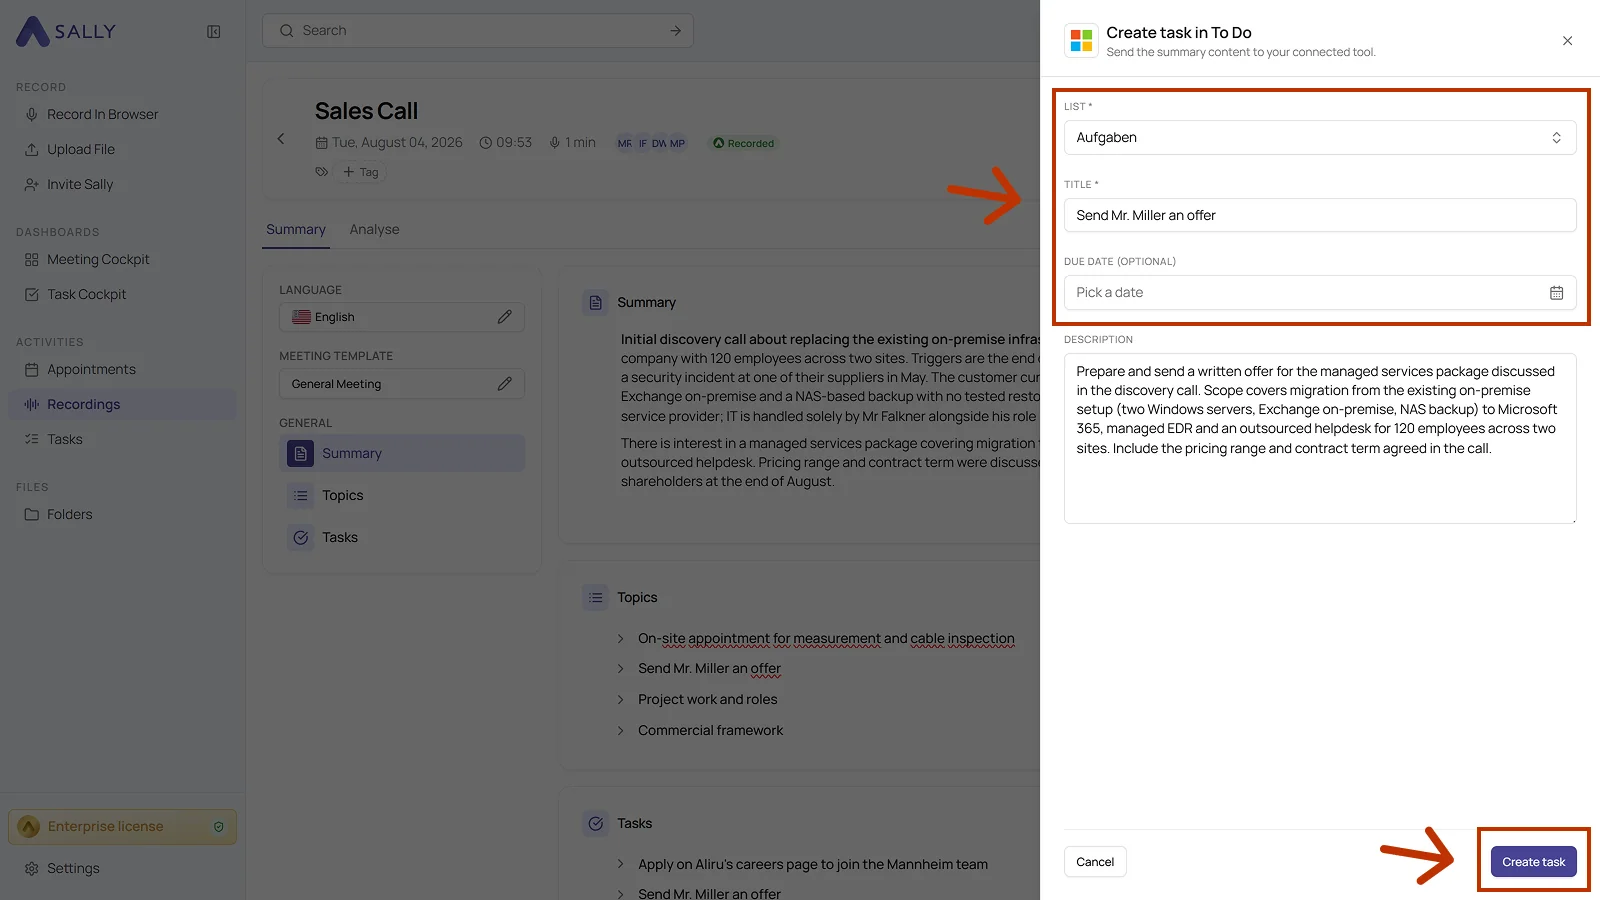
- Click Create task to put the task into your to-do list.
2.5. Create a page in OneNote
Keep a summary or single notes as a page in OneNote.
- Open the meeting in Sally.
- Click the plug icon on the block or on the entry and choose Create page in OneNote.
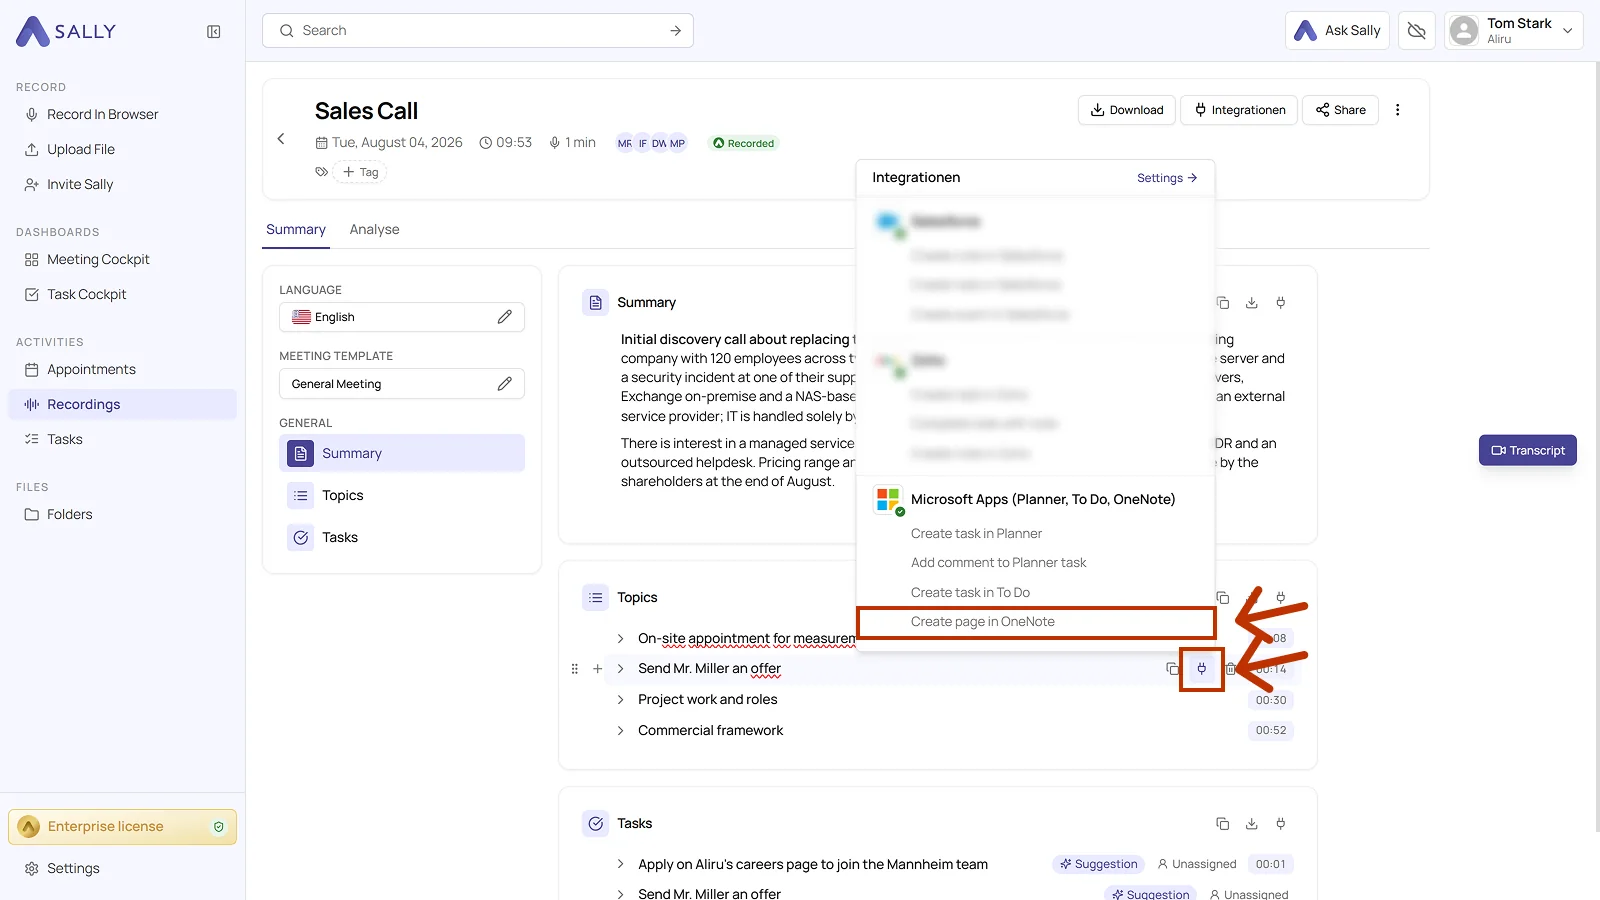
- In the dialog, pick the notebook, the section, and the title. All three fields are required.
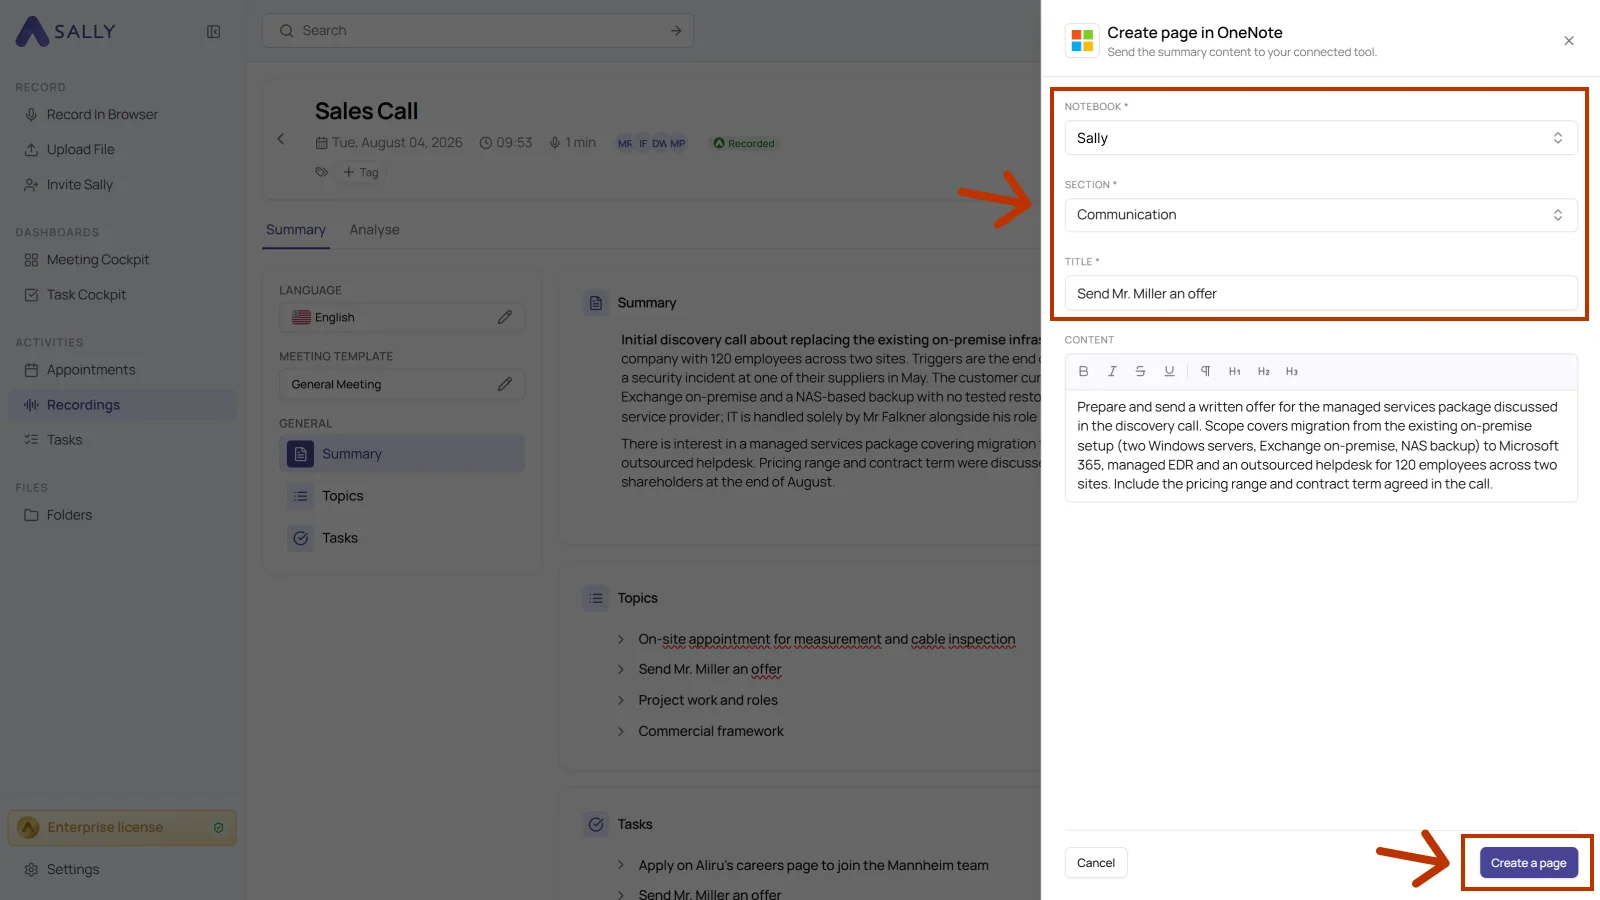
- The content field holds the details from the summary where the selected entry has any. You can edit and format them in the editor.
- Click Create a page to create the page in OneNote.
Use OneNote for structured meeting documentation and reference material, and Planner and To Do for tasks that someone works off.
3. Permissions and admin consent
For Sally to work with Microsoft Apps, she needs certain permissions from Microsoft when you connect. They're listed under required OAuth scopes. Your IT team can also approve them once for the whole organization with admin consent.
3.1 Required OAuth scopes
For the integration with Microsoft Apps (Planner, ToDo, OneNote), Sally uses OAuth 2.0 for authorization. The following scopes define which areas Sally can access on behalf of the authenticated user.
-
Sally accesses this information solely to technically establish and maintain the connection to the user account.
-
Sally does not make any autonomous changes. Actions are performed exclusively upon the explicit initiative of the user.
-
API endpoints are only called within the scope of an active action initiated by the user within the platform.
Technical overview of required scopes
| Scope | Type | What Microsoft technically allows with this scope | How Sally uses this scope |
|---|---|---|---|
Calendars.ReadWrite.Shared | Delegated | API permission for shared calendars | Part of Microsoft's permission model. Sally does not independently create or modify calendar events. |
Contacts.ReadWrite.Shared | Delegated | API permission for shared contacts | Technically required within the OAuth model. Sally does not modify contact data. |
email | Delegated | Access to the user's email address | Sally reads the email address to uniquely identify the connected account. |
Files.ReadWrite.All | Delegated | API permission for Microsoft 365 files | Part of the integration permission model. Sally does not independently create, modify, or delete files. |
Group.ReadWrite.All | Delegated | API permission for Microsoft 365 groups | Technically defined by Microsoft. Sally does not alter group structures. |
Mail.ReadWrite.Shared | Delegated | API permission for shared mailboxes | Sally does not access mailbox content or modify emails independently. |
Mail.Send | Delegated | API permission to send emails | Part of the Microsoft OAuth model. Sally does not send emails independently outside explicitly user-initiated actions. |
Notes.Create | Delegated | API permission for note objects | Included in the Microsoft permission model. Sally does not independently create notes. |
Notes.ReadWrite | Delegated | API permission for note content | Sally does not modify existing notes without explicit user action. |
Notes.ReadWrite.All | Delegated | Extended API permission for notes | Part of the OAuth model. Sally does not independently access or alter note content. |
offline_access | Delegated | Issuance of long-lived access tokens | Enables a stable connection without repeated login. No Microsoft data is modified. |
openid | Delegated | OpenID Connect authentication | Secure authentication via Microsoft Identity. |
People.Read | Delegated | Read access to contact information | Sally reads basic information for display within the integration. No contact data is modified. |
ShortNotes.ReadWrite | Delegated | API permission for quick notes | Technically defined within Microsoft's model. Sally does not independently modify quick notes. |
Sites.Manage.All | Delegated | API permission for SharePoint sites | Part of the permission model. Sally does not modify SharePoint site structures. |
Sites.ReadWrite.All | Delegated | API permission for SharePoint content | Sally does not independently create or modify SharePoint content. |
Tasks.ReadWrite | Delegated | API permission for task objects | Technically defined within the OAuth model. Sally does not modify tasks without explicit user action. |
Tasks.ReadWrite.Shared | Delegated | API permission for shared tasks | Sally does not independently interfere with team tasks. |
User.Read | Delegated | Read basic user information | Sally reads basic account information for authentication purposes. |
User.ReadBasic.All | Delegated | Read basic information of other users | Sally reads this information solely for display within the integration. |
3.2 Admin consent for your whole organization
Normally, everyone confirms the permissions in the table above themselves when they connect Microsoft Apps. With admin consent, your IT team approves them once for the whole organization, and nobody sees the consent prompt after that.
When you click Grant admin consent, you sign in to Microsoft with an administrator account and approve the permissions for your organization. Microsoft then adds Sally to Entra ID as an enterprise application and sends you back to Sally, where a results page shows the outcome. If everything worked, you'll see a confirmation along with your Microsoft tenant ID. If Microsoft declines the consent, for example because the account doesn't have administrator rights, the page shows the reason Microsoft gives. You don't need a Sally account for this.