Sally MCP with Langdock
Langdock is an enterprise AI platform that supports MCP servers as integrations. The Model Context Protocol (MCP) is an open standard that lets AI tools connect to external data sources. By adding the Sally MCP endpoint in Langdock, all team members with access can query Sally meeting data from their assistants, for example to search past meetings, review summaries, or pull transcripts for follow-ups. MCP tools are automatically converted into Langdock actions, so there's no extra development work required.
For background on the Sally MCP Connector, available tools, and security best practices, see the General Setup Guide.
Quick navigation
- Create a Personal Access Token in Sally
- Set up the MCP connection in Langdock
- Access scope
- Troubleshooting
- A Langdock account with permission to add integrations (admin or integration-manager role).
- An active Sally user with access to at least one company account.
- Sally MCP enabled for your company account (admin setting).
Langdock integrations are typically team-wide. If you use a single Sally PAT, all Langdock users will see the meeting data that specific Sally user has access to. For correct per-user scoping, each user should create their own PAT and add their own integration instance.
Langdock also offers OAuth 2.0 (Dynamic Client Registration) as an authentication method for remote MCP servers, and Sally supports it. If you choose that instead of API Key, you can skip step 1 completely: Langdock registers itself with Sally, and the authorization happens in the browser, so no token has to be created, pasted or rotated. The steps below describe the API Key route. Background in OAuth 2.1 with Dynamic Client Registration.
1. Create a Personal Access Token in Sally
A Personal Access Token (PAT) is the credential Langdock uses to authenticate against the Sally MCP endpoint. You create it once.
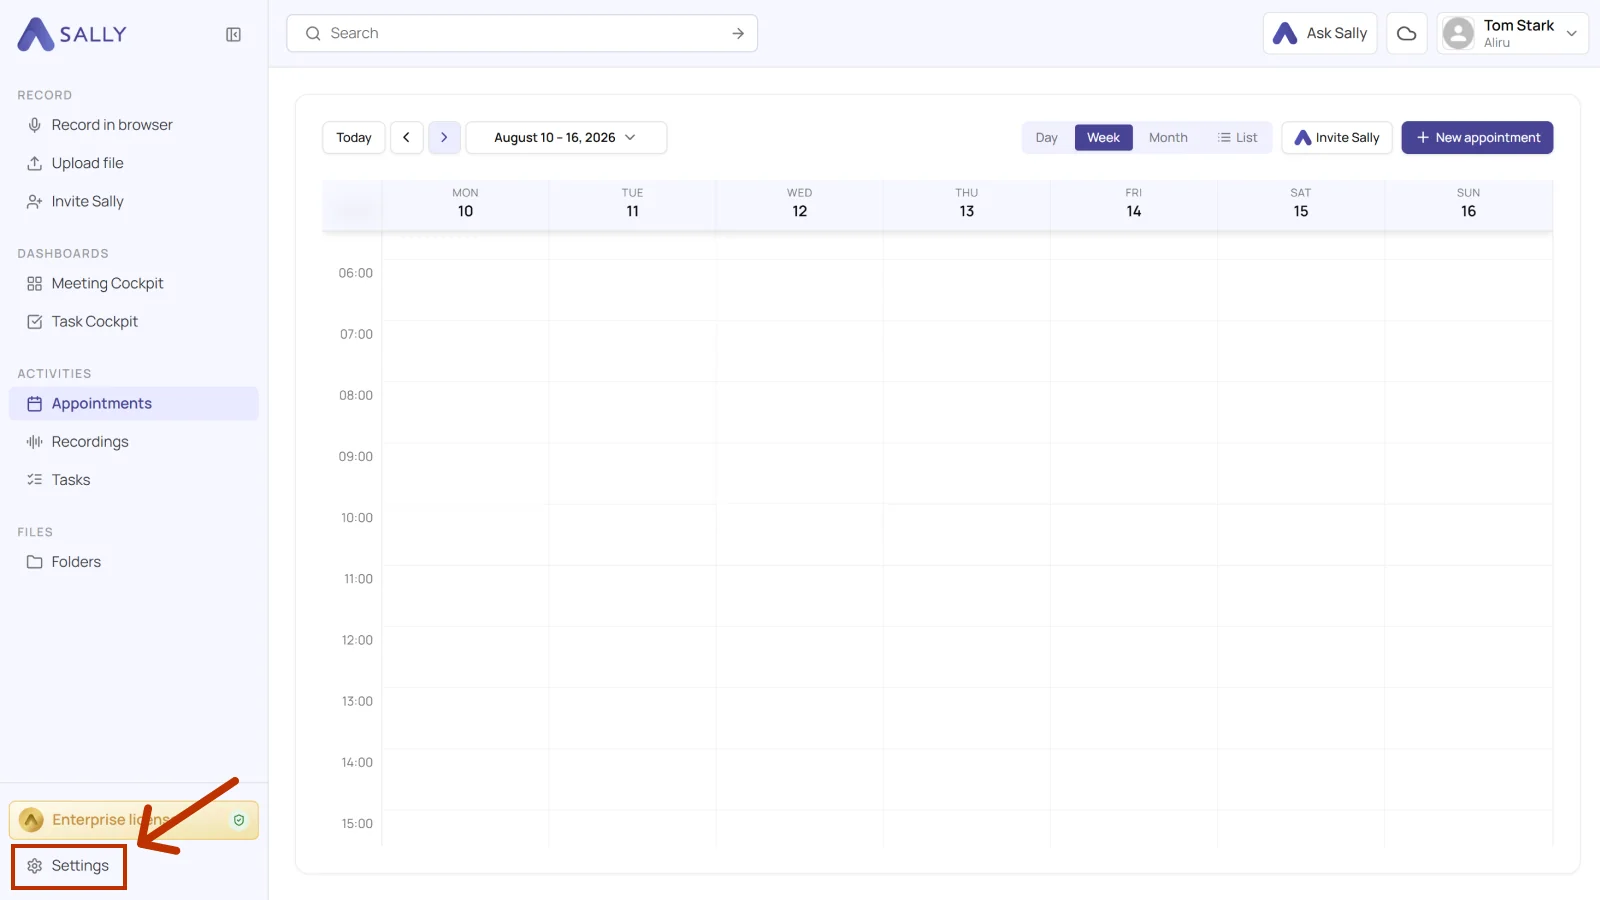
- Open Settings in the bottom-left of the sidebar.
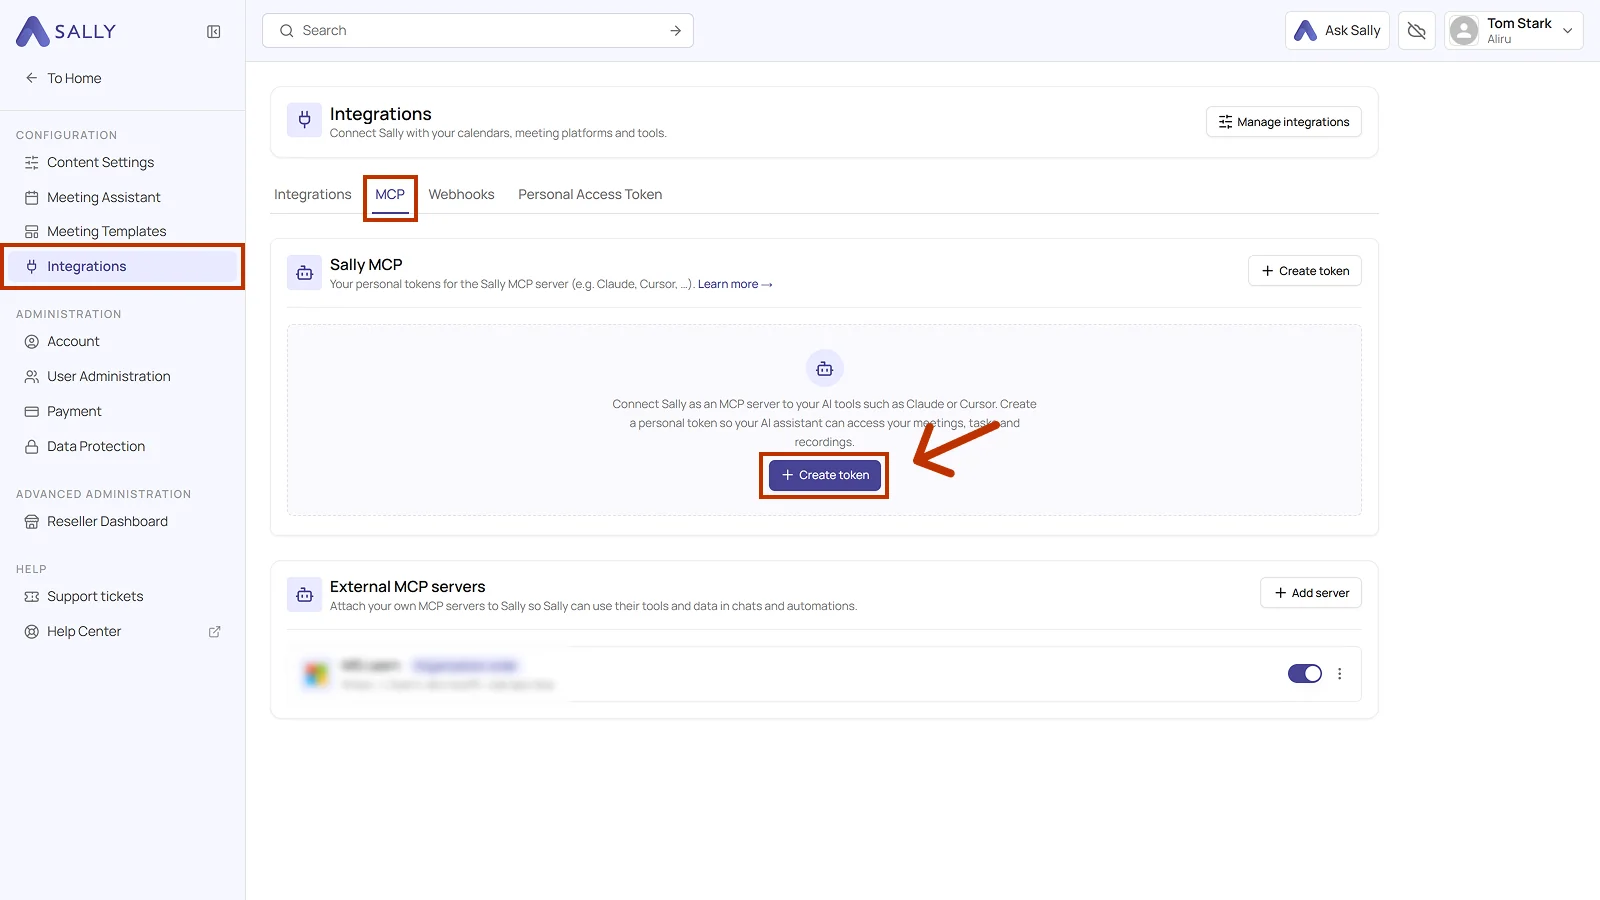
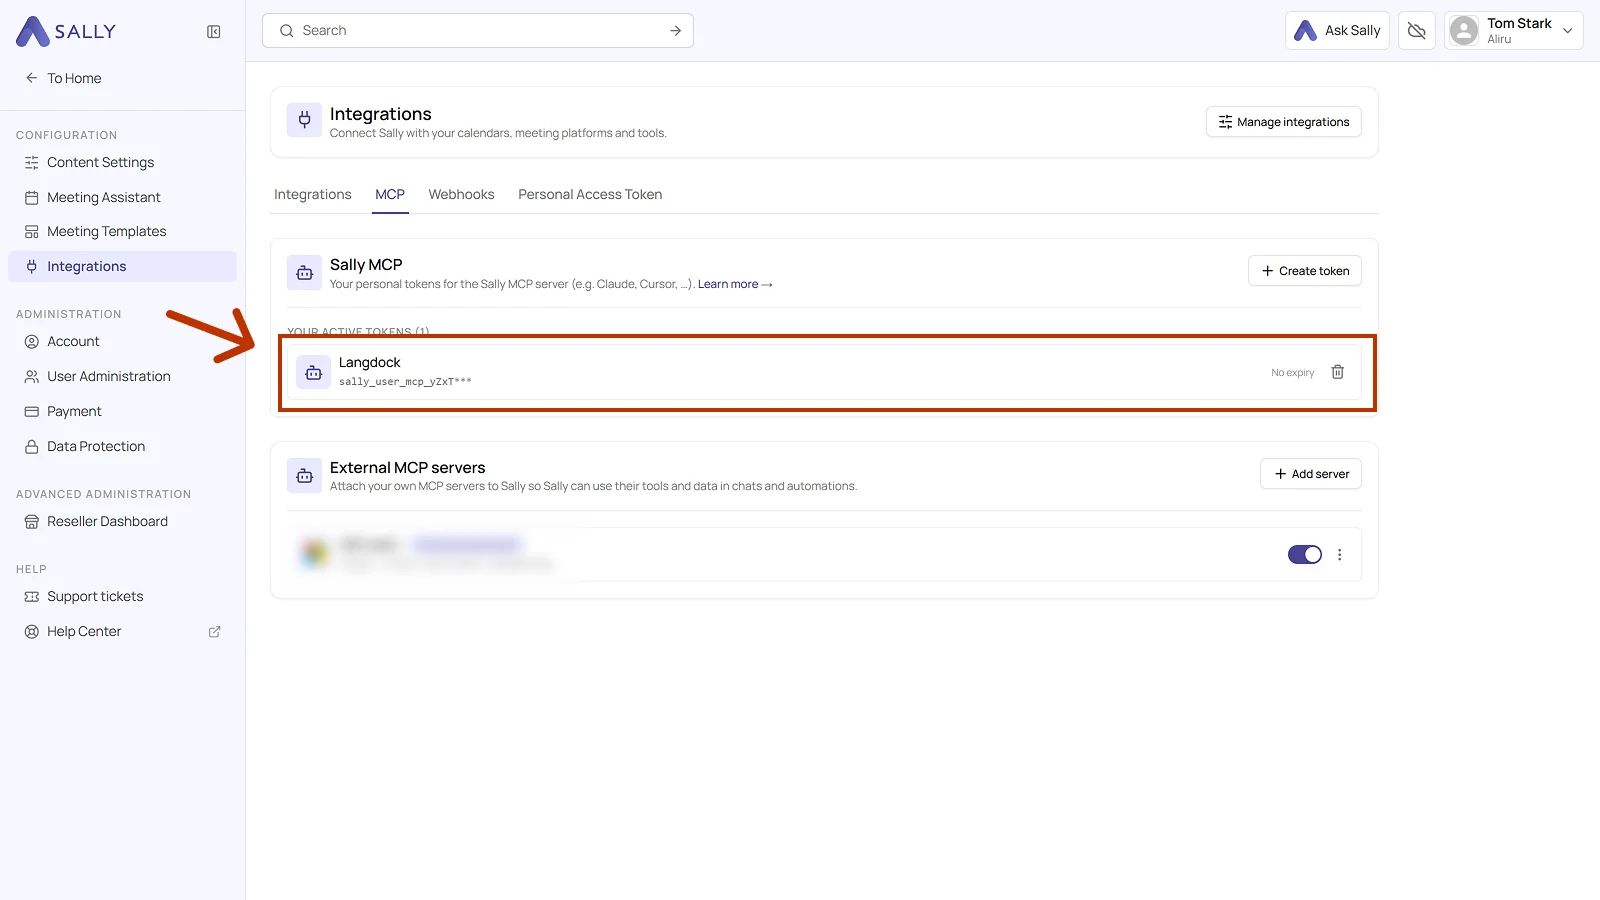
- Under Configuration, select Integrations and open the MCP tab. Click Create token under Sally MCP. With no token yet, the button sits in the middle, otherwise in the top right corner.
-
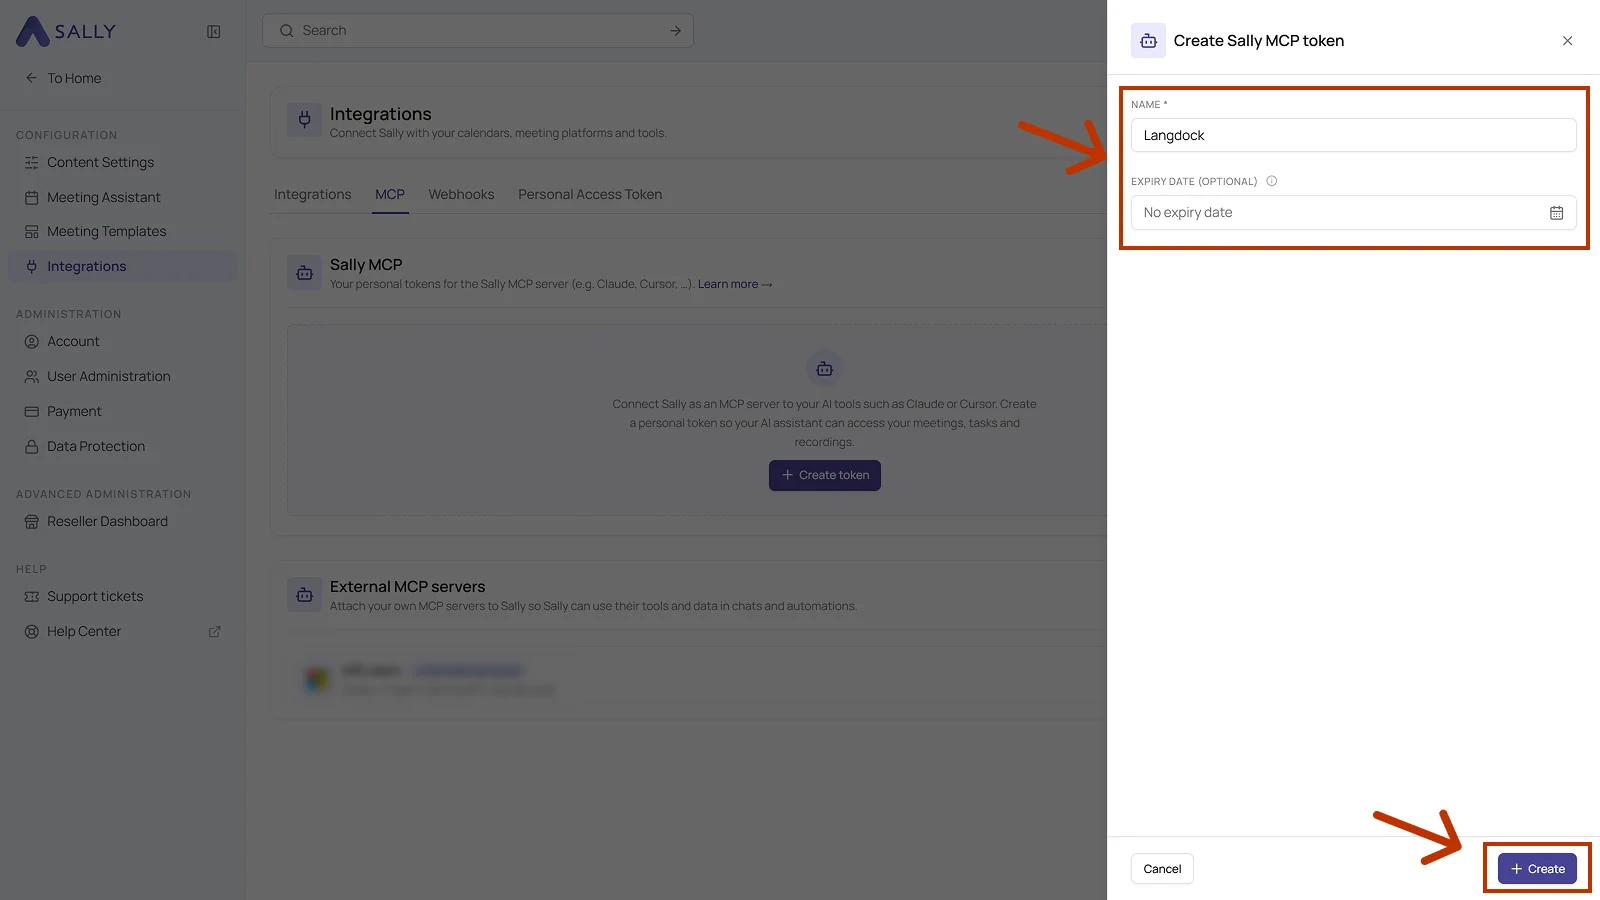
Fill out the Create Sally MCP token dialog:
- Name: required. Pick a label that helps you recognize the token later.
- Expiry date (optional): set a date if the token should expire by itself. Without one, it does not expire.
Then click Create.
- Sally shows the full token exactly once. Copy it right away with the icon on the right of the field and store it in a password manager or a secure secret store. Once you close the dialog, there is no way to retrieve it again.
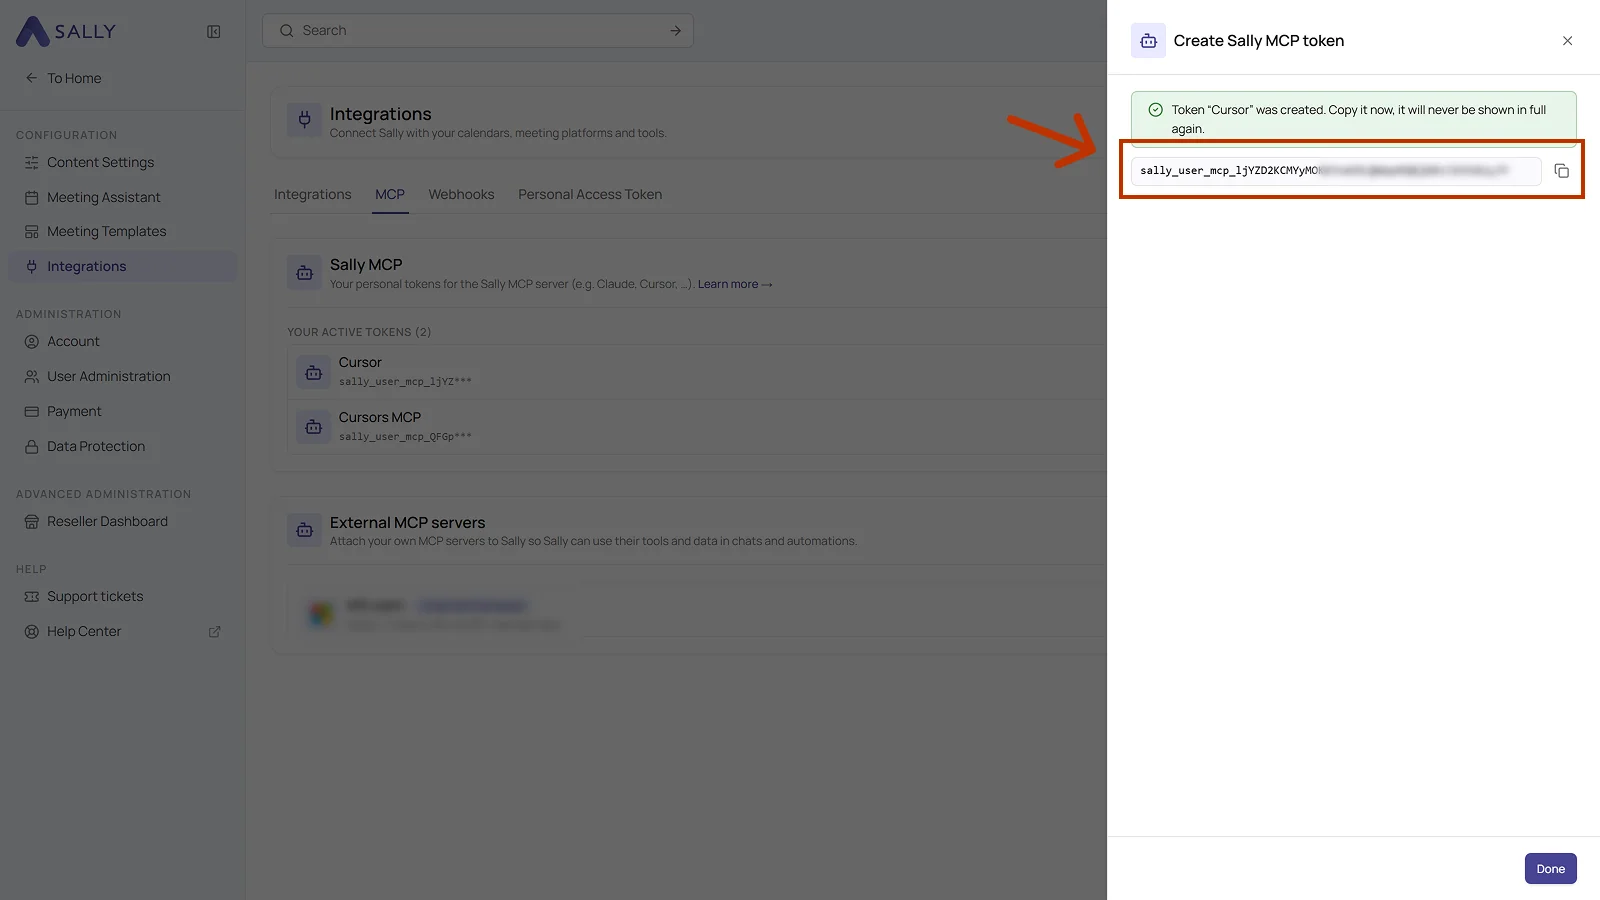
The token grants read access to every appointment, recording and summary your Sally user sees in this organization account. Do not share it over chat, e-mail or tickets, store it in a password manager instead.
- Click Done. The token then sits under Your active tokens, with its beginning, its expiry date and a trash icon. The trash icon takes the token's access away. If you need to replace a token, simply create a new one afterwards.
2. Set up the MCP connection in Langdock
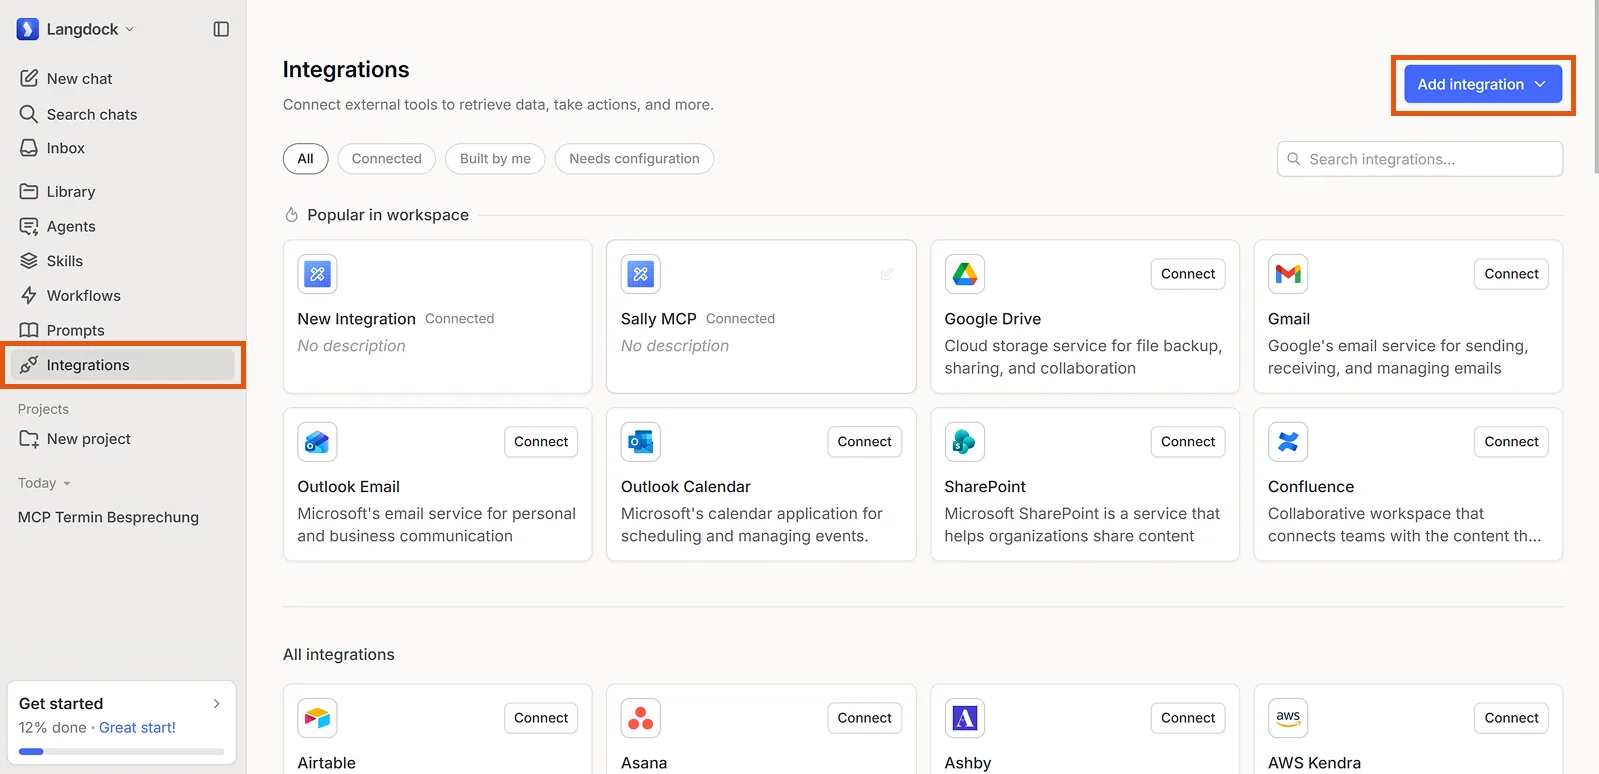
- In Langdock, click Integrations in the left sidebar.
- Click Add integration in the top right.
- Select Create new from the dropdown.
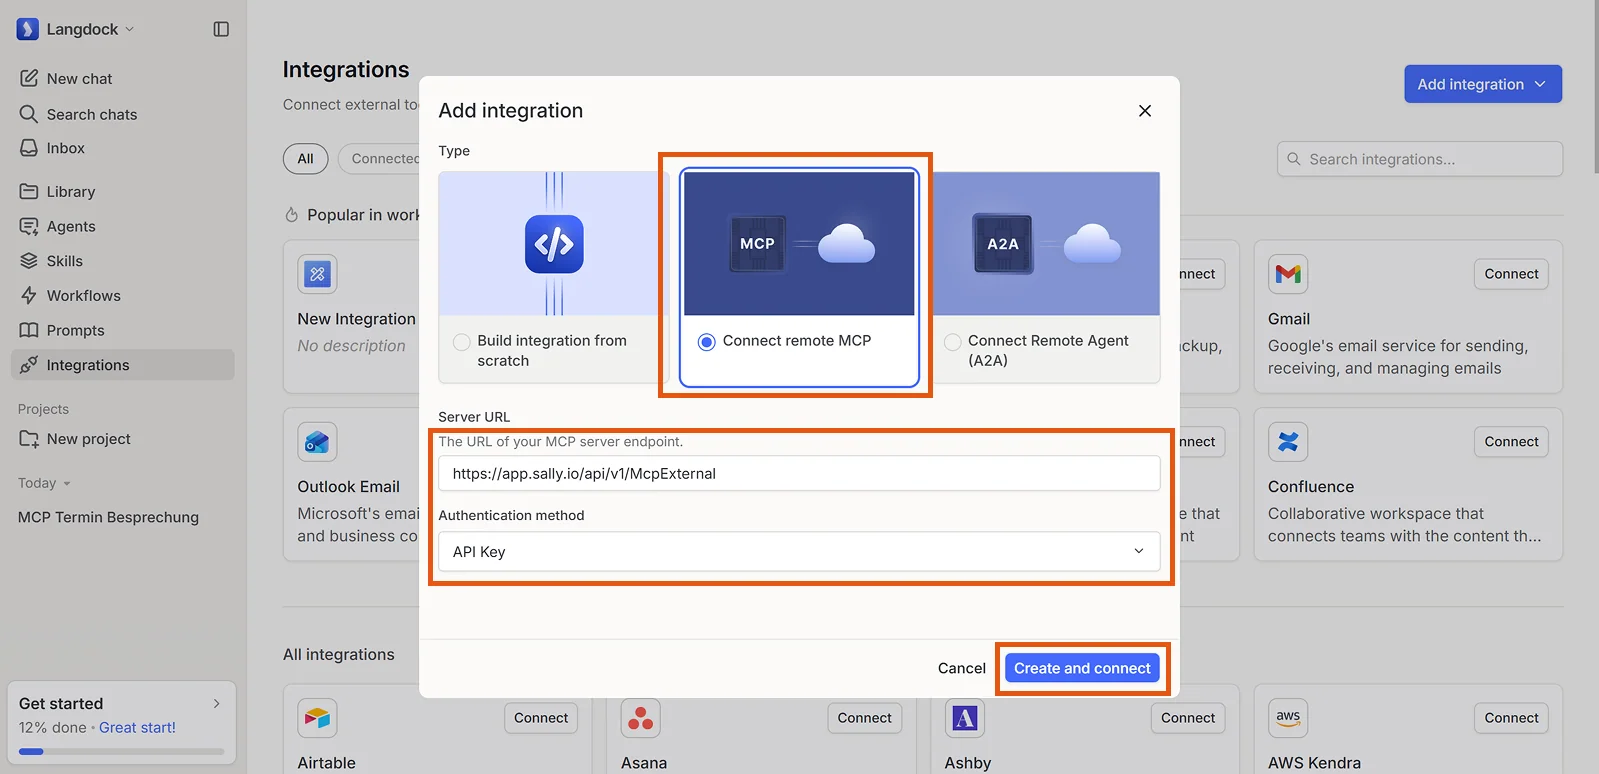
In the Add integration dialog:
- Select Connect remote MCP as the type.
- Enter the following Server URL:
https://app.sally.io/api/v1/McpExternal - Under Authentication method, select API Key.
- Click Create and connect.
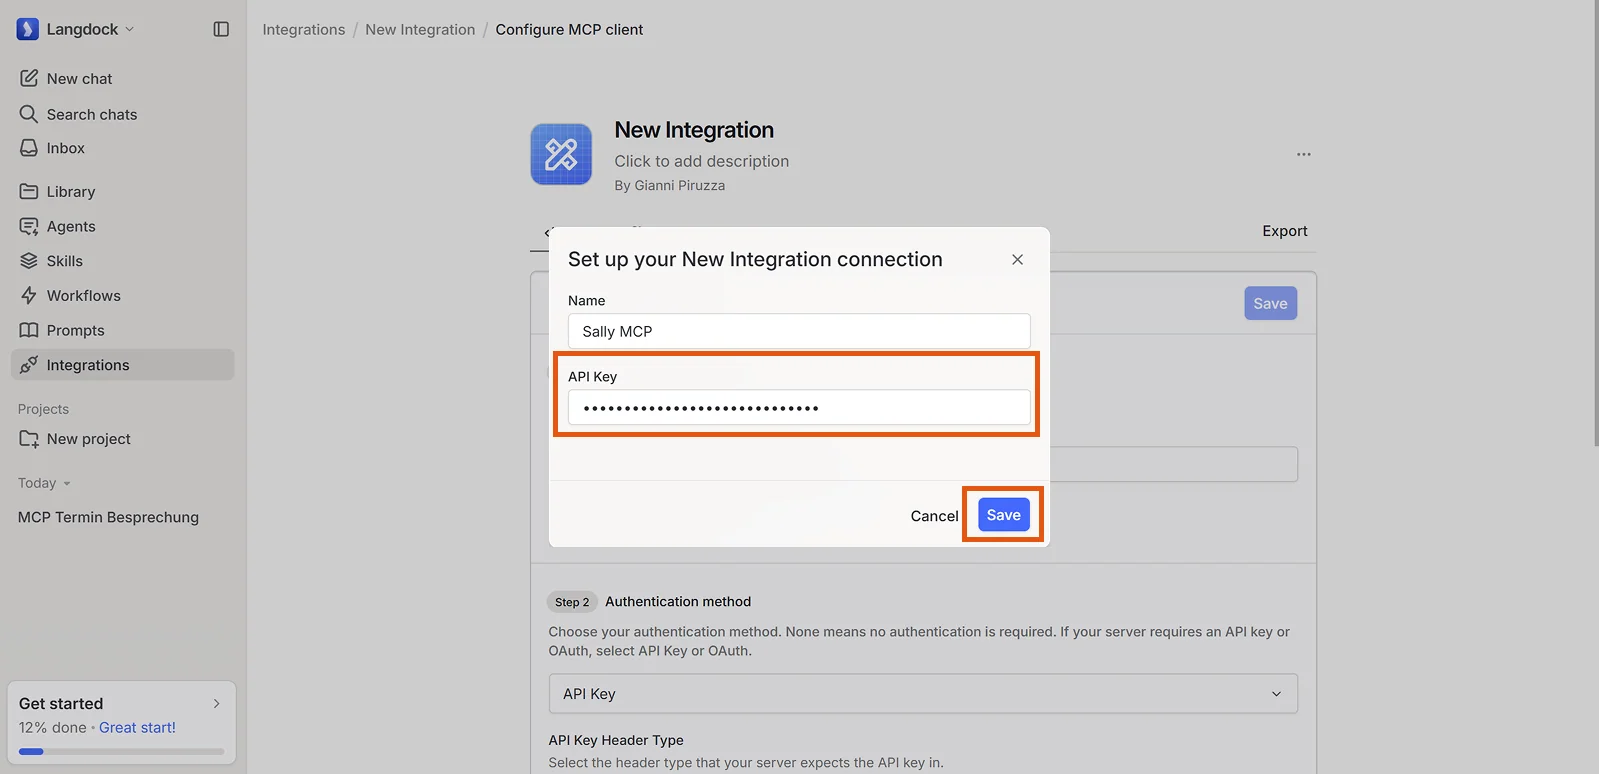
The Set up your New Integration connection dialog opens:
- Enter a Name for the connection (e.g. "Sally MCP").
- In the API Key field, paste your Sally token:
sally_user_mcp_YOURTOKEN
Paste exactly the token you just copied from Sally.
- Click Save.
You are now on the Configure MCP client page:
- Click Test connection.
- If the connection is successful, a green Connection successful indicator appears next to the button.
- Under Available tools, the Sally MCP tools are displayed (currently 5: Search appointments, Get recordings, Get summary, Search summaries, ...).
- Tick Enable action for each tool you want to use (all of them are ticked by default).
- Optionally switch on Ask for confirmation if users should approve each tool call before it runs.
- Click Save in the top right.
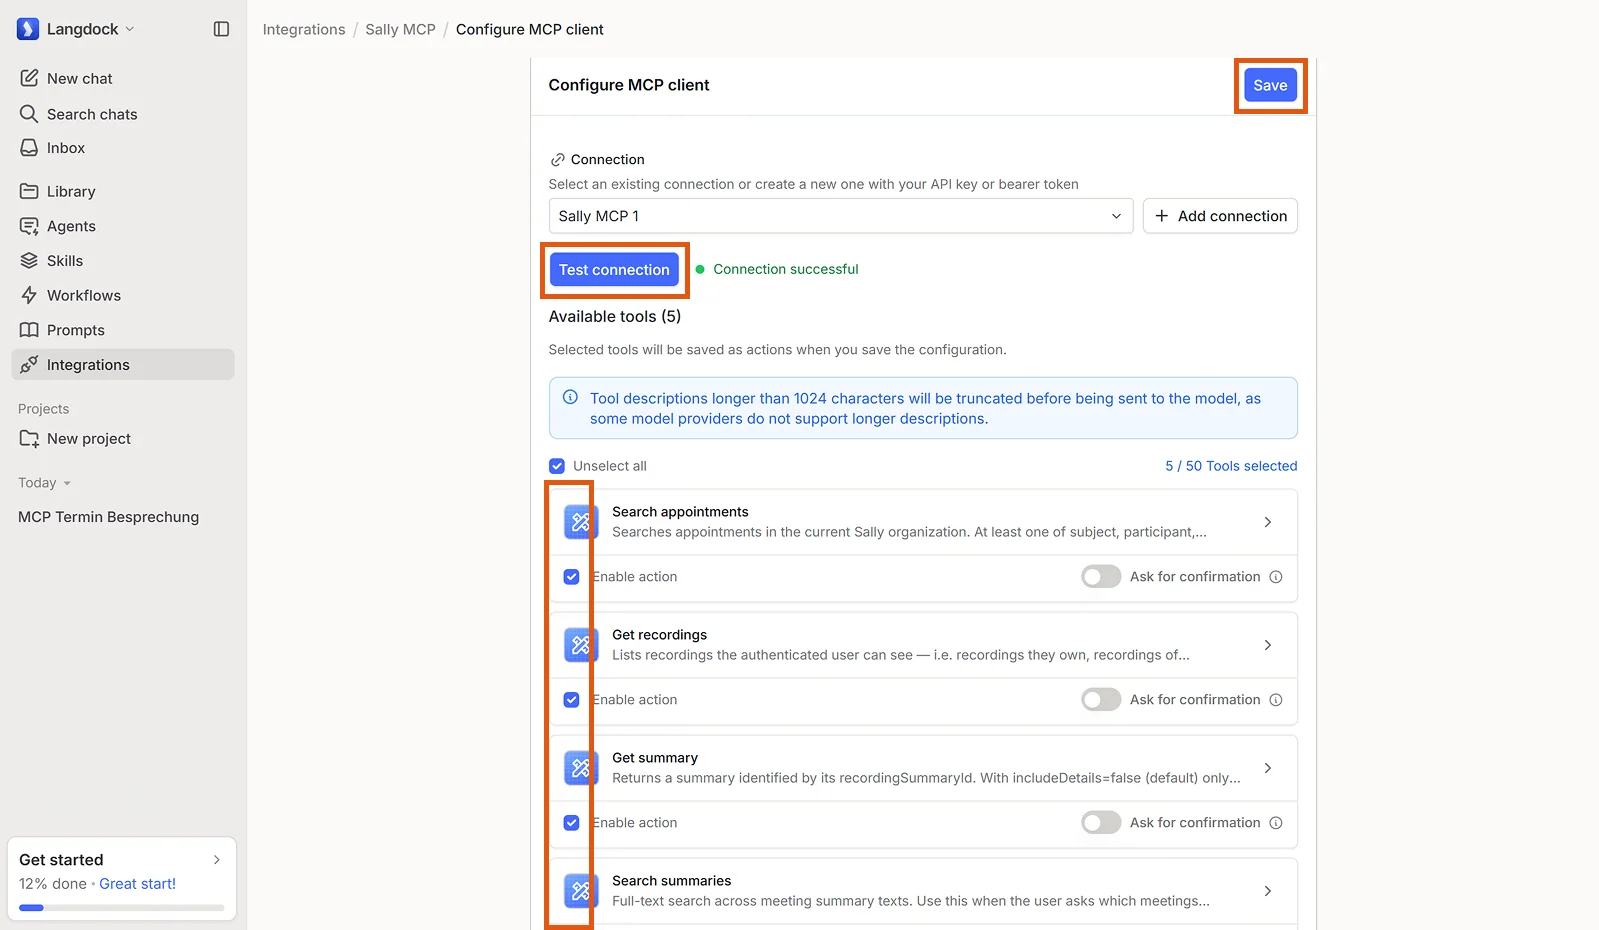
Langdock supports up to 50 tools per integration simultaneously.
- Open a new chat or continue an existing one.
- Type @ in the input field. The Sally integration and its tools appear in the selection list.
- Mention the integration with @Sally MCP or simply ask a natural question, for example:
"What was discussed in my last meeting?"
The model automatically calls the relevant Sally tools (e.g. Get recordings, Get summary) and returns a summary.
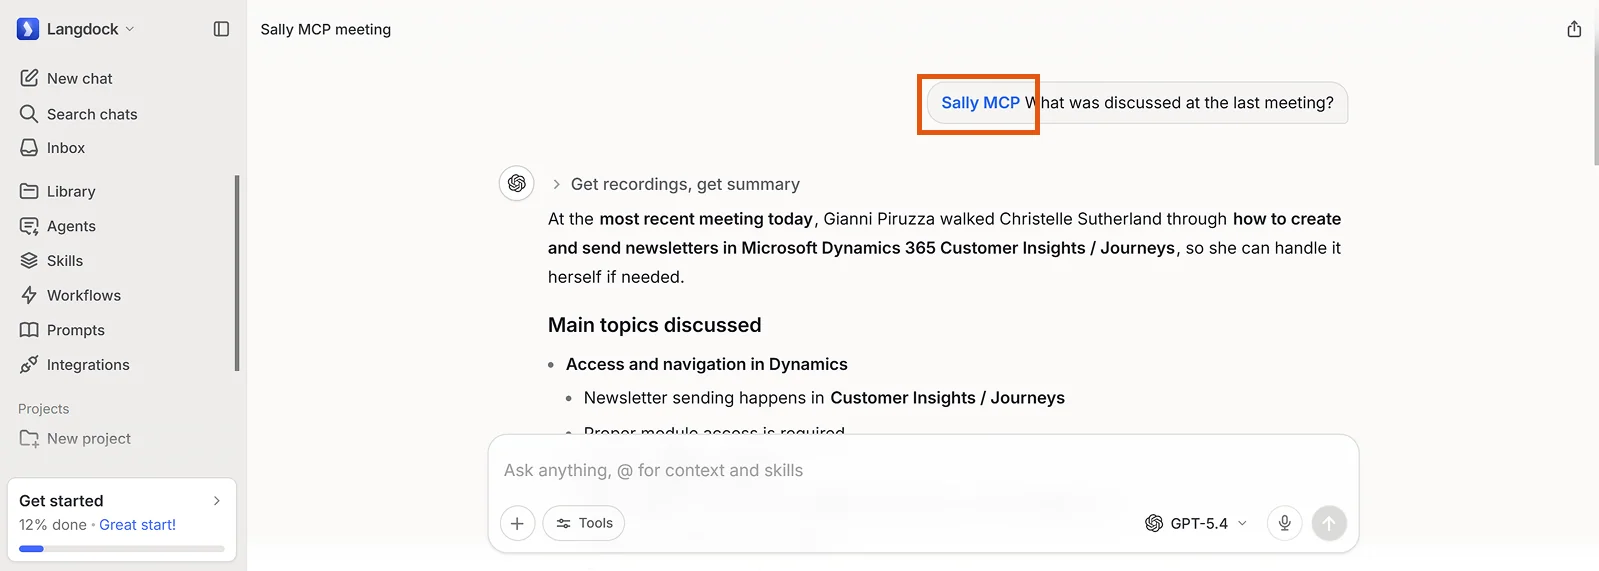
You can also add the Sally integration to the instructions of a Langdock Agent. The agent will then use it automatically for relevant queries without the user having to mention @Sally MCP.
3. Access scope
The Sally MCP connector only returns meetings tied to your own Sally user or explicitly shared with you. The table below sums up what is and isn't reachable through your token:
| Source | Accessible via MCP? |
|---|---|
| Your own meetings (you are the owner / technical owner) | Yes |
| Meetings shared with you via a recording folder (directly or through one of your teams) | Yes |
| Meetings of users for whom you have been set as deputy ("Vertretung") | No |
Even if you have been granted deputy ("Vertretung") rights for another user inside Sally, those meetings are not exposed through MCP. The connector currently only surfaces your own recordings and recordings explicitly shared with you via folders. If you need a deputy's meetings in your AI tool, ask the owner to share them through a recording folder.
4. Troubleshooting
| Issue | Fix |
|---|---|
| Connection test fails with 401 Unauthorized | The token is wrong or has been deleted. Make sure the API Key field contains only the Sally token (format sally_user_mcp_…), without any extra prefix. If needed, create a new token at app.sally.io. |
| Connection successful but no tools visible | Scroll down in the Available tools section. If the list is truly empty, contact Sally support to verify MCP protocol compatibility. |
| Other workspace members cannot use the integration | By default, the integration is only visible to the person who created it. As an admin, change the visibility to the entire workspace in the integration settings. |
For more troubleshooting tips, see the General Setup Guide → Troubleshooting.